MongoDB Shell vs MongoDB Node.JS Driver

MongoDB

MongoDB LogoThe mongo Shell and the MongoDB Node.JS Driver both provide a way to interact with a Mongo database. There are fairly significant differences in how they work, however, as well as the benefits they provide.

There are multiple ways to interact with MongoDB, and two of those are with the mongo shell and the MongoDB Node.js driver. Now at this point it might make sense to ask which approach is best. Well, the answer really depends on the scenario. So, perhaps the first question should be: “What is it that I need to do?” Once that question is answered, you can determine which tool is best suited for the task. In this article, I’ll demonstrate the differences between the mongo shell and the MongoDB Node.js driver when performing basic CRUD operations. My hope is that this will help you to decide which approach works best for what you need to do.

The mongo shell is an interactive JavaScript interface to MongoD, and it is a component of the MongoDB package. The mongo shell can be used to perform CRUD operations on data, as well as administrative operations. In other words, think of the mongo shell as a way to interact with a MongoDB database without the need to build or interact with an application.

The MongoDB Node.js driver provides a way to interact with a MongoDB database from your Node application code. It supports both callback-based and Promise-based interaction with your mongo database. This would be the opposite of the mongo shell, which is meant to be used in your Node.js application code.

Inserting One Document Into the Database

Insert One Document with the Mongo Shell – Example # 1A

Insert One Document with the MongoDB Node.JS Driver – Example # 1B

With the mongo shell, we need to specify which database we want to use. We do this by using the “use” command. The syntax is: “use DATABASE_NAME”. So, In Example # 1A, we accomplish two things; we select the madMen database with the user command (i.e. “use madMen”), and then we insert one document into the names collection. Actually, a third step was taken here, although you may not have noticed because it was not explicit; i.e., the names collection was created. With the mongo shell, if we reference a collection that does not already exist when using the insert command, then that collection is created. Note that when we inserted the document, we passed an object to the insert method. This object can have one or more key/value pairs. In this case, we provided that one key/value pair.

You’ll notice that in Example # 1B, an all of the following MongoDB Node.JS Driver examples, there is more code. The reason for this is that there this is application code, so there are some setup steps needed in order to provide dependencies to our application and tell it what we want to do. With the mongo Shell, there is context. That is to say, the mongo Shell understands that you will be working on performing MongoDB-specific tasks, so there is no need to provide dependencies or explain much.

Now here in Example # 1B, we accomplish the same tasks using the MongoDB Node.JS Driver. The first five lines of code provide dependencies and some configuration information. And on line # 8, we establish a connection to the madMen database using the mongoDbClient.connect() method. This method takes a callback, and inside the callback we set references to the madMen database and the names collection. We then use the insert method of the names collection to insert one document. We also add some console.log() statements, just to provide some helpful message so that we can see that the operation was successful. So far, so good.

Inserting Multiple Documents Into the Database

Insert Multiple Documents with the Mongo Shell – Example # 2A

Insert Multiple Documents with the MongoDB Node.JS Driver – Example # 2B

In Example # 2A we insert multiple documents Into the madMen database using the mongo Shell, and we do this in two ways. First, we insert the new documents one at a time. There is no need for a for-loop as this is not application code; since we are in the mongo Shell, we can simply run each command manually. Then, we insert three new documents by using the insertMany method. Now, the difference between the insert and insertMany methods is that with the insert method, you pass one document object as an argument, whereas with the insertMany() method, you provide an array of document objects.

In Example # 2B we insert multiple documents into the madMen database, using the MongoDB Node.JS Driver. The difference between this code and the code found in Example # 2A is that instead of only passing an array of objects to the collection.insertMany() method, we also provide a callback as the second argument. The callback is not required, but it is likely that you will want to provide it because the collection.insertMany() method is asynchronous and you will likely want to act upon the successful insertion of the documents. So, in this example, we’ve shown a couple of console.log() messages to indicate that the database insert was a success. But more importantly, we’ve called the database.close() method, which as you might expect, closed the database. The main thing to keep in mind about leveraging the collection.insertMany() method in your Node application is that it is an asynchronous action, as is often the case in Node.

Viewing All Documents in the Database

View All Documents with the Mongo Shell – Example # 3A

View All Documents with the MongoDB Node.JS Driver – Example # 3B

In Example # 3A, we use the mongo Shell to view all records in the database by simply executing the command: db.names.find(). If we were executing a script file in the shell, we’d need to set a reference to all records, set up a loop, and then in each iteration of the loop we could output the current record over which we are iterating. But because the mongo Shell provides REPL functionality, we can simply execute an expression that results in a value representing every record in the database.

In Example # 3B, we use the MongoDB Node.JS Driver to view all of the records in the database, and here, we need to roll up our sleeves, because we have a little more work to do. Now once again, this is because this is application code, so we need to explain to Node exactly what we want to do. So, if you’ll take a look at line # 11, you’ll see that we use the find() method to obtain a reference to all records in the database. We then chain the each() method to the return value of this, passing it a callback. In the callback, the second argument is the current document over which we are iterating, so we log that document. If the current document is null, then we close the database connection.

Deleting a Single Document

Dele a Single Document with the Mongo Shell – Example # 4A

Delete a Single Document with the MongoDB Node.JS Driver – Example # 4B

In Example # 3A, we use the mongo Shell to remove one document at a time. Notice that we reference a specific document by providing the key: “_id”, and the ID of the document we wish to remove. But we don’t provide the ID simply as a string; we pass a call to the ObjectId function, and then pass the document ID to that function. The reason for this is that MongoDB prefers the wrapper function that converts that string ID to an object.

In Example # 3B, we use the MongoDB Node.JS Driver to remove one document from the database. Now the main difference here is that we use the deleteOne() method, instead of the remove() method. And similar to the mongo Shell approach, we provide an object that uniquely identifies the document we want to remove. This action returns a promise, so we can chain the then() method to its return value and inside the callback, we close the database (line # 19).

Deleting All Documents

Delete All Documents with the Mongo Shell – Example # 5A

Delete All Documents with the MongoDB Node.JS Driver – Example # 5B

In Example # 5A, we use the mongo Shell to remove all documents from the database. Now this is a fairly simple task because we provided an empty object to the remove() method. This indicates to MongoDB that we want to remove all documents.

Example # 5B is somewhat similar. Using the MongoDB Node.JS Driver, we remove all documents in the database by calling the deleteMany() method (as opposed to the “remove()” method). And in a similar fashion, we provide an empty object that signals to MongoDB that we want to remove all documents from the database. Once again, this action returns a promise, so we chain the then() method, passing a callback, and inside of that callback, we close the database.

Summary

In this article, we walked through a comparison accomplishing basic CRUD operations with both the mongo Shell and the MongoDB Node.JS Driver. In each example, we saw that there is a fairly significant difference in the syntax and in some cases, the method names. The main reason for the differences is that the mongo Shell is a REPL environment; i.e., all actions are synchronous, and the shell understands that we are working with MongoDB databases. The MongoDB Node.JS Driver generally requires more work, because our Node application is vanilla JavaScript, and is not necessarily hosted in a MongoDB-specific environment. So, in this case, we need to establish a database connection, set a reference to the MongoDB client, and set references to the database and collection.

Now, as to which approach works best, it really depends on your needs. Both the mongo Shell and MongoDB Node.JS Driver provide significant power for your work with your MongoDB database. The difference is that the mongo Shell is a terminal-based REPL environment and the commands will tend to be simpler. On the other hand, the MongoDB Node.JS driver provides a way to interact with MongoDB from your Node.js code. So, in this case, you’ll need to take a more low-level approach and write code that takes care of connecting to and from the database, as well as your business logic. But while this will usually require more effort, there is great power in that you are writing application code that can have complex logic and be executed repeatedly.

Getting Started With the MongoDB Node.JS Driver – Basic CRUD Operations

MongoDB

JavaScript LogoWorking with any database always requires some CRUD. Learn how to connect to a MongoDB database and perform basic data transactions.

Database technology is a subject that can quickly become complicated, but here, we’re going to stick to the basics. For example, on a very high level, you’ll usually want to do the same few things repeatedly, that is: connect to a database, insert or update one or more records, or delete one or more records. This is otherwise known as “CRUD” (“create read update delete”). Now even though the exact syntax for these actions will differ from one database technology to the next, the good news is that the general concepts are the same.

In this article, I’ll demonstrate very basic MongoDB CRUD operations using the MongoDB Node.JS Driver. Let me just begin, however, by mentioning the part that I’ll be leaving out: the “U” (“update”) step of our CRUD operations. This is a practical move on my part, because I’m guessing that you no doubt found this article through a web search, and you’re perhaps just getting started with MongoDB. If this is the case, then I think the “create,” “read,” and “delete” steps in this article are the best ones to begin with, and I will follow up with an article dedicated specifically to the more challenging “update” operations in MongoDB. That said, let’s just dive right into some MongoDB CRUD (minus the “U” : – )

Connect to the Database – Example # 1

In Example # 1 we connect to the madMen database. There are just a few steps needed to set up the connection. On line #s 2, 3 and 4 we have the URL of the database server, the name of the database we want to connect to, as well as the name of the collection with which we want to work. On line # 7 we use the mongoDbClient object that was created on line # 1 and we call its connect() method, passing it the database url. The second argument that we pass to mongoDbClient.connect is a callback which will allow us to act upon a successful connection. Now our reason for needing the callback function is that the mongoDbClient.connect method is asynchronous. So inside of the callback function, we execute a console.log() statement just to let ourselves know that were able to establish the connection. Now there’s not too much going on here; I just wanted to point out the basics of how to connect to the database. Once again, just keep in mind that connecting to the MongoDB database is an asynchronous operation.

Insert a New Document – Example # 2

Example # 2 takes us to our next logical step in our CRUD operations by having us insert a new document into the database. The required steps for connecting to the database are exactly the same as those for Example # 1, so let’s save some time, skip over that, and talk about what’s new in Example # 2. Here, we’re using the database variable, which is the second argument passed to the mongoDbClient.connect callback function. Now, in using that database variable, we get ahold of the madMen database, and also set a reference to the names collection. So, using that variable, we call the collection.insert method, passing it the new document that we want to insert, as well as a callback function. Now the hope is that by now, you’ve noticed a pattern, which is that we need to provide a callback function because the collection.insert method is asynchronous. In the callback that we pass to the collection.insert method, we use console.log() to indicate that the document that was inserted was successful. This, of course, is just for demonstration purposes. We then call the database.close() method, to close the database connection.

Insert Multiple Documents – Example # 3

There is only a small difference between Example #s 2 and 3, and that is in Example # 3 we use the collection.insertMany method instead of collection.insert. And instead of passing one document, we pass an array of documents. Everything else is virtually the same; i.e., we execute a log message for demonstration purposes and then close the database connection.

View All Documents – Example # 4

So, now that we have created a few documents, it’s time to view them. Let’s take a look at Example # 4, and drill down to the collection object. By getting ahold of the collection, we can use its find() method. And by passing no arguments to the find() method, we get all of the documents in the collection. We iterate that list of documents, and output each one in the console. Then, when we have gotten to the end of the list, we close the database connection.

Delete One Document – Example # 5

So here we are at CRUD’s letter “D”, which is what we take care of in Example # 5. The main difference between this one and Example # 4 is that once we drill down to the collection object, we use the deleteOne() method, passing it an object that represents the document that we want to delete. Now, I say “…object that represents” because we do not pass it the exact document that we want to delete; what we actually pass it is an object that contains the ID that matches the document we want to delete. Note here that in this document the value of the _id property is an instance of ObjectID, which we initialized on line # 2. ObjectID is a special object that we need in order to pass around mongoDB document IDs. Now it’s important to point out that while it may be tempting to simply pass the ID of the document that we want to delete, unfortunately, MongoDB does not work like that. You need to actually provide an instance of ObjectID. It’s also important to note that, although the deleteOne() method is asynchronous, we handle it a bit differently. In other words, instead of passing a callback function, we use the then() method and pass a callback to that method. And once again, inside of that callback, we close the database connection.

Delete All Documents – Example # 6

In Example #6 we sort of kill two birds with one stone. We leverage the deleteMany() method and as you may have guessed, this method allows us to delete multiple documents in the database. Now, if we simply wanted to delete two or more documents, we would take an approach similar to the one in Example # 5, and pass an array of objects that contain ObjectIDs which match the documents we want to delete. In Example # 6, we wind up deleting every document in the database because we pass an empty object to the deleteMany() method. As with the deleteOne() method, deleteMany() is asynchronous, so we chain its then() method and pass a callback function to it. Inside of that callback function, we log our success and then close the database.

Summary

I’m hoping that this article has provided enough of a high-level understanding of MongDB’s basic operations to get you started. The examples are pretty simple, but they should be enough to help you do further digging around into CRUD operations. The main things to keep in mind are: most of the important methods that you will call are asynchronous, and the ObjectID is a critical component when you want to generate one or more matches with documents in the database.

JavaScript – For-In vs For-Of

JavaScript

JavaScript Logofor-in and for-of both provide a way to iterate over an object or array. The difference between them is: for-in provides access to the object keys ,

whereas the for-of operator provides access to the values of those keys.

Iterating over an object or array is a pretty routine task with JavaScript, in fact, it’s hard to imagine a day when you don’t’ need to perform this action. When Iterating over an array, things are a bit easier because you can leverage the array’s “length” property to set up your iteration. But when you need to iterate over the properties of an object, things get a little sticky.

Why For-In vs For-Of

In his article, I will demonstrate the difference between the for-in and for-of JavaScript operators. Now, while these two methods may seem to provide the same functionality, actually, they do not. In fact, you might say that they are polar opposites. The for-in operator returns the keys of an object of array, whereas the for-of operator provides access to the values of these keys.

For a better understanding, let’s take a look at some examples.

for-in – Example # 1

In Example # 1, we use a for-in loop to iterate over the elements of the days array. Now, since we are creating the variable: “day in days”, on each iteration of the loop, we have access to a day variable, which represents the element over which we are currently iterating. The output for this example can be seen in line #s 8-15, and the purpose of this example is to demonstrate that the for-in operator provides the keys of an object, not the values of those keys. It is possible to get ahold of these values, which we will see in a moment, but, for now, I just wanted to point out that for-in provides direct access to the keys of the object over which we are iterating.

Using Bracket Notation – Example # 2

Example # 2 is virtually identical to Example # 1, in that we leverage almost the exact same code to iterate over the days array. The difference here is that we manage to get ahold of the key values by using bracket-notation. So, instead of outputting console.log(day), we output console.log(days[day]). In a pseudocode kind of way, we are saying: “give me the value of the days property that had this key”. The output for this example can be seen in line #s 10-14, and it is exactly what we wanted: we see the value for each key. This does feel a little hackey though, so let’s see if we can do better than this.

for-of – Example # 3

In Example # 3, we’re able to achieve our goal by leveraging the for-of operator. Simply by using for-of (instead of for-in), we’re able to access the value of each key. So, not only is this a non-hackey way to approach this problem, it is also cleaner and easier to read.

JavaScript Rest Parameter – Basics

JavaScript

JavaScript LogoThe Rest Parameter allows you to do two things: (1) break out the first X arguments passed-into the function, and (2) put “the rest” of the arguments into an array.

Passing arguments to a JavaScript function is quite common. If a function expects one or more arguments, then it follows that inside of that function you’ll want to examine the incoming arguments. But things can get problematic when you’re not entirely sure exactly what the incoming arguments will be at design time. Now it’s true that inside of any function you have a local variable named “arguments” that is an array-like object, but there are two problems with this array-like “arguments” object.

First of all, it’s not an array, and while you can leverage the Array.prototype object in order to treat the “arguments” object as if it is a true array, that approach feels like a hack. Secondly, if you want to act upon the incoming arguments differently, based on their position, things can get messy. Now this is where the JavaScript Rest Parameter comes in – it’s a powerful tool that can help solve these problems.

Why Should I Care About the JavaScript Rest Parameter?

In this article, I will cover the basics of the JavaScript rest parameter. I’ll walk through the ways in which it can be used to collect the incoming arguments of a function and convert them into a true JavaScript array. I’ll also demonstrate how you can use the JavaScript rest parameter to break out the incoming arguments so that one or more of the initial arguments can be left as is, and then “the rest” of them can be put into an array.

Using the Rest Parameter – Example # 1 A

inspectArgs Output – Example # 1 B

Above we’ve created a function named “inspectArgs”, which we’ll use in the rest of the code examples for this article. In Example # 1 A, we use the JavaScript rest parameter to collect all of the arguments that are passed into the function, we and put them into an array. So, on line # 2, since theArgs translates to an array, we can use the forEach method of the “theArgs” variable to iterate that array. Inside of the anonymous callback function that we pass to the forEach method, we have access to each array element, as well as the index of that element. Now using this information, we output the value of each argument, and the index of that argument.

So, the key point here is that by placing “…theArgs” where the incoming arguments would normally go, we are saying: “take all of the arguments that are passed-into this function, put them into an array, and create a local variable for this function named theArgs”. And in Example # 1 B, you can see the output of Example # 1 A, which is exactly what we expect: the value of each argument that was passed to the inspectArgs function.

When you actually want “the rest” of the arguments – Example # 2 A

We See the First Argument, and “the rest” of them- Example # 2 B

Now, in Example # 2A, we made one small change, in order to really demonstrate the power of the JavaScript rest parameter. We changed “…theArgs” to “x, …theArgs” where the incoming arguments would normally go. So, what we are saying to the JavaScript engine here is: “let the first argument be what it is, but then take the rest of the incoming arguments and put them into an array”. So, before we use the “theArgs.forEach” method to iterate the “theArgs” variable, we take a look at the very first argument: “X” and output it.

Now if we take a look at Example # 2 B, we see the output of Example # 2 A. As expected, we see “x -> a” first, because we examined the first argument. Then we see the “rest” of the arguments, because we used the rest parameter to iterate the “rest of” the arguments that were passed into the function.

Skipping Arguments – Example # 3 A

The Second Argument Has Been Skipped – Example # 3 B


In Example # 3 A, we take an approach that’s very similar to that of Example # 2 A, by examining the first argument and outputting it to the console. But when you look at Example # 3 B, the output of this call to inspectArgs skips the second argument: “b”. This is because we specify: “x, y, …theArgs” where the incoming arguments would normally go. So now what we are saying to the JavaScript engine here is: “let the first and second arguments be what they are, but then take the rest of the incoming arguments and put them into an array”. As a result, we wind up with three local variables in this function: “a” “b” and “theArgs”. We output the value of “a” and “theArgs”, but we ignored “b”. The main point here is that we have changed the value of “theArgs” simply by specifying a “b” argument. So, as you can see, Example # 3 A truly demonstrates the power of the JavaScript Rest Parameter.

Handling HTTP POST Requests with Express.js

Express JS

Node.js LogoLearn how to access the body of an HTTP POST request using the Express.js framework and body-parser module.
Forms are a common component in web applications. When a user submits a form, that data is sent to the back-end for processing. To process that data, the web server must understand how to access it. Popular web server languages include Java, .NET, PHP, Python and Node.js. In this article, we’ll learn how to access the POST data sent to a Node.js web server using the Express.js framework. To get started, you can go ahead and clone the following github repository: Handling POST requests with Express and Node.js.

And you’ll find instructions on how to run the code in the Github page.

package.json

The package.json for this project is pretty straightforward, and we’ll only need the body-parser and express Node.js modules. We also create a scripts property so that running the example code requires a simple command: npm start.

Requiring the modules we need – Example # 1:

In Example # 1, we’ve imported the Node.js modules that we need. The Express module takes care of the heavy lifting with regard to fulfilling web requests. NOTE: If you’re not familiar with the Express Node.js module, please see my earlier blog post on this subject:  Set up a Node / Express Static Web Server in Five Minutes.

We also import the body-parser Node.js module, which has the critical role of parsing the body of an HTTP request. When it comes to processing a POST request, this is important. And the path Node.js module helps express to construct a file path.

bodyParser.json and bodyParser.urlencoded – Example # 2:

Now, here in Example # 2, we tell express to use the bodyParser.json middleware, which provides support for parsing of application/json type post data. We also tell express to use the bodyParser.urlencoded middleware, which provides support for the parsing of application/x-www-form-urlencoded type post data.

Creating the node.js web server – Example # 3:

In Example # 3, we use express.static to set up the static assets folder, the main purpose of which is to help the working example function in a browser, with minimal effort. For more information on express.static, please see my earlier blog post in Express mentioned above. In this example, we use the app.post method, which tells the Express module to wait for an HTTP request at the /form route that leverages the POST HTTP verb. So, when the user sends a POST request to the /form route, Node.js executes the provided callback, which is the second argument passed to the app.post method.

The app.post callback takes two arguments, the first of which is the request object (i.e. “req”). The second is the result argument (i.e. “res”). We use the res.setHeader method to set the Content-Type header to application/json, which tells the user’s browser how to properly handle the returned data from the request.

NOTE: We wrap the rest of the callback code in a setTimeout, the purpose of which is to mimic a slow internet connection. Otherwise, the working example will move too fast for most to comfortably follow.

Inside the setTimeout, we use the res.send method to send the result body back to the user, and here we’re sending a serialized JSON object. To construct this object, we access the body property of the req object (i.e. the request object), which is why we have implemented the bodyParser.json middleware. And this is what allows us to parse the properties of the request body. In this example, we are expecting firstName and lastName POST parameters, which will allow us to access the req.body.firstName and req.body.lastName properties, to build the JSON for our result object.

To see this code in action, just follow these steps :

  1. Clone the git hub repository: https://github.com/kevinchisholm/video-code-examples/tree/master/node-express/handling-POST-requests-with-express
  2. Follow the instructions in the readme to set up the code
  3. Point your browser to: http://localhost:3000
  4. In the web page, enter some text into the two input boxes, and then click the “Submit” button
  5. Notice the logging statement in your node.js terminal
  6. Notice that the text you entered displayed in a browser message

You might also want to take a look at the Network tab in your Web Developer Tools, which allows you to see the actual network request that goes to the web server. You’ll be able to inspect the POST data sent, and the JSON data returned.

Viewing the working code example

Here’s what happens when you submit the data in the browser:

  1. The JavaScript in www/js/form-handler.js makes an AJAX POST call to the route: /form.
  2. The object sent in the POST request is: {firstName: XXX. lastName: XXX}. (NOTE: “XXX” is whatever value entered into the form’s text inputs.)
  3. Our Node.js web server intercepts the HTTP request to /form.
  4. Our Node.js web server parses the body of the HTTP request and constructs a JSON object.
  5. The XMLHttpRequest for the AJAX call is this JSON object.
  6. The browser displays the data from this JSON object in the browser.

Nothing too fancy here, just illustrating the “round trip” of our HTTP POST request.

Summary

In this article, we learned how to handle POST requests with the Express node.js module, and we talked about the need for bodyParser.json and bodyParser.urlencoded. We also learned how to listen for a POST request to a specific route, and how to access the POST parameters in the HTTP request body. Now, while the working example is simple, it does allow you to inspect every step of the process. If you look at your browser’s network tab, you can see the HTTP POST request go out, and then return. What happens during the server-side processing of that request is what you see in our Node.js code: server.js.

So, a lot to digest at first, but I’m hoping that this it will get you started with your next form-based Node.js application!

Introduction to Express.js, the Node.js web application framework

Express JS

Node.js Logo - expressExpress.js provides the kind of abstraction that lets you stay out of the weeds and focus on your application code.

While the low-level nature of Node can be an asset, it can also be somewhat of a curse because when you’re serving static assets, it can be tedious to detect routes and serve the correct static assets for an entire web page. Some examples of static assets are CSS files, images or JavaScript files. Now, the good news is, Express is a Node module that provides abstraction for these kinds of challenges. It’s popular, it’s used by large companies, and there’s strong community support for it, all of which make this a solid choice.

Why Express?

The main goal of Express is to provide an application framework, and getting started is simple. Take a look at the code samples, which you can clone at the following Github repository: Introduction to Express.js, the Node.js web application framework. You’ll find instructions on how to run the code in the Github

package.json

The package.json for this project is simple: the single dependency is express.

The get() Method – Example # 1

In Example # 1, we call the get() method of the app variable, and we pass the string “/” to the get method. This tells Express.js how we want to handle any GET request to the root of the application. (NOTE: GET is an HTTP verb, other examples are POST and PUT.) In Example # 1, we are sending back a simple HTML page, and we have created the HTML by constructing a string that represents that HTML code. This happens in the “HTML” variable. We then call the send() method of the result object, sending our HTML back to the user. Now run Example # 1 in your terminal with the command node example-1.js, then navigate to http://localhost:3000/ in your browser. There you will then see “This is Example # 1”.

The use() method – Example # 2

Example # 2 is much shorter than Example # 1 because we have not hard-coded our HTML. Instead, we have used the use method of the app object, which tells Express which folder we want to use for serving static assets. As a result, our JavaScript code is cleaner, and easier to read. Also, we’ve separated concerns. In other words, instead of hard-coding our HTML in our JavaScript file, we’ve put HTML where it belongs: in an HTML file.

Now notice how the web page in Example # 2 has an image. I included that to point out how Express handles this for us, even though we never had to write any JavaScript code that specifically waits for an image request. There is also a CSS file being served. In both cases, Express understands that WWW is our public web folder and it serves up static assets as needed, which certainly saves us a lot of time. Now run Example # 2 in your terminal with the command node example-2.js, then navigate to http://localhost:3000/ in your browser. There you will see “This is www/index.html”, which is a major improvement, as the HTML that the user sees is actually served from a static HTML file.

Adding Handlers for a Second Route – Example # 3

In Example # 3, we use the GET method to add a handler for when the user requests “/about“. In this case, we serve-up “/www/about.html“, which is just one example, but we could have added any specific route handlers needed. Now run Example # 3 in your terminal with the command node example-3.js, and navigate to http://localhost:3000/ in your browser. There you will see “This is www/index.html”. Now, click “About” in the upper-right-hand corner, to display the “About Us” page. You can then click “Home” and “About” over and over, to switch routes, because our JavaScript code in Example-1.js handles the alternation of these two routes.

Summary

In this article, we learned the absolute basics of Express, but in doing so, we also got to see how simple it is to use. In our discussion we saw examples of the get() method, as well as the use() method. I’m hoping that this was enough to illustrate the power behind this Node.js web application framework, and that it will get you well on your way to enjoying its usefulness.

Create a Node Websocket Server in Five Minutes

Node.js

Node.js Logo - node websocket serverLeveraging Express.js and the ws NPM module, it is possible to create a Node Websocket Server in less than ten lines of code.

The Websocket protocol provides full-duplex communication channels over a single TCP connection. In the past, web clients had to employ long-polling or the repeated pinging of a server in order to achieve this kind of “push” functionality. Now, Websocket technology eliminates the need for such outdated techniques. So, when a Websocket client connects to the server, a persistent connection is created, and the Websocket server can then push notifications to all connected clients. It is possible for the clients to send messages to the Websocket server as well, but I’ll cover that in a later article.

In this article, I’ll explain the bare-minimum code needed to create a Node Websocket server that can broadcast all incoming messages to connected clients. This should take us about five minutes, and less than ten lines of code. The beauty of Express.js is that it takes care of the heavy lifting with regard to the actual web server. The ws NPM module also plays a starring role in that it handles the Websocket communication layer, allowing us to expose an endpoint that accepts connections and messages from clients. Plus, we can broadcast messages to connected clients.

package.json

Above is the contents of package.json. There are only two dependencies: the Express.js framework and the ws module.

The Node Websocket Server – Example # 1

So, here in Example # 1 we have the entire working application. On line #s 3 through 9 we create our dependencies. I’ve grouped things in a way that I hope makes sense, but I’ll just point out that on a high level there are two things happening here. We require the modules that we need as constants: http, express, and WebSocket. Also, we create the constants app, server and websocketServer. These constants are the results of expressions. Now if you’ve ever worked with Express.js before, the app constant should be familiar to you; it’s simply an instance of the Express framework. The server constant is the result of calling http.createServer(), passing it our express.js instance (ie. “app”). And finally, the constant websocketServer represents our Websocket server.

Now let’s jump ahead for a moment to line # 30, where we start our web server. It’s not that there’s much going on here; it’s just that I wanted to point out that the server is started by calling the server.listen method, passing it the port to listen on (i.e. 3000). The second argument (the anonymous function) is optional.

Now let’s go back up to the top of the file. As you can see, the rest of the code is surprisingly simple. We create two event handlers, the first of which takes care of each Websocket client connection, and the second one processes each message that it receives from that client. On line # 12, we have the first event handler. We use the “on” method of the websocketServer instance to handler an incoming connection. This is somewhat similar to creating a handler for a GET or POST request in Express.js.

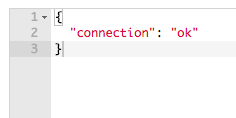
We pass the event as the first argument (i.e. “connection”), and then a function as the 2nd argument. The anonymous function that we provide contains the code that we want executed for each new Websocket client connection. This function also receives a Websocket client as its first argument. We have named this variable: “webSocketClient”. On line # 14 we provide some feedback to the Websocket client by sending it the first Websocket message: { “connection” : “ok”}. This is for demonstration purposes only, just so that we can see right away that the connection has been established.

Now inside of the anonymous callback, we set up the second event handler, which will process each message that this client receives. And similar to the connection event handler, we use the “on” method of the webSocketClient variable to handler an incoming message. We pass the event as the first argument (i.e. “message”), and then a function as the 2nd argument. The anonymous function that we provide contains the code that we want executed for each message received by this Websocket client.

Broadcasting the Message to All Websocket Clients

On line # 20, we start the process of broadcasting the incoming message to all Websocket clients. Using the forEach method of the Websocket.clients list, we iterate the list of websocket clients. And for each iteration, we provide a callback function. This callback function receives the currently iterated Websocket client as its first argument. So, we then use the send method of that client object, and send the incoming message (i.e. by sending one message to many recipients, we are “broadcasting” that message).

Testing the Websocket Server

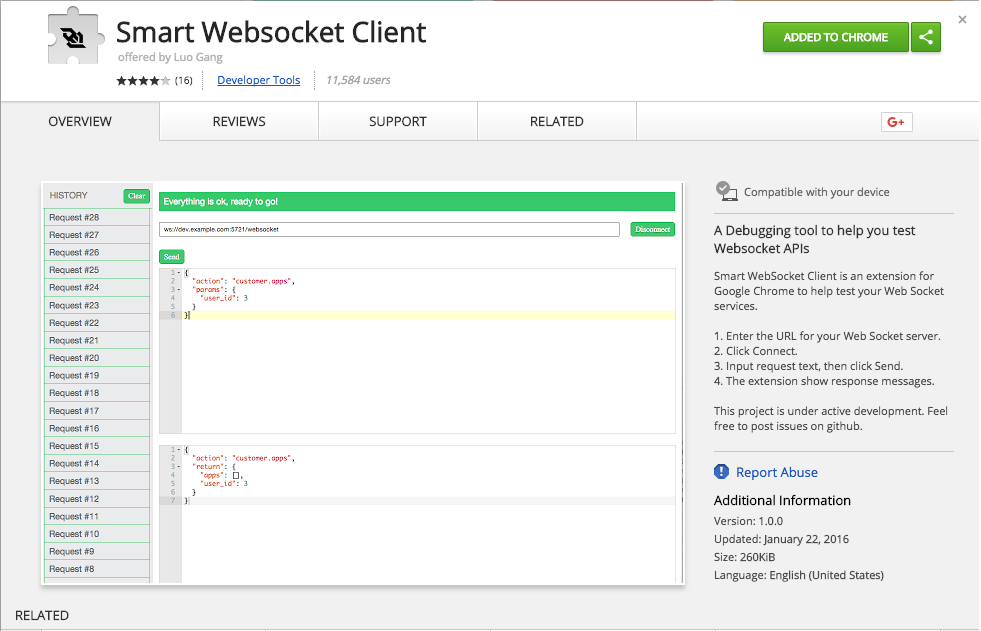
Now if you copy all of the code from Example # 1 into a file and then execute it, you’ll have a running Websocket server on port # 3000. But that isn’t enough. Now we want to test our websocket server, and an easy way to do this is to use the Smart Websocket Client plugin for Google Chrome.

So go ahead and click this link to install the plugin, and once you’ve installed it, start the plugin by clicking the icon in the upper-right-hand corner of your Chrome browser.

smart-websocket-client-icon
smart-websocket-client-1
Smart Websocket Client

Once the Smart Websocket Client is running, enter http://localhost:3000 in the address bar and then click the “Connect” button. You should see { “connection” : “ok”} in the lower window, indicating that a Websocket connection was successfully established (see example # 2).

smart-websocket-client-2
Connecting
smart-websocket-client-3
Connecting Success Message

Example # 2

In the top window, enter any text, click the “Send” button, then you’ll see your message appear in the lower window. Now open a few more instances of the Smart Websocket Client and follow the same steps. If you place your Chrome browser tabs side by side, you’ll see that every message you’ve sent has been broadcast to every Websocket client. Congratulations!  You’ve just built a working Node Websocket server.

Example # 3

Now earlier in this article, I promised that we could create our Websocket server in less than ten lines of code. Example # 1 clocks in at 32 lines of code, but this is because I used whitespace and comments to make the code as readable as possible. So, in Example # 3, I’ve provided the condensed version of our Node Websocket server. This code is not very pretty, but as promised, it is a fully functional Node Websocket server that’s set up in less than ten lines

What is the difference between LET and CONST in JavaScript?

JavaScript

JavaScript LogoThe JavaScript let and const keywords provide block-level scope, but there is a slight difference in how they behave. With const, you can not re-assign a value to the variable. With let,
you can.

Over time, JavaScript applications have grown in complexity. As a result of the increased code complexity programmers have been faced with a challenging dilemma: build applications that satisfy ever-evolving business requirements, yet continue to work with the same tools. It only makes sense that JavaScript would be in need of improvements, since for much of its history, functions were the only tools available to achieve scope. But, for several years, block-level scope was a feature that was sorely lacking. Then along came the ECMAScript-2015 specification that finally met that need with the let and const keywords.

The JavaScript let and const keywords are quite similar, in that they create block-level scope. However, they do differ a bit in the way that they behave. For example, the JavaScript let keyword is similar to the var keyword in that assignments can be changed. On the other hand, the JavaScript const keyword differs in that assignments can not be changed. So, once you declare a variable using the const keyword, you cannot re-assign a value to that variable. This does not mean that the variable is immutable. If you assign an object to a variable using the const keyword, you can mutate that object. You just can’t re-assign that variable with a new value. Let’s take a look at some examples.

Example # 1 A

Example # 1 B

In Example # 1 A, we have two different versions of the “i” variable. I say “two different versions” because the same variable name exists in two difference scopes, the global scope and a block scope. The block scope exists between the two curly braces: “{ }”. Then inside of the two curly braces, I used the JavaScript let keyword to declare a second “i” variable. Because we used the let keyword, that particular “i” variable is scoped to the block in which it was declared. And because of this, the console.log() statement on line # 6 outputs  50. I’ll just note here that it may seem a little odd at first to declare a variable anywhere other than at the top of the function, but this actually is the correct syntax; if we want a block-level scope variable, we use the let keyword inside of a set of curly braces.

Take a look at Example # 1 B. Notice how, in the second console.log() statement, the output is 100. This is because that second console.log() statement is in the global scope, and in that scope the “i” variable is equal to 100. So, there we have it: two different scopes without even having used a function.

Example # 2 A

Example # 2 B

Now, in Example # 2 A, there are two “j” variables.
The first “j” variable is a global, equal to 100, and the second is defined inside of the for loop. And because it’s defined inside of a block, it has block-level scope. Now look at example # 2 B. Because “i” is global, the “i” variable increments, just as we would expect. But notice that the “j” variable is always 50 in each console.log() statement, even though there is a global “j” variable. This is because on each iteration of the for loop, a block-level “j” variable is declared using the let keyword, and it is incremented (just to demonstrate that with let, we can re-assign a variable value). So in this case, with each iteration of the for loop we have a block-scoped “j” variable and it is always 51. Note that the global “j” variable is ignored on line # 12.

Example # 3 A

Example # 3 B

In Examples # 3 A and # 3 B you’ll see a similarity to Examples # 1 A and # 1 B, the only difference being the use of the use of the const keyword instead of let when declaring our block-level version of the “i” variable.

Example # 4 A

Example # 4 B

Now here in Example # 4 A, we’ve run into a problem. We tried to take the same approach as Example # 2 A, that is, we tried to increment the “j” variable declared on line # 6. The problem, though, is that when you use the JavaScript const keyword, you cannot re-assign a new value to a variable. So when you look at Example # 4 B, you’ll see that we never see the full output of the for loop that we expected, because line # 9 of Example # 4A throws a TypeError. This is because when we try to change the value of “j”, we find that this is not possible because it was created using the const keyword. In other words: it’s a constant.

Example # 5 A

Example # 5 B

Now Example # 5 A is virtually identical to Example # 4 A, except that we have not tried to increment the “j” variable. And when you look at Example # 5 B, you’ll see that we no longer have an error. In the console, the value of “j” is 50 every time.

Summary

So to recap, we now know that the JavaScript let and const keywords allow you to create block-level scope for variables, which, in turn, negates the need to always use functions to create scope. With block-level scope, all you need are the curly braces “{ }”, and within that block, any variable created using let or const is private (or local) to that block. This is particularly helpful with for-loops. And a very important thing to keep in mind: with const, you cannot re-assign values to a variable. In other words, any variable created with the const keyword is a constant and the assignment cannot be changed.

A lot to take in here, but I think it’s worth keeping on your radar, given this very functional block-level scope now increasingly available in browsers.

The Paradox of JavaScript

JavaScript

JavaScript LogoAre you getting an ECMA-Headache?

In the book: The Paradox of Choice: Why More Is Less, author Barry Schwartz argues that too many choices can dilute satisfaction. While this title spends much of its time in the context of consumer products, a similar argument can be made about the world of JavaScript. There is so much going on in the wild wild west that is JS, but is that really a good thing?

In short, I’d say  yes, it is a good thing. Even though it can be difficult to navigate the maze of libraries and frameworks, the explosion of activity breeds a world of innovation and creativity. But there is no doubt a cost; Where to begin? How to keep up? There is a lot of noise associated with the world of JavaScript. I actually feel that most of it is good noise, but it can be overwhelming.

I recently participated in an  Aquent Gymnasium webinar titled: keeping up with javascript is a full-time job, and I thought the title was brilliant. Not only are beginners feeling JavaScript anxiety, but experienced developers as well. I’ve heard many people ask the same questions: “Should I learn Angular or React”? – “If few ES-2015 features are currently supported, should I still learn them?” – “Grunt , Gulp or Webpack?” and so on.

ES6 vs ES-2015 vs ES-2016 vs ES-WTF

And speaking of ECMAScript, what is up with the naming-scheme? ES6 is AKA ES-2015, and ES7 is AKA 2016? Ok, that’s easy to remember. But what to learn? What the hell is a JavaScript symbol? And, what significance does it play in the million-and-fifty-fifth JavaScript slideshow I will have to make in my next Agile Sprint? Is this just like all that cruddy math that we had to learn in 8th grade, knowing perfectly well that we’d never ever need it in adult life?

Sigh.

So many libraries, so little time

This is where the paradox may lie. We have so many JavaScript toys to play with, but who has time to keep up with all of them? First, you have to be aware of changes in the JavaScript jungle. For example, Angular 4 is out, but there is no Angular3. Okie dokie. Next you have to understand the role of each library or framework. And then at some point, you want to learn how to use it, right?

Sometimes it is really tough to know where to invest your time. I’ve been hearing more and more about Aurelia and Vue.js. Both have enjoyed positive reviews and are gaining traction. But are they really going to take off line Angular? Am I really going to benefit in my next job interview by learning either one of these libraries or any of the other up-and-coming JavaScript libraries/frameworks ?

My answer: Bet on JavaScript every time

I’m not sure it is necessary to learn every single JavaScript framework or library that falls from the tree. We all have lives to live and there are only 24 hours in each day.

Something interesting about all of this craziness is that there is one common thread throughout: JavaScript.  JavaScript is the language used in all of these libraries/frameworks/build tools. So, you simply cannot lose by making JavaScript your top priority. If you have a free hour, spend 45 minutes studying JavaScript, and 15-minutes learning a new library. As long as your JavaScript skills continue to improve, you will always have the tools you need to learn any new library/framework/build tool. Not only that, but you will get better at picking them up. In addition, you will start to see the similarities between them and common patterns in the source code.

In short: you simply cannot lose by concentrating on JavaScript.

ECMA-Everything

Not only is it important to focus on JavaScript, but it is also key to learn the new features of the specification.  Most browsers do not support these features, but they will soon, so best to get ahead of the eight-ball. ES-6 and ES-7 features are powerful and when supported, will take much of the pain out of creating sophisticated client-side web applications. More important than Angular, more important than React, learn the newest features of JavaScript. And, Babel is your friend; it allows you to use features that browsers do not yet support. Also, the combination of Typescript/Webpack is another solid solution.

Planning is key

I can only speak to what has worked for me, and that is: always trying to decide where my time is best spent. For example, one of the biggest arguments in the JavaScript world is: “should I learn Angular or React?” Well, I’d say: learn both!

You don’t have to master each one, but learn enough to understand the differences between them as well as their strengths / weaknesses. Since, I happen to spend 90% of my professional day working with Angular2, I am a fan. But, I was worried that I was falling behind on my knowledge of React, so I spent my last Christmas holiday building an application with React. Now, I am far from a React guru, but in building a simple CRUD application that I actually use each day, I was able to gain an understanding of how it works, how it differs from Angular, and what its strengths are.

I’ve tried to take this approach with every other segment of the JavaScript ecosystem: NPM vs Yarn, Gulp vs Grunt vs Webpack, Typescript vs Vanilla JavaScript, and so on. In each case I ask myself: “What is the most important thing I need to know about this library/framework/build-tool ?” and then my goal is to be able to speak intelligently about it. Sometimes it takes a Saturday afternoon, sometimes it takes a month. Sometimes it turns out that I wind up using that particular tool heavily in my daily work. But I try to at least understand what it does, how it differs from its competitor and what it brings to the table.

Summary

In my opinion, there will always be a couple of JavaScript libraries or frameworks that you work with on a daily basis, a few that you used to work with, and then a zillion that you have heard of but have not had time to learn yet. They key from my perspective, is to accept this reality; you can’t have an expert-level knowledge of everything. But you can keep your finger on the pulse of what’s going on out there, and do your best to have a good understanding of the more popular tools and the role the play.

Set up a Node / Express Static Web Server in Five Minutes

Node.js

node express static web server

Setting up Node and Express as a Simple Lightweight Web Server for Your Single Page Application is Very Easy to Do.

Sometimes you just need a local web server.  Sure, you could use MAMP, but installing Apache, MySQL and PHP seems like overkill in some cases. I have used MAMP for years and it is terrific. In particular, when you need to run PHP locally and / or connect to a MySQL database, it’s the cats pajamas. But that was the standard 10 years ago. Nowadays, it’s very common to build a single page web application where all of the assets are static, data is pulled-in from a REST endpoint and all of the heavy lifting is done in the browser via JavaScript. In these kinds of scenarios, a static Node / Express server is a simple, easy and lightweight approach.

In this article I’ll explain the steps needed to set up a Node / Express Static Web Server. And the good news is that on this high level, the required steps are very simple. First, you’ll need to require the express and path modules. After that, you’ll create an instance of express, then set the port that the web-server will use. The next step, and the key-ingredient here is the express.static method. This tells Express.js that you want to serve static content from a specific folder. In that one line of code, you’ve done the majority of the configuration work.

So, not only will Express serve-up static content from that folder, it can do so for any subfolders as well. You can specify any folder in your project as the static web folder. And the beauty of it is that any folder outside of the one you specify will be hidden from public view, so your application code will be safe. When you pass the the express.static method to the use method of your express instance, you provide the details that express needs to serve your static content. Then finally, you use the listen method of your express instance to start the web server. We’ll take a closer look at the express.static method in Example # 2.

Now, I just want to remind you here that this article pertains to the specific occasions in which you need to serve static web assets locally. In other words, using a Node / Express static web server can be a very simple way to satisfy your need for a local web server, but may not be the best approach for your production needs. Technically, you could take the code that is detailed in this article and deploy it to your production server, and in theory it would work just fine. For this article, however, I’m just going to concentrate on providing a fast and simple way to get a local web server running so that you can test your front-end code (e.g. HTML, CSS or JavaScript).

The code samples can be downloaded here: https://github.com/kevinchisholm/node-express-static-web-server

Example # 1 – package.json

In Example # 1, we have the contents of package.json. Nothing too special going on here. But just note that our only dependency is the express module. Also, in the scripts property, I’ve set up the start command to execute the app.js file in the node web-server folder. This way, we can simply type npm start in the terminal, instead of node web-server/app.js (just a bit less typing).

Example # 2 – The Express Static Web Server

In Example # 2, we have the entire contents of our web server: 15 lines of code (and nearly 25% of that is comments!). The magic happens on line # 10:  We call the app.use method and pass it express.static, which also takes a couple of arguments. So this tells Express that we want to set a static folder. We then use the path.join method to tell Express where all static assets should be served from. In our case, it is the www folder. The two arguments passed to the path.join method are __dirname, which tells us the absolute path to the folder within which the current script is found, and then “../www” which is a relative path to the www folder.

Now, as I mentioned earlier, anything outside of your static folder is protected from public view. This means that while the folder you specify when calling the express.static() method (i.e. “../www”) is publically viewable, any folder that is a sibling or descendant of that folder is not available publically. This is not a critical factor when working locally (i.e, developing), but it does matter in production. In other words, you wouldn’t want your application code to be viewable to the general public. Nor would you want to make available any sensitive information that’s in your application code, such as a secret key or other credentials. So, as you can see, this is one of the key strengths of Express, which is the ability that it provides you to not only define your public/static folder in one line of code, but to also protect all of the other folders by default.

Express does all of the heavy lifting

A little earlier, I used the word magic. We both know that none of this is actually magic, but it sure feels like it. If you’ve ever created a Node web server manually, then you know two things: 1) It’s really easy, 2) It’s really tedious once you get past “Hello World”.  But Express hides all the tedium and makes serving static assets as easy as 1-2-3.

HTTP Headers

There is one downside here. Express does not set the appropriate content-type headers for the HTTP requests.  This is not fatal in most cases because this approach is simply meant to provide a very fast and easy way to set up a static web server. The actual web server works just fine, but keep in mind that content-type headers for files such as JPEG, PNG, CSS or JS will not be set accordingly. If that is a problem, then a simple static web server is probably not what you need and you should consider a more robust approach. So, hopefully, if you do need a simple static web server, this article was what you needed to get up and running quickly.

Summary

There are multiple options when it comes to setting up a static web server. One advantage to leveraging Node and Express.js, however, is that as a developer, you probably already have Node installed on your machine. So, in this case, you won’t need to install any additional software. You can simply import the Express framework, write about a dozen lines of code, and you have a static web server. This is probably not a server that you would use in production, but as you can see, it can easily solve the problem of quickly serving web content on your local machine. If you need to write moderately complex dynamic application logic, then you might need something a bit more advanced than what was discussed here. But for a basic static web server, this approach should get you going (hopefully in less than five minutes : – )

Yikes! AWS Node / NPM ERR! enoent ENOENT: no such file or directory package.json

Node.js

Node.js LogoAWS’s Node deployment keeps telling me that it cannot find package.json, but it’s there! – Fortunately, this problem is easily solved.
AWS makes deploying your Elastic Beanstalk easy. Compress your build files, upload the ZIP and then deploy that application version. Lovely. But sometimes your application goes into a “warning” or “degraded” state, and then a visit to the application with a browser yields: “502 Bad Gateway“. Errrggggg…..

At this point, you look in the logs and see a cryptic message that says something like: “enoent ENOENT: no such file or directory package.json“. You double-triple-quadruple-check and yes, package.json is in-fact very much alive and well. So, of course your next thought it: “WTF???

I have run into this problem a few times and in each case, the problem was me: I zipped-up a folder, instead of the contents of a folder.

Do not compress an entire folder

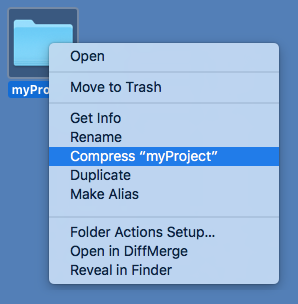
Compressing the my project folder does not fix package.json problem

Let’s say your Node application is in a folder named: “myProject“. If you are compressing that folder, then this is your problem. You don’t want to compress a folder because when AWS un-zips that file, it will not know to look in the “myProject” folder that is created when the file is un-zipped.

Compress ALL of the items in  your project folder

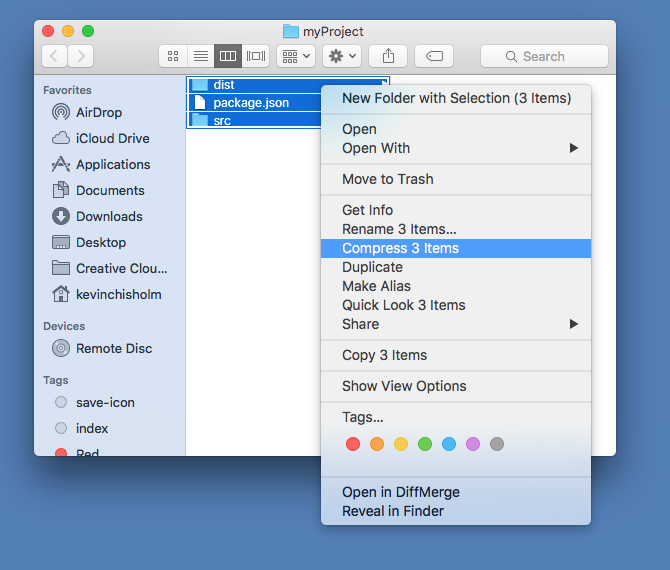
Compressing the root files fixes package.json problem

What you want to do is: select EVERY file in the root of that folder (i.e. your Node application’s root folder), and then compress THOSE files. This will create a ZIP file that when un-zipped, creates the file structure that AWS expects. Now AWS will find package.json. This should solve the problem.

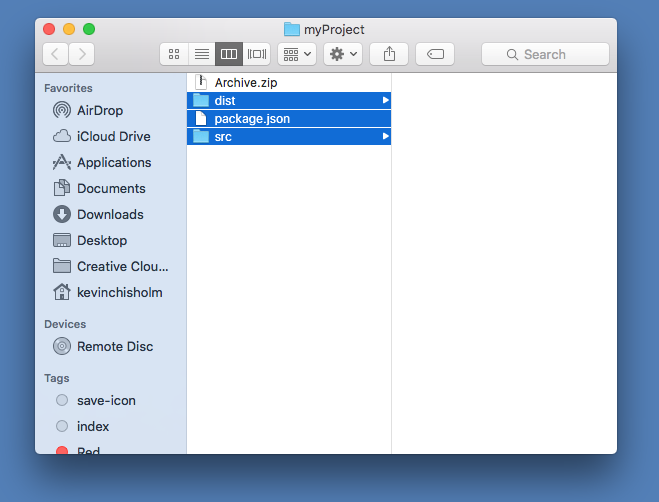
Compressing the root files fixes package.json problem

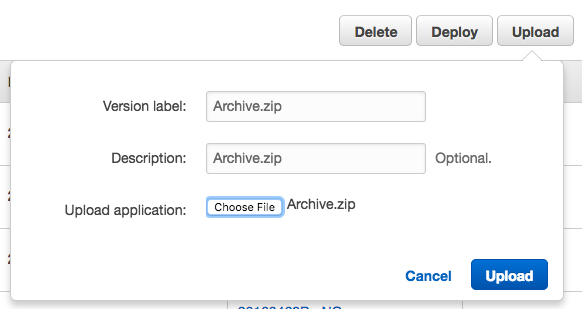
In the image above, I have zipped up the contents of the “myProject” folder, and created Archive.zip.

Upload the zipped file

Compressing the root files fixes package.json problem

Now, back in your AWS console, you can use the “Upload and Deploy” button to upload your ZIP file, and then deploy it.

Setting Your AWS-Hosted Node Application’s Port

Node.js

Node.js LogoWhen working locally, using an arbitrary port number is fine, but you need to get that property when deploying your Node application to AWS.

Technically, you can code-up a Node web server in less than ten lines of code. Most likely, your application will require a few more lines of code than that. But my point here is: getting a basic Node web server running is not terribly difficult.

Example # 1

In example # 1, I used port # 3000, but I could have used virtually any valid port number. When working locally this is for the most part a non-issue. As long as no other application is using the port you want to use, you chose one and then use it. Easy. This example does little more than say “Hello!”, but the point I’m trying to make is that your main JS file ends with the server.listen method, and you need to pass it a port number.

But when you attempt to deploy this code to your AWS Elastic Beanstalk instance, you will get a “503 Bad Gateway” error in your browser. The reason for this is: you don’t know which port should be used when calling the server.listen method. The great thing about AWS is that it provides a layer of abstraction for those kinds of details. In other words; AWS takes care of details such as which port to listen on. The downside here is that you have no way of knowing exactly which port that will be when you deploy your code.

Example # 2

In example # 2, we set a variable named: port. We attempt to assign the value of process.env.PORT to that variable. If that value is falsely, then we set it to 3000. The reason this works is; if our code is running on our AWS instance, then process.env.PORT will automatically be set and we will listen on that port. If we are running our code locally, then process.env.PORT will be undefined (or “falsely”). So, then our port variable will have a value of 300. This way, our code can run successfully on our AWS instance, or locally.

Node.js Hosting Links

Node.js

JavaScript LogoThe good news is: there are a lot of Node hosting services out there. The bad news is: there are a lot of Node hosting services out there

Installing Node locally is easy. Cloning an existing Node application from GitHub and running it locally is easy. Creating your own Node application and running it locally is easy. But, choosing a hosting solution for your Node application is definitely not easy.

Below is a list of companies that offer Node hosting services. I do not claim to have every possible company listed here. But I’ve done my best to list the ones that I know about and will update this page any time I learn about another one worth mentioning.


Title: Openshift

Link: openshift.com

Description: I’ve used Openshift.com quite a bit and for the most part have been very happy with their service. They offer a free plan that definitely includes what you need to get up-and-running.


Title: Heroku

Link: heroku.com

Description: Heroku was the first Node hosting service I knew about. I’ve not used it in a while but I was always very happy with it. Setup and deployment was fairly pain-free, as was adding services such as MongoDB.


Title: Amazon Web Services

Link: Deploying Node.js Applications to AWS Elastic Beanstalk

Description: AWS is a big topic. But in general, it’s really easy to get a Node instance up-and-running with Elastic Beanstalk.


Title: Nodejitsu

Link: nodejitsu.com

Description: I’ve not tried Nodejitsu but have heard good things about them.


Title: zeit.co

Link: zeit.co/now

Description: This is a new one to me, but their setup looks super-simple.


Title: Node.js on Google Cloud Platform

Link: cloud.google.com/nodejs

Description: Although Google still has not caught up with Amazon yet, they are serious about their cloud offerings. I’ve not tried their Node hosting but have confidence that it is at worst, solid.


Title: Node.js Hosting

Link: a2hosting.com/nodejs-hosting

Description: Another new one to me, but their packages look very affordable.


Title: Node.js One Click Install | Cloud Hosting – GoDaddy

Link: a2hosting.com/nodejs-hosting

Description: Godaddy now offers a “Cloud” service that supports Node hosting.

Helpful Node.js Education Links

Node.js

JavaScript LogoNode.js is growing fast. This is a great problem. While is means that JavaScript lovers have a rosy future, it can sometimes be difficult to keep up with what is going on with Nodes.js

Here are a list of links that you might find helpful in your Node.js travels. In each case, I’ve provided a brief description of the link / organization / article, so that you have a sense of where you are are headed. If you feel that there is a Node.js link that I should have included in this article, please contact me at: kevin@kevinchisholm.com.

Critical Node.js Links


Node.js Logo

Title: nodejs.org

Link: nodejs.org

Description: Since this is the home page for Node.js, you cannot go wrong here.


Node.js Logo

Title: Node.js v6.6.0 Documentation

Link: nodejs.org/api

Description:The official documentation for Node.js. Very well organized and easy to read. Almost the most important Node.js documentation you can read if you are getting started.


Node.js Logo
Title: npm – Home of the package manager for JavaScript.

Link: www.npmjs.com

Description: It’s hard to imagine doing anything with node without the use of NPM. This is the official home page of NPM, and a great starting point.


Node.js Logo

Title: Homebrew. The better way to install Node.js on Mac OSX

Link: brew.sh

Description: I’m being a little opinionated here (ok. I’m being a lot opinionated). But, for Mac users, Homebrew is the way to go when you install Node.js (sorry Windows users, you are stuck with scoop : – )


Node.js Logo

Title: Built in Node.js – startups, apps, projects using Node

Link: builtinnode.com

Description: A great way to learn about who is using Node.


Node.js Newsletters

Node.js Logo

Title: npm Weekly

Link: www.npmjs.com/npm-weekly

Description: Find out what npm has been working on, thinking about, and talking about every week. A great newsletter if you are into NPM.


Node.js Logo

Title: node weekly

Link: nodeweekly.com

Description: A free, once–weekly e-mail round-up of Node.js news and articles. Another awesome newsletter if you are into Node.


Other Helpful Node.js Links

Node.js Logo

Title: Node Tutorials on scotch.io

Link: scotch.io/tag/node-js

Description: scotch.io tutorials are very easy to read. The site is in general a great resource for learning about a number of web development technologies. Fortunately, they are passionate about Node!

Setting AWS-Node.js Stormpath keys

Node.js

Stormpath Logoprocess.env can be used to set the environment variables you need when using the stormpath api in your aws-hosted node application

Stormpath provides amazing abstraction when it comes to authentication. There are certainly other services like this, but when it comes to security, Stormpath is not only popular, but well respected. This comes as no surprise as they simply make authentication easy.

I have to say that their documentation is for the most part very good. If Node is  your thing, they make it very easy to get up-and-running with their API. Their mailing list is also quite helpful.  At least a once or twice per week, I receive emails that link to interesting articles on their blog.

Recently, I was trying to setup a Node.js/Express.js application, leveraging their express-stormpath Node module. I was thinking to myself: “…hmmmm. There must be a step where I have to configure my secret key or something like that”. After some quality time with Google, I came across this article, that suggested the following:

Unix/Linux/Mac:

Windows:

(where “xxx” is your actual key)

Well, that is fine for working locally, but I knew if I wanted to deploy this as an AWS Elastic Beanstalk application, I needed to actually set these values somewhere.

Using process.env

I set the three environment variables I needed to be properties of process.env:
I

(where “XXX” is your actual key)

I took a look in the source code for the express-stormpath Node module and could see that it seemed to want to find these on process.env, so I think this approach should be fine. I’m still in the process of getting this Node.js/Express.js application up and running, but if you are faced with the same challenge, hopefully this helped you.

Share Node.js code with JSApp.us

Node.js

JavaScript LogoJSApp allows you to write Node.js code in a browser, run it, and also share it with others

One of the things that makes front-end development so much fun is that you can easily create and share code. With tools such as JSFiddle, you can create an example web page and then send that JSFiddle URL to someone. Or you can even send someone the URL of a JavaScript file that you created so that they can just run $.getScript(yourJavaScriptURL) to inject your code in their page. And there are plenty of other clever ways to share / demo front-end code without a lot of fuss.

But what about Node?

Well, it’s not always so easy with Node, right? It’s server-side code, so you can’t just send someone a URL of your Node.js file to inject in their page. Github really saves the day in this case; you can create a public repo, and then send someone the Github repo URL. But that still requires the recipient to have at least git installed on their computer. And as we all know, once something takes more than 2 clicks, you start to lose your audience. That said, anyone with a reasonable attention span and a genuine interest in your code will follow the few clicks needed to clone your repo and run your code, but for quick little snippets, it sill feels like overkill sometimes.

For example, I like to write blog posts here about Node. In some cases, it does make sense to create a Github repo, especially if you have to leverage package.json, and the app requires file access, etc. But what about little examples? Just 10-20 lines of code to demonstrate a concept? Or even a simple working example?

Enter JS App!

When you navigate to jsapp.us, you immediately see some sample Node.js code. You can delete it and write your own. Then,  you simply click “test” in the sidebar (or CTRL + b), and a new browser window opens with your Node.js code running!

If you create a profile (free), you can save your code and share it with others. This is one of the most clever things I’ve seen in a long time. You can also go back and edit your files, re-name them, delete them. Really fun stuff.

If you need to create a quickie Node.js app and a Github repo would be overkill, JSApp might be just the tool you need. It’s been a while since I was this impressed but something I stumbled upon.

Bravo!

Getting Started with Gulp.js – Creating Multiple Tasks

Gulp.js

Gulp.js Logo
Learn how to create multiple Gulp.s tasks

In the article: “Getting Started with Gulp.js – Introduction,” I discussed the absolute basics needed to set up a Gulp.s task.  In that article’s gulpfile.js, we had only one task named “default”. One of the great features of Gulp, is that it will look for a task named “default”, and execute it automatically. This is fine if you have only one task, but as soon as you have two or more, it makes sense to give each one its own name.

When you have one or more named Gulp tasks, you’ll want to execute those tasks from the default task.

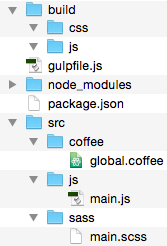
Figure # 1 – The folder structure before running Gulp

File structure - before

In Example # 1, you’ll see the folder structure before running gulp. So, if you look in the BUILD folder, you’ll see two sub-folders: JS and CSS. The file main.scss will be compiled into CSS and the output will go into the BUILD/CSS folder. The file: SRC/JS/main.js will be uglified and the output will go in the BUILD/JS folder. The file SRC/COFFEE/global.coffee will be compiled and the output will also go in the BUILD/JS folder.

Example # 1 – gruntfile.js

In Example # 1, we have the contents of gruntfile.js. You’ll notice that there are four tasks: default, uglify, sass and coffeescript. The default task is executed automatically. So that task simply executes the other three tasks.

How to Demo the Code Example

  1. Clone this repository: https://github.com/kevinchisholm/gulp-basics-tutorial-multiple-tasks
  2. Install node_modules with this command: npm install
  3. Run gulp: gulp
  4. Look in the following folder: BUILD/CSS, you will see the file: main.css
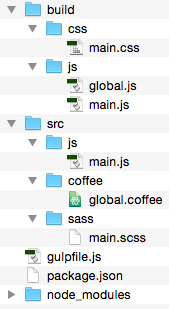
  5. Look in the following folder: BUILD/JS, you will see the files: main.js and global.js

Figure # 2 – The folder structure after running Gulp

File structure - after

Summary

One of the key features of Gulp is the ability to have a default task. This task is always executed by default. In this article, I demonstrated how to execute one or more named Gulp tasks from within the default task. While I chose to uglify JavaScript, compile SASS and compile coffeescript, you can create Gulp tasks for any need you might have. I hope that this article has made it easy for you to understand how to run multiple Gulp tasks.

Getting Started with Gulp.js – Introduction

Gulp.js

Gulp.js LogoLearn how to automate your front-end build process using this streaming build system
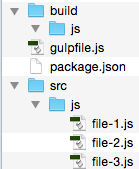
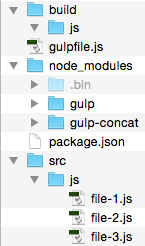
A while back, I posted an introduction to Grunt, the JavaScript task-runner. I also posted an article about the basics of concatenation and minification with Grunt. Grunt is an excellent tool, and still enjoys a large audience. That said, the most common complaint against Grunt is that its configuration-based syntax can become tedious and cryptic. In this article, I will introduce you to Gulp.js, an excellent streaming JavaScript built tool that has become quite popular in recent years. For this article, I will not discuss the details of installing Node or Gulp. There are plenty of articles available that will provide full details on that. Instead, I will provide a very gentle introduction to Gulp and how to create a simple Grunt task.

Code over configuration

Gulp’s success has to a large degree been based on the fact that it provides a powerful alternative to Grunt’s configuration-based approach. Gulp leverages actual JavaScript code in order to accomplish its tasks. With Gulp, you read files into memory, do things to the files, and then output the files from memory to a specified destination folder.

Easy Setup

Gulp is a node module. Installation and setup could not be simpler. On a very high-level, the steps needed are:

  1. Using npm (node package manager), install Gulp
  2. Create a file named: gulpfile.js or gulpfile.coffee (coffeescript)
  3. Execute the following command in a terminal: gulp

That’s it!

Gulp is simple

One of the things that amazed me most when first looking into Gulp was the fact that there are only four APIs. Yep, four. But there is a great deal of power lurking beneath the hood.

gulp.task – Defines a task
gulp.src – Reads files into memory
gulp.dest – Writes files from memory to disk
gulp.watch – Watches the files defined by gulp.src for changes

Note: The official Gulp documentation states that there are four APIs, but I find it odd that the .pipe method is not counted amongst these.

A Simple Example

I think many people might wonder: “…what would I use Gulp for?” A very common task in front-end tooling is concatenation; you may have three JavaScript files and want them to be combined into one JavaScript file that will be used in your web page. In this example, we will take three JavaScript files, concatenate them, and then output one file that consists of those three files.

Where to Get the Example Code

Clone this repository: https://github.com/kevinchisholm/gulp-basics-tutorial-introduction

Example # 1A – package.json

In Example # 1A, we have the contents of package.json. This file tells Node that we need the following modules: gulp, and gulp-concat.

Figure # 1: Project File Structure

Project File Structure

In Figure # 1, we have the folder structure of our first example. Notice that in the SRC/JS folder there are three JavaScript files. These are the files that we will concatenate into one file. The BUILD/JS folder is empty, but that is where the final concatenated file will be written.

Now, before going any further, let’s install the node modules which our code will need. Navigate to the example-1 folder with your terminal application and then execute the following command: npm install

When running npm install, you’ll notice some activity in the console (don’t worry about the “warn” message), and then there will be a “node_modules” folder. These are the node modules specified in package.json. npm has downloaded them for us and put them in the “node_modules” folder. A detailed explanation for npm and the “node_modules” folder is beyond the scope of this article. A few google searches on either topic will yield plenty of links for further reading.

Figure # 2: Project File Structure with “node_modules” folder.

Project file structure after installing node dependencies

In Figure # 2, you’ll see that we now have a “node_modules” folder. Let’s take a look at gulpfile.js.

gulpfile.js

This is the file where the Gulp code goes. Gulp does support Coffeescript, so gulpfile.coffee is also a valid file name, but for the sake of simplicity, I will only cover the JavaScript implementation.

Example # 1B – gulpfile.js

In Example # 1B, there are two things happening: First we create to variables, each representing a module that we need. Second, we create a gulp “task”. The gulp.task method takes two arguments: 1) a task name, which is a string, and 2) a callback function, which contains the code that defines the actual task. Here is where Gulp’s real power lies: a gulp task is driven by JavaScript code (i.e. code over configuration).

Returning a File Stream

A Gulp task always returns a file stream. This is to say that gulp will read a file into memory and you want to return that in-memory file object from your task’s callback function. In-between those two tasks, you “pipe” that file to one or more plugins that manipulate the file in some way.

gulp.src

In Example # 1B, we use the gulp.src method to read one or more files into memory. In this case, it is the three JavaScript files in our SRC/JS folder. We then chain the pipe method, passing a call to gulp.dest as an argument. The call to gulp.dest takes a string as its sole argument: the path to our output directory: BUILD/JS.

Executing the Gulp Task

In order to actually execute our Gulp task, simply type the following in your terminal: gulp

Yep, that’s it! Because our task is named “default”, we do not need to specify a task name. Gulp assumes that we want to run the “default” task, looks for it, and then executes it. Now when you look in the JS/BUILD folder, you should see three files: file-1.js, file-2.js, and file-3.js.

Figure # 3: Non-Concatenated Files in the BUILD/JS Folder.

Build output

In Figure # 3, you’ll see that there are now three files in the JS/BUILD folder.

You may be wondering why our output is three files, and not one concatenated file. This is because we did not actually concatenate the files inside of our task. In Example # 1, I wanted to demonstrate the basic flow of a Gulp task: using gulp.src to read files into memory, and then using gulp.dest to write those files from memory to disk. Now let’s update our Gulp task so that it actually concatenates the files.

Example # 2 A – Add the Contact Module to Our Gulp Task

In Example # 2 A, we have added a new line to our Gulp task: .pipe(concat(‘scripts-all.js’)). This line takes the in-memory files, pipes them to the concat module (which concatenates them into one file named: “scripts-all.js”), and returns that in-memory file. That’s really it. Now, navigate to the folder: “example-2” in your terminal, and then run Gulp again, so see the output: gulp

Figure # 4: Concatenated Files in the BUILD/JS Folder.

The concatenated JavaScript file

In Figure # 4, you’ll see that instead of three files, there is one file: scripts-all.js.

Example # 2 B – scripts-all.js

Example # 2B shows the contents of scripts-all.js. The details of the actual code are not important. What matters is that by piping the three source files to the concat module, our output is now one file that consists of the contents of all three source files.

Summary

The fact that there are only four APIs is a testament to the fact that Gulp.js is a simple yet powerful tool for running JavaScript tasks. There is a strong and growing community behind Gulp with thousands of existing plugins. The beauty of Gulp is that since it is code, you can leverage plain old JavaScript to make your gulpfile as powerful and efficient as needed. You are only limited by your imagination. While the examples in this article were very simple, there is a great deal of depth to Gulp and plenty of details / features that you can look into. I hope that this article was a helpful introduction and provided the tools you need to understand Grunt and easily start implementing it in your project.

Helpful Links for Gulp.js Basics

http://gulpjs.com/

https://github.com/gulpjs/gulp

https://www.npmjs.com/package/gulp

https://github.com/gulpjs/gulp/blob/master/docs/API.md

https://github.com/gruntjs/grunt-contrib-concat

https://www.codefellows.org/blog/quick-intro-to-gulp-js

What Are the Best Links for Learning About ECMAScript 6 ?

JavaScript

ECMAScript 6 LogoLike it or not, ECMAScript 6 is coming soon to a browser near you (and what’s not to like about that?). Learning about new additions to the specification is only a few clicks away.

Being in a “feature frozen” status since August of this year, ECMAScript 6 is on its path towards becoming a part of daily life. While the speed with which each browser manufacturer will implement these features will vary, adoption is inevitable.

I won’t waste pixels discussing why ECMAScript 6 is such a big deal. I’m assuming that you are aware of some of the more well-known features and are excited about them. But understandably, it can sometimes be difficult to decide where to jump in. I’ve gone through the tons of ECMAScript 6 bookmarks that have piled-up in my Google Docs and detailed the best ones below. This is by no means an exhaustive list; I tried to limit it to articles or videos that I felt were the most well-presented.

ECMAScript 6 Introduction

ECMAScript Language Specification ECMA-262 6th Edition – DRAFT

https://people.mozilla.org/~jorendorff/es6-draft.html

It doesn’t get much drier than this. But sometimes dry is good. There are many links out there that will be more enjoyable to read (and possibly more helpful), but when you really need to drill-down on a particular topic, the specification is always a source worth considering.

ECMAScript 6 with Kit Cambridge

Kit does a really nice job here. He starts out with a history of JavaScript that is worth the price of admission alone. Instead of just regurgitating key dates and facts, he helps you understand why the ECMAScript standard has evolved the way it has (did you know that ECMAScript 4 never survived beyond “draft” status?). He then prioritizes some of the less “sexy” features such as: the Spread operator, Default parameters, the Destructuring Assignment, Symbols and Generators. This guy is pretty young, but he is incredibly smart, super-technical, and presents himself very well.

Kit Cambridge, “EcmaScript Next: The Subtleties of ES 6” at W3Conf 2013

This is technically the same exact presentation as the previous video. But I must say, just like watching a good band perform the same song on two different occasions, it is still worth watching, even if you have seen the previous video.

Announcing Understanding ECMAScript 6 | NCZOnline

http://www.nczonline.net/blog/2014/03/26/announcing-understanding-ecmascript-6/

https://leanpub.com/understandinges6/read/

https://github.com/nzakas/understandinges6

OK, the first link is actually promoting his book: “Understanding ECMAScript 6”. But I wanted to include it because Nicholas C. Zakas is a JavaScript developer who is really worth listening to. I think the intro blog post is worth a read. The second link is where you can read the current state of the book.  The third link is the GitHub repository for the book, in case you want to follow his work in real-time.

Toward Modern Web Apps with ECMAScript 6 | Blog | Sencha

http://www.sencha.com/blog/toward-modern-web-apps-with-ecmascript-6/

Ariya Hidayat presents a clear and well-thought-out overview of some of ECMAScript 6’s most exciting features.

ECMAScript 6 Features

While there is much to shout about, it can also be a bit overwhelming. Here are the ECMAScript 6 features you are most likely to experiment with, or be asked about in an interview.

Arrow Functions

Functions have gotten a significant injection of new functionality: Greater control over lexical “this” binding and streamlined syntax.

Arrow functions – JavaScript | MDN

https://developer.mozilla.org/en-US/docs/Web/JavaScript/Reference/Functions/Arrow_functions

ECMAScript Wiki – Arrow Functions

http://tc39wiki.calculist.org/es6/arrow-functions/

Understanding ECMAScript 6 arrow functions | NCZOnline

http://www.nczonline.net/blog/2013/09/10/understanding-ecmascript-6-arrow-functions/

Kevin Chisholm – Blog

http://blog.kevinchisholm.com/javascript/ecmascript-6/getting-started-with-ecmascript-6-arrow-functions-basic-syntax/

http://blog.kevinchisholm.com/javascript/ecmascript-6/getting-started-with-ecmascript-6-arrow-functions-parameters/

http://blog.kevinchisholm.com/javascript/ecmascript-6/getting-started-with-ecmascript-6-arrow-functions-the-this-keyword/

Block-Level Scope

Learn about how the new “let” and “const” keywords break the “functions-only” paradigm with regard to managing scope.

https://developer.mozilla.org/en-US/docs/Web/JavaScript/Reference/Statements/let

http://www.sitepoint.com/preparing-ecmascript-6-let-const/

Rest parameters

If you’ve ever written a function that needs to take a variable number of arguments, you’ve probably used the Array.prototype.slice.call approach to convert the arguments object into a true array, or designed the function so that it expects an array. ECMAScript 6’s Rest Parameters removes this pain and makes for more concise code.

Rest parameters – JavaScript | MDN

https://developer.mozilla.org/en-US/docs/Web/JavaScript/Reference/Functions/rest_parameters

Default and Rest Parameters in ES6

http://www.htmlxprs.com/post/24/es6-functions-default-and-rest-parameters

ECMAScript 6 and Rest Parameter

http://ariya.ofilabs.com/2013/03/es6-and-rest-parameter.html

Spread Operator

A yang to the Rest Parameter’s ying, the Spread Operator allows you to pass the elements of an array to a function as individual arguments in one shot, without the need to iterate that array.

Spread operator – JavaScript | MDN

https://developer.mozilla.org/en-US/docs/Web/JavaScript/Reference/Operators/Spread_operator

ECMAScript 6 and Spread Operator

http://ariya.ofilabs.com/2013/03/es6-and-spread-operator.html

Classes

Although constructors provide a way to implement classes JavaScript, ECMAScript 6 introduces a syntax that more closely resembles languages such as Java and PHP, not only in the way you create a class, but also in how you inherit from it.

An introduction to ES6 classes

http://javascriptplayground.com/blog/2014/07/introduction-to-es6-classes-tutorial/

Use ECMAScript 6 Today – Tuts+ Code Article

http://code.tutsplus.com/articles/use-ecmascript-6-today–net-31582#class