 Learn how to automate your front-end build process using this streaming build system
A while back, I posted an introduction to Grunt, the JavaScript task-runner. I also posted an article about the basics of concatenation and minification with Grunt. Grunt is an excellent tool, and still enjoys a large audience. That said, the most common complaint against Grunt is that its configuration-based syntax can become tedious and cryptic. In this article, I will introduce you to Gulp.js, an excellent streaming JavaScript built tool that has become quite popular in recent years. For this article, I will not discuss the details of installing Node or Gulp. There are plenty of articles available that will provide full details on that. Instead, I will provide a very gentle introduction to Gulp and how to create a simple Grunt task.
Code over configuration
Gulp’s success has to a large degree been based on the fact that it provides a powerful alternative to Grunt’s configuration-based approach. Gulp leverages actual JavaScript code in order to accomplish its tasks. With Gulp, you read files into memory, do things to the files, and then output the files from memory to a specified destination folder.
Easy Setup
Gulp is a node module. Installation and setup could not be simpler. On a very high-level, the steps needed are:
- Using npm (node package manager), install Gulp
- Create a file named: gulpfile.js or gulpfile.coffee (coffeescript)
- Execute the following command in a terminal: gulp
That’s it!
Gulp is simple
One of the things that amazed me most when first looking into Gulp was the fact that there are only four APIs. Yep, four. But there is a great deal of power lurking beneath the hood.
gulp.task – Defines a task
gulp.src – Reads files into memory
gulp.dest – Writes files from memory to disk
gulp.watch – Watches the files defined by gulp.src for changes
Note: The official Gulp documentation states that there are four APIs, but I find it odd that the .pipe method is not counted amongst these.
A Simple Example
I think many people might wonder: “…what would I use Gulp for?” A very common task in front-end tooling is concatenation; you may have three JavaScript files and want them to be combined into one JavaScript file that will be used in your web page. In this example, we will take three JavaScript files, concatenate them, and then output one file that consists of those three files.
Where to Get the Example Code
Clone this repository: https://github.com/kevinchisholm/gulp-basics-tutorial-introduction
Example # 1A – package.json
|
|
{ "name": "gulp-basics-tutorial-example-1", "version": "1.0.0", "devDependencies": { "gulp": "^3.8.11", "gulp-concat": "2.5.2" } } |
In Example # 1A, we have the contents of package.json. This file tells Node that we need the following modules: gulp, and gulp-concat.
Figure # 1: Project File Structure
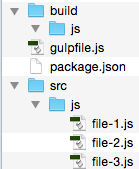
In Figure # 1, we have the folder structure of our first example. Notice that in the SRC/JS folder there are three JavaScript files. These are the files that we will concatenate into one file. The BUILD/JS folder is empty, but that is where the final concatenated file will be written.
Now, before going any further, let’s install the node modules which our code will need. Navigate to the example-1 folder with your terminal application and then execute the following command: npm install
When running npm install, you’ll notice some activity in the console (don’t worry about the “warn” message), and then there will be a “node_modules” folder. These are the node modules specified in package.json. npm has downloaded them for us and put them in the “node_modules” folder. A detailed explanation for npm and the “node_modules” folder is beyond the scope of this article. A few google searches on either topic will yield plenty of links for further reading.
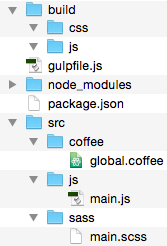
Figure # 2: Project File Structure with “node_modules” folder.
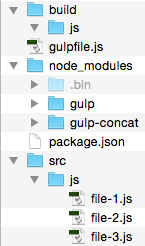
In Figure # 2, you’ll see that we now have a “node_modules” folder. Let’s take a look at gulpfile.js.
gulpfile.js
This is the file where the Gulp code goes. Gulp does support Coffeescript, so gulpfile.coffee is also a valid file name, but for the sake of simplicity, I will only cover the JavaScript implementation.
Example # 1B – gulpfile.js
|
|
//get references to the two modules that we need var gulp = require('gulp'), concat = require('gulp-concat'); //create a default gulp task gulp.task('default', function() { //return the file stream return gulp //read the files into memory .src(['src/js/file-1.js','src/js/file-2.js','src/js/file-3.js']) //write the files from memory to disk .pipe(gulp.dest('build/js')); }); |
In Example # 1B, there are two things happening: First we create to variables, each representing a module that we need. Second, we create a gulp “task”. The gulp.task method takes two arguments: 1) a task name, which is a string, and 2) a callback function, which contains the code that defines the actual task. Here is where Gulp’s real power lies: a gulp task is driven by JavaScript code (i.e. code over configuration).
Returning a File Stream
A Gulp task always returns a file stream. This is to say that gulp will read a file into memory and you want to return that in-memory file object from your task’s callback function. In-between those two tasks, you “pipe” that file to one or more plugins that manipulate the file in some way.
gulp.src
In Example # 1B, we use the gulp.src method to read one or more files into memory. In this case, it is the three JavaScript files in our SRC/JS folder. We then chain the pipe method, passing a call to gulp.dest as an argument. The call to gulp.dest takes a string as its sole argument: the path to our output directory: BUILD/JS.
Executing the Gulp Task
In order to actually execute our Gulp task, simply type the following in your terminal: gulp
Yep, that’s it! Because our task is named “default”, we do not need to specify a task name. Gulp assumes that we want to run the “default” task, looks for it, and then executes it. Now when you look in the JS/BUILD folder, you should see three files: file-1.js, file-2.js, and file-3.js.
Figure # 3: Non-Concatenated Files in the BUILD/JS Folder.
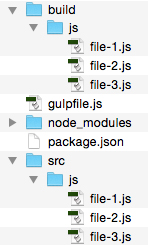
In Figure # 3, you’ll see that there are now three files in the JS/BUILD folder.
You may be wondering why our output is three files, and not one concatenated file. This is because we did not actually concatenate the files inside of our task. In Example # 1, I wanted to demonstrate the basic flow of a Gulp task: using gulp.src to read files into memory, and then using gulp.dest to write those files from memory to disk. Now let’s update our Gulp task so that it actually concatenates the files.
Example # 2 A – Add the Contact Module to Our Gulp Task
1 2 3 4 5 6 7 8 9 10 11 12 13 14 15 16 17 18 19 20 21 22 23 24 25 26 27 28 29 30 |
var gulp = require('gulp'), concat = require('gulp-concat'); gulp.task('default', function() { return gulp .src(['src/js/file-1.js','src/js/file-2.js','src/js/file-3.js']) .pipe(gulp.dest('build/js')); }); //get references to the two modules that we need var gulp = require('gulp'), concat = require('gulp-concat'); //create a default gulp task gulp.task('default', function() { //return the file stream return gulp //read the files into memory .src(['src/js/file-1.js','src/js/file-2.js','src/js/file-3.js']) //pipe the file to the contact module, //which creates one concatenated file .pipe(concat('scripts-all.js')) //write the files from memory to disk .pipe(gulp.dest('build/js')); }) |
In Example # 2 A, we have added a new line to our Gulp task: .pipe(concat(‘scripts-all.js’)). This line takes the in-memory files, pipes them to the concat module (which concatenates them into one file named: “scripts-all.js”), and returns that in-memory file. That’s really it. Now, navigate to the folder: “example-2” in your terminal, and then run Gulp again, so see the output: gulp
Figure # 4: Concatenated Files in the BUILD/JS Folder.
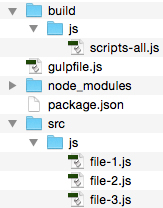
In Figure # 4, you’ll see that instead of three files, there is one file: scripts-all.js.
Example # 2 B – scripts-all.js
|
|
(function(){ window.getLocation = function(){ return window.location; }; })(); (function(){ window.getNavigator = function(){ return window.navigator; }; })(); (function(){ window.getSearch = function(){ return window.location.search; }; })(); |
Example # 2B shows the contents of scripts-all.js. The details of the actual code are not important. What matters is that by piping the three source files to the concat module, our output is now one file that consists of the contents of all three source files.
Summary
The fact that there are only four APIs is a testament to the fact that Gulp.js is a simple yet powerful tool for running JavaScript tasks. There is a strong and growing community behind Gulp with thousands of existing plugins. The beauty of Gulp is that since it is code, you can leverage plain old JavaScript to make your gulpfile as powerful and efficient as needed. You are only limited by your imagination. While the examples in this article were very simple, there is a great deal of depth to Gulp and plenty of details / features that you can look into. I hope that this article was a helpful introduction and provided the tools you need to understand Grunt and easily start implementing it in your project.
Helpful Links for Gulp.js Basics
http://gulpjs.com/
https://github.com/gulpjs/gulp
https://www.npmjs.com/package/gulp
https://github.com/gulpjs/gulp/blob/master/docs/API.md
https://github.com/gruntjs/grunt-contrib-concat
https://www.codefellows.org/blog/quick-intro-to-gulp-js
 Simplify Your Web Scraping with Scraper API. This library allows you to get up-and-running fast and provides impressive features.
 When it comes to the UI, file uploads are pretty simple. But on the back-end, there is some work to do. Multer is a Node.js module that simplifies this process.



 AWS’s Node deployment keeps telling me that it cannot find package.json, but it’s there! – Fortunately, this problem is easily solved.


 Learn how to automate your front-end build process using this streaming build system


 If you are just getting started with server-side JavaScript, “Node for Front-End Developers” offers a fast, high-quality introduction.
 Combine multiple JS files into one using JavaScript, Node.js and Grunt.


