Book Review: Node for Front-End Developers, by Garann Means

Node.js

Node for Front-End Developers, by Garann Means - CoverIf you are just getting started with server-side JavaScript, “Node for Front-End Developers” offers a fast, high-quality introduction.

The ubiquity of front-end JavaScript is undeniable. Not only has the appetite for web-based content increased dramatically, but so has the appetite for sophisticated user interfaces. More and more, visitors expect web-based content to offer complex interaction and high-performance. The explosion of mobile device use has only exacerbated this dynamic. Ryan Dahl’s Node.js turned the whole concept of JavaScript on its head by providing an open-source tool that allows the language to be leveraged on the server-side, significantly expanding the potential of this language.

Node for Front-End Developers, by Garann Means is a fast introduction to this incredibly powerful technology. The concept of creating a web-server provides a door through which clear and concise explanations present the basic concepts of server-side JavaScript. I found it particularly helpful that for such a short book, topics such as the query string, post data, path data routing, asynchronous events, templating, databases and MVC are well handled.

The book’s length is deceptive; readers will find a wealth of useful information here. While each topic represents a thread that deserves further reading, anyone who is new to Node.js will find Ms. Means’ introduction helpful. Her writing style is both relaxed and professional. From using NPM to install modules, to real-time communication with WebSockets, Node for Front-End Developers offers a range that is just enough to excite the reader, yet never too much detail. Any of the examples can be typed into your favorite text editor and fired-up with minimal effort. This is critical when delving into a new topic, and makes your introduction to Node.js disarming and fun.

  • Title: Node for Front-End Developers
  • Author: Garann Means
  • Publisher: O’Reilly Media
  • Date Published: February 7, 2012
  • Language: English
  • ISBN-10: 1449318835
  • ISBN-13: 978-1449318833

Making a Simple HTTP Server with Node.js – Part IV

Node.js

Node.js Logo

Setting the right value for the “Content-Type” header is a critical task for any web server

In Part III of this series, we built out our Node.js server to serve up any file that is requested, or gracefully return a 404 / “Not Found” header, as well as a custom HTML page informing the user that the requested file was not found. But the only problem is that we are not setting headers for each request. So, it’s important that HTML, CSS, JavaScript and image file, have the appropriate “Content-Type” header set.

In order to demonstrate all of this, we will include a CSS file and a JavaScript file in our web page. I won’t bother including the CSS file in an example; it’s just some silly CSS… nothing too interesting. But I will include the source of our JavaScript file in Example # 1, just so we can see that the second blue box in the web page is created via JavaScript.

TO SAVE TIME, THE FULL WORKING VERSION OF THE CODE EXAMPLES CAN BE CLONED HERE: HTTPS://GITHUB.COM/KEVINCHISHOLM/SIMPLE-HTTP-SERVER-WITH-NODE-PART-IV

Example # 1

Example # 1 simply shows the contents of the JavaScript file: “script.js” that we will request in our pages.

Example # 2

Example # 2 is the source code for index.html.

Example # 3

Example # 3 is the source code for about.html, a second web page that we can request from our Node.js web server.

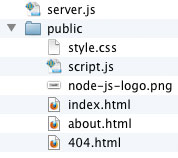
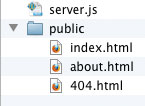
Before we go any further, let’s take a  moment to discuss the folder structure. Just as in Part III of this series, the folder that our server.js file sits in has a sub-folder named “public”. This is where our assets will go. It is this “public” folder that the world will have access to and all requested files will be in there. See Figure # 1.

Folder structure
Figiure 1: The folder structure for this article’s example.

Example # 4

In Example # 4, we have a JavaScript object that contains a list of mime-types that we will support. Each of the object’s properties represents a file extension that we plan to support, and the corresponding value is the mime-type string that will be used for the “Content-Type” header.

Example # 5

In Example # 5, we have added a new line to the variable declarations for the requestHandler() function. The variable “ext” contains a string copy of the requested file’s extension (e.g. “.html” for a web page, “.js” for a JavaScript file, and so on). So we will use that string to check all properties of the “extensions” object from Example # 4. Don’t worry if you feel like you are getting lost; we’ll piece everything together nicely at the end. For now, just know that we have so far provided a hard-coded list of file extensions that we will allow, and the mime-type string values for each one, and we have the variable: “ext” that tells us what the file type is.

Example # 6

In Example # 6, we see if the extensions object has a property that matches the value of the “ext” variable. If not, we write a 404 header, and return a simple HTML page, informing the user that the requested file type is not supported.

Example # 7

In Example # 7, we add a new argument to the getFile() function call. We pass-in the value of the property in the extensions object that matches the file extension of the user’s request. In a nutshell, we are telling the getFile() function what type of mime-type to set in the response header.

Example # 8

In Example # 8, we have expanded the res.writeHead() function call. Where previously we only set the 200 / “OK” response code, we now set the “Content-Type” and “Content-Length” headers. The “Content-Type” property is mapped to the value of the mimeType variable, which was passed-in as an argument to the function. So the fruits of our labor in this article all become apparent in this example. The value of the mimeType variable will be set accordingly, for the file type.

Example # 9

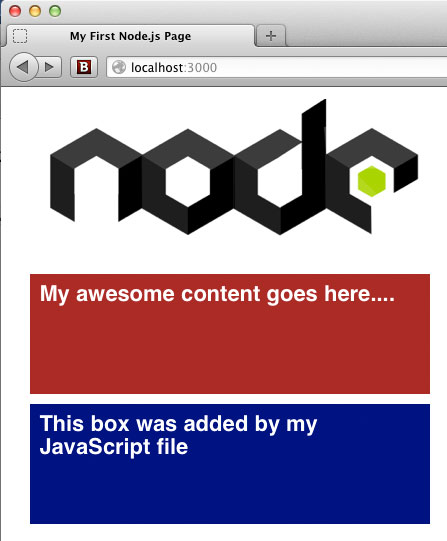
Example # 9 is a complete code-listing for this article. In Figure # 2, we see the results of http://localhost:3000/index.html. So, as you can see, we are serving not only HTML, but also an image file, a CSS file and a JavaScript file. The JavaScript file dynamically creates the blue box you see on page load (simply to demonstrate that our JavaScript file is served correctly from our Node.js web server, and works).

index.html page
Figure # 2: Our index.html page.

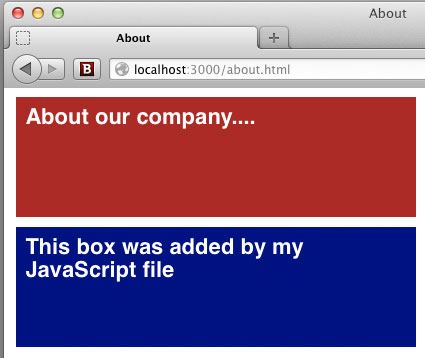
In Figure # 3, we see that our “about.html” page works, and also pulls in the CSS and JavaScript files with no problems.

about.html
Figure # 3: about.html

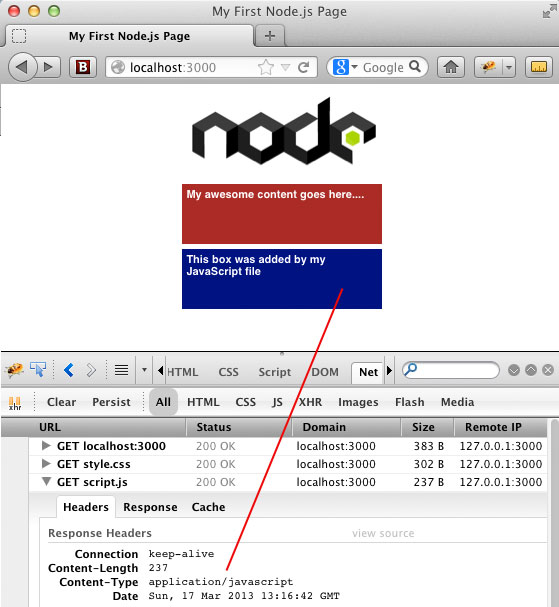
In Figure # 4, we inspect the JavaScript file call in the “net” tab of FireBug and can see that the “Content-Type” header is set accordingly.

The FireBug
Figure # 4: Inspecting the call to script.js in FireBug’s “net” panel

Summary

In this article we learned how to set the appropriate “Content-Type” header for each request, based on the file extension of the requested file. We demonstrated how to use the extname() method of the path module, to return the extension of the requested file. We also applied some logic, to handle scenarios in which the requested file-type is not supported.

Helpful Links for the Node.js path module

http://nodejs.org/api/path.html

http://docs.nodejitsu.com/articles/file-system/how-to-use-the-path-module

Helpful Links for HTTP header fields

http://en.wikipedia.org/wiki/List_of_HTTP_header_fields

http://www.w3.org/Protocols/rfc2616/rfc2616-sec14.html

Helpful Links for mime-types

http://en.wikipedia.org/wiki/MIME_type

http://en.wikipedia.org/wiki/MIME

Making a Simple HTTP Server with Node.js – Part III

Node.js

Node.js LogoIn Part II of this series: Making a Simple HTTP Server with Node.js – Part II we learned how to use the “path” and “file system” modules. By leveraging these Node.js modules, we were able to read the path of the HTTP request that our server received, and read from the file system of the web server. We also learned about the “__dirname” keyword, which provides an abstract reference to the folder in which the currently executing JavaScript file exists.

That version of our HTTP server simply checked to see if the request was for the file “index.html”, and if so, served it up. That was progress over Part I, but still not robust enough.

In this article, we will expand our Node.js HTTP server so that the following services are provided:

  • If an asset is requested, and it exists, it will be returned
  • If an asset is not specified, then “index.html” will be returned
  • If an asset is requested, and it does not exist, our custom 404.html page will be returned

We will make every effort to keep our three-step paradigm, which will, we hope, continue to illustrate that creating an HTTP web server with Node.js is at its core, quite simple. What we have to take a closer look at, is the fact that, as we ask more of our little web server, we have to roll up our sleeves and write the code that provides that very functionality.

So the good news is: It’s just more JavaScript. Yay!

Example # 1

In Example #1, we have the three-step core of our HTTP web server. We have already discussed each step in detail, so let’s just quickly re-cap:

Step # 1: Use the require() method to gain access to the Node.js modules that we need
Step # 2: Use the createServer() method of the HTTP module, and pass it a reference to our “requestHandler” function
Step # 3: Listen for a request on port # 3000

Simple, simple, simple.

Next, let’s look at two functions: our updated requestHandler() function, and then our new getFile() function.

Example # 2

In Example # 2, we first look at the request, and if no file was requested (i.e. the user simply typed http://somedomain.com into their browser), then we prepare to serve up “index.html”.

As we learned in Part II, the __dirname keyword provides an abstract reference to the folder in which the currently executing JavaScript file resides. We then create a variable named “page404”, which will provide a reference to our custom “404 / Not Found” page, should we need it.

Now we have everything we need, so we call the getFile() function, passing it the path and name of the asset we want (i.d. index.html), the response object, and then the reference to our custom 404 page.

Example # 3

In Example # 3, there are some new things happening. First, we use the exists() method of the file system object that was returned by the “fs” module, and assigned to our variable: “fs”. This method takes two arguments: a path to the file, and an anonymous function. That anonymous function takes one argument: “exists” (call it whatever you like). That single argument provides a helpful “truthy/falsy” flag against which we can test.

Folder Structure
The folder structure of this article’s example code

So if you take a moment to think about this, you’ll find that it’s quite cool: baked into the Node.js “fs” module is a method that simply tells us whether or not a named file exists. This is a perfect example of the brilliance of Node.js modules. Imagine how much heavy lifting you’d have to do if you needed to provide this kind of implementation yourself. Fortunately, someone did it for you. And that module can be used over and over again… a zillion more times if you like.

So moving along, if the “exists” argument returns a “truthy” value, we use the fs.readFile() method to literally read the physical file from the local file system. We have a little error checking to make sure that the file read operation did not fail, and if it did not fail, we send the contents of that file back to the user.

If the requested file was not found (i.e. the “exists()” method told us that the named file does not exist), then we serve up the custom 404.html file that we still have a reference to.

Example # 4

Example # 4 simply puts all our code examples together, to provide some context.

Summary

In this article we expanded our simple Node.js HTTP web server. We leveraged the exists() method of the “fs” (file system) object, to determine if the requested file actually exists, and provided logic that handles cases in which the requested file does not exist.

Helpful Links for the Node.js path and fs Modules

http://nodejs.org/api/fs.html

https://github.com/jprichardson/node-fs-extra

http://docs.nodejitsu.com/articles/file-system/how-to-write-files-in-nodejs

Making a Simple HTTP Server with Node.js – Part II

Node.js

Node.js Logo

OK, enough “Hello World!” Let’s serve up an HTML file, dagnabbit.

In Part I of this series: “Making a Simple HTTP Server with Node.js – Part I“, we learned the bare-bones steps needed to create an HTTP server with Node.js. While it was fun to see our text message make its way from our server-side JavaScript file, at the end of the day we sent a hard-coded text message. Not too sexy.

In this article, we will invite the user to type “index.html” into their browser window and prepare to be amazed. Ok, the user has to be on your local DEV machine, and type “http://localhost:3000/index.html”, but we have to start somewhere, right?

Example # 1

There are a few new things happening in Example # 1, when compared to the examples from Part I of this series. The biggest change is that we’ve expanded “Step # 1” and are requiring two new Node.js modules: “path” and “fs”.

The “path” module provides a number of methods that help you to examine and parse file paths. The “fs” module is short for “File System”. This module provides access to the file system. So here is where the fun stuff starts: Writing JavaScript that has access to the local file system? Yep. You bet. We have not even begun to scratch the surface of what is possible.

Next, our helper function has grown a bit as well. We use the basename() method of the path module to return the name of the file that was requested by the user (i.e. index.html). We then leverage the “__dirname” keyword, which provides a quick and easy handle to the folder that your server-side JavaScript file resides in.

After that, we check to see if the user has requested “index.html”, and if so we will return it. The fs.fileRead() method takes two arguments: a path to the physical file that we want to return to the user, and an anonymous function. That anonymous function takes two arguments: an error object, and the content of the file that is to be returned. So just to play it safe, we check to see if there is an error: if ( !err ). If there is none, then we use the res.end() method to return the contents of index.html and then close the request. If there was an error, for now we are piping it to the console for our own troubleshooting.

If none of that worked out, then we set a “404 / Not Found” header, and send some markup back, letting the user know. Step # 2 and Step # 3 haven’t changed since our last article: Create the server, and then listen for a request.

Phew!

That was a lot, but our Node.js HTTP server has grown up quite a bit. Instead of just sending back a plain text message or some hard-coded HTML, we are now serving up an actual HTML file. We could change that file any time, which would change what the user sees in the browser. It’s not exactly Facebook, but hey, we are creating an HTTP web server using nothing but JavaScript!

For Part III, we will smarten things up and enhance our server so that it will serve up any static content that is requested.

Summary

In this article we learned how to use the “path” and “file system” Node.js modules. By leveraging the modules, we were able to read the path of the HTTP request, and read from the file system. We also learned about the “__dirname” keyword.

Helpful Links for the Node.js path and fs Modules

http://nodejs.org/api/path.html

http://docs.nodejitsu.com/articles/file-system/how-to-use-the-path-module

http://nodejs.org/api/fs.html

http://jspro.com/nodejs/accessing-the-file-system-in-node-js/

http://docs.nodejitsu.com/articles/file-system/how-to-read-files-in-nodejs

Making a Simple HTTP Server with Node.js – Part I

Node.js

Node.js LogoThe beauty of creating an HTTP server with Node.js is that you are doing so using a language that you already know: JavaScript.

If you work with JavaScript, then you’ve probably heard about Node.js. What makes Node.js such an amazing technology is that it turns web-development on its head: a historically client-side language is now being used as a server-side language. I’m sure I don’t have to tell you how insanely cool this is.

When I first started looking at Node.js, my first question was: “Ok, server-side JavaScript. Got it. So what the heck can I do with it?”

Short answer: A lot.

Probably the most obvious and easiest to comprehend application for Node.js is to make a web server. Node handles all the low-level ugliness and let’s you just write code. The code you write is not too much different than the client-side JavaScript that you are used to. The biggest differences come in when you start to realize that you have access to the file system. You can do things with Node that are completely off-limits on the client side. When it comes to creating a simple HTTP server, the amount of code you need to write for proof of concept is amazingly minimal. The examples that follow are very basic. They don’t offer any real-world usefulness, but they do illustrate the small amount of effort needed to get up and running. In Part II of this series, we will look at more realistic HTTP server code for Node.js.

Example # 1 A

In Example # 1, we have the absolute bare minimum needed to set up an HTTP web server using Node.js. The very first line tells Node.js that we need to use the “http” module. Using Node’s “require” method, we assign the return value of the “HTTP” module to the variable “http”. This was Step # 1.

(A detailed discussion of the require() method is beyond the scope of this article, but a topic that plays an important role in Node.js. If you are not familiar with the Modules/AsynchronousDefinition proposal from Common.js, I highly recommend reading up on that topic. For any client or server-side JavaScript developer, it’s a biggie.)

The only part that might seem a bit confusing to some is the callback that is passed into the createServer() method. This callback is executed each time the server receives an HTTP request.

For Step # 2, we call the createServer() method of the http object. We pass that method an anonymous function which takes two arguments: the request object and the response object. Inside of that anonymous function, we use the writeHead() method of the response object, to set the server’s response of “200 ok” to the client’s browser, and set the header of “Content-type” to “text/plain”. Next, we call the end() method of the response object. The end() method closes the response to the client. It can also send output to the client. We pass in a string as an argument in this example, and that string is sent to the client’s browser.

For Step # 3, we call the listen() method on the return value of the createServer() method. We pass in “3000”, which tells Node.js to listen on port # 3000.

If you run this code in Node.js, and then in your browser, “type localhost:3000”, you will see the following in your browser: “Your node.js server is running on localhost:3000.”

Whew! The explanation for Example # 1A took much longer to write than the actual code!

As you can see, it’s pretty easy to create an HTTP server with Node.js. In my opinion, the only part that might seem a bit confusing to some is the callback that is passed into the createServer() method. This callback is executed each time the server receives an HTTP request. It might make things easier to understand if we move the guts of that callback to its own function, and then pass that function declaration as the callback to the createServer() method.

Example # 1 B

In Example # 1B, we create a function declaration named requestHandler. Then we pass that function as the sole argument to the createServer() method. I believe that if you are new to Node.js, you’ll find it is easier to see what is going on, because the createServer() method is all on one line.

Example # 1 C

In Example # 1C, we’ve refactored our code to make things even simpler. First, our helper function processes the HTTP request, then Step 1, Step 2 and Step 3. Bing, Bang, Boom. Simple stuff.

Example # 2 A


In Example # 2A, we’ve upgraded our message to the client’s browser to include some HTML. After all, HTML is what we will really want to serve, right? The only problem is that Node is not parsing the HTML. When you run this example in your browser, you see the HTML tags in the response. That is not what we want. What is happening?

The problem is in the header that we are setting with the res.writeHead() method call. The value of the “Content-Type” header is “text/plain”. So, Node just passes all the text along as… well, plain old text.

Example # 2 B

In Example # 2B, we have changed the value of the “Content-Type” header to “text/html”. If you run this example in your browser, you will see that Node sends the string as HTML, so our H1 and UL elements are rendering as they should in the browser.

Example # 3

In Example # 3, we take things a bit further. Up until now, we have been using the res.end() method to do two things: send some text or HTML to the client’s browser, and then close the response. In this example, we use the res.write() method to send our HTML to the client’s browser, and the end() method is used only to close the request.

We’ve also introduced some logic into our code. While what this example accomplishes is very little, and has virtually no real-world value, it demonstrates that while we have created an HTTP server, we have done so with JavaScript, and we already know the JavaScript language. So, we can do something like create a for/loop block, and use that loop to provide some dynamic HTML output. Again, this “dynamic” aspect of our code is not very impressive, but I think you get the point: it’s just JavaScript, so the sky’s the limit.

Summary

In this article, we learned how to create a simple HTTP server using Node.JS. We covered the three most basic steps needed, which include requiring the HTTP module, calling the createServer() method, and then telling the server to listen for an HTTP request. Finally, we learned how the server executes a callback function for each HTTP request it receives, and the most basic things that need to happen inside of that callback.

Helpful Links for creating a simple Node.js HTTP Server

http://nodejs.org/

http://docs.nodejitsu.com/articles/HTTP/servers/how-to-create-a-HTTP-server

http://www.youtube.com/watch?v=jo_B4LTHi3I

http://stackoverflow.com/questions/6084360/node-js-as-a-simple-web-server

http://www.nodebeginner.org/

Google’s First Production Server Rack, Circa 1998

Internet
Google's first production server rack, circa 1998
Google’s first production server rack, circa 1998

Hard to believe, but a mere “fifteen years ago….” this little Frankenstein rack was the heart and soul of Google’s entire operation… at least for a minute or two

One recent rainy night when the home shopping network was showing re-runs, I stumbled across this:

http://en.wikipedia.org/wiki/Google_platform

There’s plenty of light reading in there if you feel you want to melt your own brain. But what immediately caught my attention was the photo: “Google’s first production server rack, circa 1998.” The fact that it’s a high-resolution image makes it even more fun because you can see quite a bit of detail. I’m not much of a hardware guy, so I won’t even begin to talk about that twisty-curvy menagerie of RJ-45 cables that go from top-to-bottom and left-to-right, but as you can see, this little pile of moving parts was “doing something.”

It’s amazing to think that a mere 15 years ago, this was the heart of Google. I don’t know how many people were actually using Google search in 1998, but someone was. And that someone (and I’m sure plenty of others) hit this server. If you look at the specs, you’ll find some pretty serious beefcake for 1998, but in hindsight, amazingly low-tech by today’s standards.

From the WikiPedia Page:

  • Sun Ultra II with dual 200 MHz processors, and 256 MB of RAM.
  • 2 × 300 MHz Dual Pentium II Servers, they included 512 MB of RAM and 10 × 9 GB hard drives between the two.
  • F50 IBM RS/6000 donated by IBM, included 4 processors, 512 MB of memory and 8 × 9 GB hard drives.
  • Two additional boxes included 3 × 9 GB hard drives and 6 x 4 GB hard drives respectively
  • IBM disk expansion box with another 8 × 9 GB hard drives.
  • Homemade disk box which contained 10 × 9 GB SCSI hard drive.

Just a quick glance over those details and you get the impression that considering this was 1998, this little jimmy was put together by some pretty clever folks. It’s starting, and a little surreal, to realize that the internet has been around long enough for terms like “ten years ago…” and “fifteen years ago…” to be tossed about. Needless to say, Google has gone on to take over the world, and most folks use it for their searches (or at least plenty of folks do).