Scraper API – An Introduction

Web Scraping

scraper apiSimplify Your Web Scraping with Scraper API. This library allows you to get up-and-running fast and provides impressive features.

Web Scraping can be challenging. While you can certainly leverage a module such as Axios and handle the details yourself, sometimes it is better to stand on the shoulders of giants.

Scraper API is a giant. This multi-language product makes basic to advanced web scraping a breeze. Scraper API supports Bash, Node, Python/Scrapy, PHP, Ruby and Java. It also features Rendering Javascript, POST/PUT Requests, Custom Headers, Sessions, the ability to specify a Geographic Location and Proxy Mode.

In this article, we will cover basic usage and rendering Javascript. All of the code examples leverage Node.js in order to demonstrate Scraper API.

package.json

Above we have the package.json needed in order to run our application. The only detail we need to concern ourselves with is the inclusion of the scraperapi-sdk NPM module in the dependencies section.

The Web Page to Be Scraped

In the example above, we have the HTML for the web page that we will scrape using the Scraper API. It is important to note that the content mainly contains the paragraph: “I’ve been scraped!”. But, if you visit the target URL: http://examples.kevinchisholm.com/scrape-me, you will see the text: “This text was added with JavaScript.” The reason for this is: there is a JavaScript file that is being executed in the page. That script looks for the element with the ID:”Main” and then replaces the HTML text “I’ve been scraped!” with “This text was added with JavaScript.” This is an important detail that we will touch upon in the next two examples.

Basic Scraper API Usage

Example # 1-A

Example # 1-A is where the web-scraping begins. We set the variable scraperapiClient, which is a reference to the imported scraperapi-sdk NPM module. The reason we have created a scrapePage() function, is that we want to use the JavaScript await expression, so that our script will pause until the asynchronous call to the Scraper API client returns.

Let’s break-down what is happening here:

  1. We set the scrapeUrl variable, which is the page to be scraped.
  2. We set the scrapeResponse variable, which will be the HTML returned when we scrape the page.
  3. We call the scraperapiClient.get() method, passing it the scrapeUrl variable (the page to be scraped).
  4. We use console.log to output the HTML returned from the scraped page (the scrapeResponse variable).

NOTE: See Example # 1-B below for a discussion of the HTML that is returned from the scraped page.
Example # 1-B

In Example # 1-B, we see the HTML that is returned from the scraped page. Ironically, there is not too much to discuss here: the HTML is 100% identical to the actual HTML that was in the web page. This demonstrates the simplicity and power of the Scraper API. In other words: you get exactly what you ask for: the HTML of the URL that you pass to Scraper API.

NOTE: Earlier we discussed the fact that the HTML content is: “I’ve been scraped!”, but what we seen when you visit the URL is: “This text was added with JavaScript.” In the next example, we will discuss the reason for this.

Rendering Javascript

Example # 2-A

Example # 2-A is identical to the code in Example # 1-A with one exception: When we call scraperapiClient.get(), we pass a 2nd argument: {render: true}. This 2nd argument, tells Scraper API to wait until the JavaScript in the page has finished executing. The benefit of this is demonstrated in Example # 2-B: If JavaScript alters the page content, then the HTML that we get back includes the changes that the JavaScript has implemented.

Example # 2-B

In Example # 2-B, you will see that the HTML content returned by Scraper API is: “This text was added with JavaScript.” instead of “I’ve been scraped!”. This is because we passed {render: true} as the 2nd argument when we called scraperapiClient.get().

With Scraper API, you can implement web scraping in minutes. The process is simple and the features are well thought out. Whether your project is for research or commercial purposes, this product provides a robust and reliable way to fetch the source code of any web page.

Creating your First Node Module

Node.js

Node.js Logo - node moduleBy defining your node module in package.json, you do not need to be concerned about its physical location when referencing it in your code.

Sometimes your Node.js application depends on functionality that falls outside of Node’s core components. In this case, you’ll need to import that functionality. This can be achieved with a node module. Organizing your code into modules enforces best-practices such as separation of concerns, code-reuse and test-ability. When you create a custom Node module, you can reference that module’s code in package.json.

So, in this article, I’ll demonstrate how to create a custom Node module for local use. We’ll cover how to reference a local custom Node.js module in package.json, how to expose methods from within that module, and how to access the module from a JavaScript file. To get started, why don’t you go ahead and clone the following github repository: Creating your First Node.js Module

You’ll find instructions on how to run the code in the Git hub page.

package.json – Example # 1

Example # 1 is the contents of our package.json file. The name and version properties are for demonstration purposes, but the dependencies property is the one that’s important to us. The dependencies property is an object that contains one or more Node modules needed by an application. So, when running the npm install command, node package manager will download all required modules. And the information in the dependencies object will tell node package manager what to download.

Specifying a local file instead of a remote resource

For this project, we use a special syntax to import a module that’s in the local file system. Notice that the value of the dateTools property is: “file:my_modules/dateTools“. This tells node package manager that the dateTools is in the my_modules/dateTools folder.

Our Custom Node Module – Example # 2

In Example # 2, we have the contents of our dateTools module. Now, obviously, this module doesn’t do all that much. It simply shows that there are four methods: getDays, getMonths, getDay, and getMonth, and that there are two arrays: days and months. The idea is that the getDays and getMonths methods return the appropriate arrays, and the getDay, and getMonth methods return the specified day or month, based on the number you pass in as an argument.

So, while this module is not one you would use in a real-world application, it does provide simple methods so that we’ll have some structure to work with.

File Structure

What I really want to focus on for this article is the architecture of the module. So, when you look at the Github repo, you’ll notice that in the dateTools folder, there are two files: index.js and package.json. Now, you may be thinking: “hmmmm… didn’t we already have a package.json file in this application?” Well, yes, we did, but this is the beauty of Node.js: all modules can, in turn, have a package.json file. This way, a module may have its own dependencies, and those dependencies might each have their own dependencies, and so on. So, the idea is that this architecture allows for a highly modular approach to creating software.

package.json in Our Module – Example # 3

In Example # 3, we have the package.json file that sits in the root of our custom module. The private property indicates that we do not wish to publish this to the npm registry, and the main property indicates the name of the module’s JavaScript file. Our module is the result of this file’s execution.

module.exports

Now, take a look again at Example # 2. On line # 22, you’ll see module.exports = {…}. Every Node module has an object named module.exports, and this object allows the author to make one or more properties and methods available to the outside world. In our case, we provide an object with properties that correspond to four methods. So, this way, when any Node.js code references our dateTools module, it is accessing this module.exports object.

The Demonstration Code – Example # 4

In Example # 4, we have the JavaScript file that demonstrates our module. The most important part of the code is line # 2, where we use the Node.js require method to import our dateTools module. Notice how we reference the module by name: dateTools. This way, we are not concerned with the actual location of the module; the package.json file in the root of our application takes care of that for us. Thus, the name dateTools resolves to the my_modules/dateTools folder, and in that folder, the package.json file resolves the name dateTools to index.js.

Summary

The dateTools module in this article is simple and is designed, primarily, to offer four basic methods as the heart of an introduction to the creation of a custom Node module. The purpose of this custom module was to provide a context for the discussion, and that context was to provide an understanding of your file organization, and how you access your module. The key to much of this discussion was, of course, the file package.json, which allows you to keep your code modular and easy to reference.

I hope that you’ve found this article helpful and that you’re on your way to creating your first custom Node module.

How to test HTTP POST with the Node.js request Module

Node.js

Node.js Logo - test HTTP POSTTesting HTTP POST requests is usually tedious. Bit with a few lines of JavaScript, you can spin-up your own HTTP POST testing tool.

In web development, GET and POST requests are quite common. GET requests are the ones more frequently seen, and in fact, when you load most web pages, the majority of the requests that make up what you see in the page are GET requests. For example, you request the initial HTML file, CSS files, JavaScript files and images. But sometimes, you need to make a POST request.

Making a GET request is easy, as is testing one. Testing a POST request is not always so simple, though, because the HTTP request body must include the data you want to send. One approach is to create a simple HTML page with a form. The problem here is that you need to create an input element for each data property that you want to send in the POST request, which can be tedious for a simple test. But then there’s Node.js, which can be leveraged to solve this problem.

In this article, we will see how a small JavaScript file can make an HTTP POST request. Now this approach may not be appropriate for use in a production application, but the idea behind this article is to point out that any time you need to test a POST endpoint, you can set up a quick test using Node.js.

Get the example code from GitHub

If you clone this repo: github.com/kevinchisholm/video-code-examples/tree/master/node/testing-http-post-with-request-module, you can clone the example code locally and edit the code yourself.

package.json

The package.json for this project contains references to the modules needed. We’re using the request module, the body-parser module, and the express module.

Example # 1 – The Web Server

In Example # 1, we have the server code. (Creating the server code is not the focus of this article, but it’s still good to review.) We need the express module and the body-parser module, and once we’ve set the references to those, we set up the POST route. So, when the user sends an HTTP POST request to /form, our code will handle this request. The requestAsJson variable allows us to set up the round-trip – that is, the exact same data from the POST request that we return to the user as JSON. We then set the Content-Type header to be application/json so that the HTTP header will be correct. Note the “log the output” comment; this is just for demonstration purposes. We then send the response using the res.end method.

Example # 2 – Testing the POST Request

In Example # 2, we have the test client, which is the focus of the article. We want an easy way to test POST requests, so instead of mocking up an HTML page with a form, we can use the file test-post.js to test an HTTP POST request. We set a reference to the request module, and no other module is needed in this file.

The postData variable is an object containing the data for the HTTP POST request. The postConfig variable contains the URL for the HTTP POST request, and a reference to the postData variable. The postSuccessHandler variable is a success handler for the HTTP POST request. Inside of that success handler, you can see a console.log statement, which completes the proof of concept. Whatever data sent for the HTTP POST request should be output in that console.log statement.

<h2>How to test the example code</h2>

Open two terminal windows (terminal A and terminal B), and make sure that you are in the root of the repository folder. In terminal A, execute this command: node post-server.js. In terminal B, execute this command: node test-post.js. In terminal A, you should see the message: The POST data received was XXX. In terminal A, you should see the message: JSON response from the server: XXX. (In each case, XXX represents the data from the HTTP POST request).

NOTE: Go ahead and change the properties of the postData object. You can create more properties if you wish. No matter what you do, you can see the data that you set in that object in the two console.log statements.

Fat Arrow Function Basics – Node Modules

Node.js

JavaScript LogoJavaScript Fat Arrow Functions solve the “this” problem by maintaining a reference to the object to which a method belongs. This is the case even with nested functions.

One of the most popular aspects of JavaScript is the fact that functions are first-class citizens. So, this aspect of the ECMAScript specification provides a great deal of power. Now when a function is a property of an object, it is also considered a method. That is, it is a method of that object. And inside of a method, the JavaScript “this” keyword is important, because it allows us to access the object to which the method belongs, as well as its other properties.

Now, when nesting functions, the JavaScript “this” keyword, one of the more frustrating aspects of the language, can be a bit tricky to deal with. So, in this article, I will discuss this very problem and how to solve it using fat arrow functions. If you’d like to run the code examples locally on your computer, clone the following github repository: Using fat arrow functions in your Node module.

(Instructions on how to run the code are available in the Github page.)

One important note about the code examples: the title of this article references “…Node Modules” to keep things simple, so I did not use a node module for the context of the code examples. Most Node applications keep the main file code minimal. Taking a modular approach is almost always a best practice, but for this article, I have put the code in the main JavaScript file.

The problem with “this” – Example # 1

Run Example # 1 in your terminal with the following command: node example-1.js. The result of this is: “THE MESSAGE IS: undefined“.

We have created a tools object in Example # 1, and that name is “tools“, which is arbitrary. It could have been any name, we just need an object to work with. The “tools” object has a “message” property, and there is also a method named “asyncTask“. The asyncTask method simulates an asynchronous task by using the setTimeout method. There is a reference to the JavaScript “this” keyword inside of the anonymous function passed to the setTimeout method. Now here’s where it gets a little dicey: the anonymous function passed to the setTimeout method is not executed in the context of the “tools” object, and therein lies the problem. The resulting console.log message is: “THE MESSAGE IS: undefined“.

So, we need a way to reference the “tools” object inside of the anonymous function that we passed to the setTimeout method. Well, the best approach is still to reference the “this” keyword. A common and popular approach in the past has been to set a reference to “this” before calling the setTimout method. For example: “var me = this;”. Okay, so while that is still a possible technique, there now is a far more elegant approach.

Fat arrow functions solve the “this” problem – Example # 2

Run Example # 2 in your terminal with the following command: node example-2.js. The result of this is: “THE MESSAGE IS: Hello from this.message!”

We made a small change in Example # 2. We converted the anonymous function passed to the setTimeout method to a fat arrow function. Fortunately, this action solved our problem. One of the advantages of fat arrow functions is that they preserve the meaning of the JavaScript “this” keyword. Because of this, when we reference this.message we no longer have an error, and we also see the expected message in the console.

Fat Arrow Function – One Argument – Example # 3A

Fat Arrow Function – Multiple Arguments – Example # 3B

A few things to keep in mind:

  • In Example # 2, the fat arrow function takes no arguments, but, it still has a pair of opening and closing parentheses. This is because when a fat arrow function takes no arguments, you must include a pair of opening and closing parentheses.
  • In Example # 3A, there are no parentheses in the fat arrow function. This is because when there is one argument, you do not need to include parentheses.
  • In Example # 3B, there are two arguments contained inside of parentheses. This is because when there is more than one argument, you must include parentheses.

Summary

In this article we saw that fat arrow functions solve the “this” problem because they provide access to the object to which the containing function belongs, and you can access that object at all times by using the “this” keyword. And even when nesting fat arrow functions, the “this” reference is preserved, eliminating the need to set a temporary reference to “this”. Just keep in mind the importance of how the syntax can differ, depending on the number of arguments that the fat arrow function takes. In other words, with zero or multiple arguments, parentheses are required, and with only one argument parentheses are not required. Pretty simple, once you get used to it.

Node.js Templating with EJS – Basics

Node.js Templating

JavaScript LogoEJS Makes Templating in your Node.js application a breeze. Just supply a template string or .ejs file and some data.
The moniker says it all: “Effective JavaScript templating.” If you haven’t already discovered it, you’ll soon find that as front-end web developers have been transitioning to more of a full-stack role, templating has quickly become an important topic. In other words, this is no longer an unusual front-end task for JavaScript developers. And when working with Node.js, EJS has become the standard for server-side templating.

In this article, I will cover the bare-bones steps needed to get up and running with EJS, and in doing so, I’ll show you how to render data in an EJS template. First, I’ll explain the vanilla JavaScript approach. Then, we’ll move on to rendering your EJS template when using the Express.js framework. And finally, we’ll cover the syntax for EJS template code as well as how to use “if” logic in your template.

Now the power in EJS templates is the separation of concerns. Your data is defined (and possibly manipulated) in your server-side code, and your template simply declares what data will be rendered. This approach embraces the concept of “loose coupling”. With EJS templates, you can leverage that same “loose coupling” design pattern in your Node application. This scenario is, of course, fairly common to back-end developers, who have experience with languages such as Java, PHP, Python or .NET. For a front-end developer, however, this may be new territory. So, to illustrate, let’s take a look at some examples.

Example # 1-A

Example # 1-B: The Rendered HTML

In Example # 1 – A we first require the ejs module. This will be the case with every example, so I won’t cover that again. Just know that we need the ejs module in order to render our EJS templates, so we set a variable named “ejs” via require first. Next, we set the days variable; it’s just an array that contains the five days of the work week. Here, too, this will be the case in every example, so no need to cover this again. Just know that in each code example, there is a days variable – an array that contains the five days of the work week. We also set a variable named “http” which is an instance of the Node http module. We’ll need this in order to run our web server.

Okay, so let’s take a look at line # 3 in Example # 1. We’re using the ejs.render method here to create HTML that we will send to the user. The ejs.render method takes two arguments: a string template and the data for that template. In this case, our string template has the “<%=” and “%>” delimiters to indicate to EJS the start and end points for our template. And inside of those delimiters, we can write JavaScript code. So, let’s use the join() method of the days array to convert the array to a string. Then, inside of the execution of the http.createServer method, we’ll call the end method of the result object (i.e. res.end), passing the html variable to that method. And since the res.end() will send the response to the client and end the connection, the contents of our html variable will be sent to the user’s browser. Now, in Example # 1 – B, we have the HTML that is rendered in the user’s browser. This HTML happens to be very simple, and in fact, is not markup that we’d want to use in production. But what I wanted to demonstrate here is that rendering HTML in an EJS template is as simple as defining the template, then providing data to that template.

Example # 2-A: Setting the view engine for Express.js

Example # 2-B

Example # 2-C: The Rendered HTML

In Example # 2-A we’re leveraging the Express.js framework, so there’s a new require statement at the top of our code which sets the Express variable. On line # 3, we create the app variable which is an instance of the Express.js framework. And on line # 9, we use the app.set method to tell Express that we’re using EJS as our view engine. Note that this is required when leveraging EJS templates in your Express application. Now, on line # 12, we set up a handler for the “/” route. And inside that handler callback, we use the render method of the response object. This render method is available to use because of what we did on line # 9: using the app.set method to let Express know that EJS is our view engine. Okay, so let’s go back to line # 13, where we’ll pass two arguments to the render method: the string “example-2” and the data that our EJS will consume.

Now, you may be scratching your head as to what the first argument in “Example # 2-A” means. Well, it’s important to note that when you leverage EJS as your view engine, Express.js assumes that you will have view templates. These view templates are text files with an “.ejs” extension. So, it’s also important to note that Express.js assumes that these files will be in a folder named “views” that resides in the same folder as the file that is currently being executed. You can specify a different folder for your views, but the default folder that Express will look for is “views”. And in the “views” folder, Express.js will look for a file named XXX.ejs, where “XXX” represents the string that you pass as the first argument to the render method. So in our example, we want to use a template that resides in the file: “views/example-2.ejs”.

Here in Example # 2-B, we have the contents of the file “views/example-2.ejs”. And in this template file, there are two locations for data; the title tag and the body tag. In the title tag, we have a binding for the headerTitle property. In other words: we’ve provided some data to the res.render() method on line # 13 of Example # 2-A. That data was an object literal, and it had a property named: “headerTitle”. So, on line # 3 of our “views/example-2.ejs” file, we’ve told the template to inject the value of the “headerTitle” property of the data object that was provided to it. And the same thing is happening in line # 6 of our “views/example-2.ejs” file. In other words, we’ve asked EJS to inject the value of the “welcomeMessage” property of the data that was provided to the template. And then in Example # 2-C, you see the HTML that is returned to the user’s browser as a result of our template in Example # 2 B. In this HTML, the “headerTitle” property binding is replaced by the actual value: “EJS Demo Page” and the “welcomeMessage” property binding is replaced by the actual value: “This message was rendered on the server.”

Now, Example # 3-A is very similar to Example # 2-A, except that the data we provide to the template is an array, instead of just an object literal. If you look at Example # 3-B, you’ll see that the way we bind to the data differs from example # 2-A. In example # 2-A, we bound to a single property: “welcomeMessage”, but here we are using a loop to iterate over each element in the “days” array. Specifically, we use the forEach() method of the “days” array and in each iteration of the callback function, we have access to a variable named “day”. Then we generate a list item and output the value of “day”. So, if you look at Example # 3-C, you’ll see the HTML that is rendered by the server and sent to the user’s browser. Voila! As expected, we have the HTML with the unordered list rendered with each day of the week (i.e. the “days” array).

Example # 4-A is virtually identical to Example # 3-A; the only difference is the value of the “welcomeMessage” property. Take a look at Example # 4-B. You’ll see that on line # 4, we have some custom CSS in a set of style tags. This will make more sense in a few minutes. Now look at line # 20. Here we are looping over the “days” array, just as we did in Example # 3-B. But on line # 22, we use a basic JavaScript “if” block, to determine if this is the fourth element in the array. We do that by using the index variable, which is the 2nd argument passed to the callback function that we provide to the days.forEach() method. So, if index is equal to 3, then we generate the following in our HTML: class=”selected”. What we are doing here is, we are telling our EJS template that the 4th element in the list (i.e. the element with the index of 3) should have the CSS class “selected”. So, in Example # 4-C, you can see in the rendered HTML that the fourth list item has class=”selected“. As a result, the CSS that we added at the top of the EJS template kicks-in and “Thursday” is dark red text with a yellow background.

Summary

So, in this article, you learned the most basic steps needed to leverage an EJS template in your Node.js application. You started by learning how to render data in an EJS template using vanilla JavaScript, and also when using the Express.js framework. Then we went on to cover how to bind a single data property, as well as how to iterate an array in your template. And finally, we wrapped it up by illustrating how to use “if” logic in your EJS template.

Now this article only scratched the surface of what is possible with EJS templates. My goal here was simply to provide the information needed to get up and running quickly, and to illustrate the most basic concepts so that you can dig in further on your own, because, believe me, there is plenty more to discover on this topic!

Node.js – What is the Difference Between response.send(), response.end() and response.write() ?

Express JS

JavaScript Logoresponse.send() sends the response and closes the connection, whereas with response.write() you can send multiple responses.

In this article, I will explain the difference between response.send(), response.end() and response.write(), and when to use each one. When you’re working with the Express.js framework, you’ll probably most frequently be sending a response to a user. This means that regardless of which HTTP verb you’re handling, you’ll pass a function as the handler for that endpoint. This function will receive two arguments: the request object and the response object. The response object has a send() method, an end() method and a write() method, and in this article we’ll get to know the differences between them.

So, let’s start with the main issue, which is that the response.send() method is used to send the response to the server. Now this makes sense and in some cases, it’s actually the perfect tool. Problems can arise, though, if you’re not entirely sure what the response.send() method actually does. Well, in a nutshell, it does two things; it writes the response and also closes the connection. So, this seems like a win-win, right? Well, in some cases it is, but if you don’t want to close the connection on your first write, then the response.send() method may not be the right tool. When this happens, you’ll need to use a combination of response.write() and response.close(). So, let’s take a look at a few examples, to see just how this works.

Get the example code from GitHub

If you clone this repo: github.com/kevinchisholm/video-code-examples/tree/master/node-express/response-send-end-write-difference, you can clone the example code locally and edit the code yourself.

Trying to use the response.send method more than once per request – Example # 1

Run Example # 1 in your terminal with the following command: node example-1.js, then point your browser to: http://localhost:5000/. Now you’ll see this: “This is the response #: 1“. There are two problems here, however, the first of which is that any responses after the first one are never sent. This is because the send method of the Express.js response object ends the response process. As a result, the user never sees the messages “This is the response #: 2” or “This is the response #: 3”, and so forth.

The second problem is that the send method of the Express response object sets the Content-Type header, which is an automatic action. So, on the first iteration of the for-loop, the Content-Type header is set (i.e. “This is the response #: 1”). Then on the next iteration of the for-loop, the Content-Type header is set again because once more, we are using the response.send() method (i.e. “This is the response #: 2). But, we have already set the Content-Type header in the first iteration of the for-loop.
Because of this, the send method will throw this error: “Error: Can’t set headers after they are sent”. So, our application is essentially broken, but we don’t want users to have an error in their consoles. And more importantly; our back-end logic is not working correctly.

Using the result.write method – Example # 2

So, using the result.write method run Example # 2 in your terminal with the following command: node example-2.js. Now point your browser to: http://localhost:5000/. As you can see, there is still a problem with our code. Depending on your browser, either you will see only the first message or you will see none of them. This is because the response has not been completed. So, I’ll just mention here, that not every browser handles this case the same, which is the reason why you may see one message, all of the messages or none of them. But you should see that the request is “hanging” as your browser will stay in that “loading” state.

So, open your developer tools (e.g. FireBug or Chrome Dev Tools), and then look at the network tab. You’ll see that all five responses did, in fact, come back to the client. The problem is, the browser is waiting for more responses.
At some point, the request should time out and you can see all messages in the browser. This behavior can vary between browsers, but it is not the correct experience.

result.end fixes the problem – Example # 3

Run Example # 3 in your terminal with the following command: node example-3.js, then point your browser to: http://localhost:5000/. You will now see all of the messages in the browser, which means that here, in Example # 3, the problem has been fixed. We see all of the messages generated by the for-loop and the response completes successfully with no console errors. So, we’ve solved the problem by using a combination of of response.write() and response.close().

First we set the Content-Type header, just to get that task out of the way. Then, in each iteration of the for-loop, we used response.write() to send a message back to the client. But since response.write() does not set any headers or close the connection, so we were free to call response.write(), to send another response to the client. And once the for-loop was completed, we used the result.end() method to end the response process (i.e. we closed the connection). This said to the browser: “we’re done; go ahead and render the response now and don’t expect anything more from me.”

Summary

In this article, we learned about the difference between response.send(), response.end() and response.write(). During this discussion, we found that response.send() is quite helpful in that it sends the response and closes the connection. We saw that this becomes problematic, however, when we want to send more than one response to the client. But, fortunately, we discovered that this is easily solved by using a combination of response.write() and response.close(). We used response.write() to send more than one response, and then used response.end() to manually end the response process and close the HTTP connection. So, useful steps and easily solved problems.!

Node.js File Uploads with Multer

Node.js

Node.js LogoWhen it comes to the UI, file uploads are pretty simple. But on the back-end, there is some work to do. Multer is a Node.js module that simplifies this process.

Uploading a file is a common task for Web applications. Today, most Web pages leverage AJAX — which requires JavaScript — for a smoother user experience, but this can be accomplished using only HTML and zero JavaScript. The truth is, HTML-only file uploads have been possible for more than 20 years. I mention this to point out that in the browser, file uploads are simple and require only a small amount of HTML. This is only half of the equation, however, because a file upload is useless without some back-end code that can process the file. So, in this article I’ll show you how to process a file upload in your Node.js application. To simplify the back-end code needed to handle a file upload, we’ll leverage Multer, a Node.js middleware for handling multipart/form-data.

For this article, our working example code is a simple Node application that accepts a POST request with an “enctype” of “multipart/form-data.” When the user uploads a file, our back-end code will take the uploaded file and put it in the “uploads” folder, right within the root of the project folder. Nothing too fancy here, but it’s worth noting that the examples provide plenty of opportunities for copy/paste. What you do with these examples is up to you, but at least you’ll know how to process a file upload in your Node application.

index.html

In the above example (index.html), we have the HTML file for our application, so take a look at the form element. You’ll see that the “enctype” attribute is set to “multipart/form-data,” which means that we will send images in various formats. This is also important to keep in mind because Multer will only process this kind of file-upload. Note also the input element, which has a type attribute of “file.” This ensures that the browser will take care of implementing a file-upload interface. So, in other words, there will be a “Choose File” button, which allows the user to select a file from his or her hard drive. We certainly don’t need to put any effort into this; simply setting type=“file” takes care of all of it. There is also a name attribute for this input element. This attribute is required so that Multer understands how to handle the request. The Submit button will pass the form to the same exact URL because there is no “action” attribute, so the default behavior is: this is the form submitted to the same exact URL.

Configuring Multer – Example # 1

Example # 1 contains all of the code for our Node application. For this project, we leverage the Express framework. By using Express, we significantly reduce the amount of code needed. One of the most powerful features of Express is the ability to easily create middleware, which is a perfect context for Multer because it needs to intercept the HTTP request for us. The upload variable is used to provide configuration for Multer. In this case, for example, it lets Multer know that we want our uploaded files to be placed in the “uploads” folder. We’re using express.static in order to serve the HTML and CSS files to the user, so when the user goes to the “/” route, index.html and style.css are served by the Express framework.

Adding a Handler for the POST route

On Line # 11, we set up a handler for the POST route. If you’ve ever used the Express framework when building a Node application, this pattern should look familiar to you. But notice that the second argument passed to the app.get() method is upload.single(‘img’). We’re using the upload variable created earlier. The single() method takes a string as an argument, which is the “name” attribute of the form field containing the uploaded file. For demonstration purposes, we output req.file to the console so we can see information on the uploaded file. We call the send method of the response object, passing it some HTML, which simply informs the user that the upload was successful and allows that user to go back to the “/” route.

At this point, it would be a good idea to run the example code yourself, so just follow these steps:

  • git clone
  • git@github.com:kevinchisholm/video-code-examples.git
  • cd /node/file-uploads-with-multer/
  • npm install
  • node index
  • Open this URL in your browser: http://localhost:3000/

Now in your browser, click the “Choose File” button and browse your hard drive for a file to upload. Once you’ve selected a file, click the “Submit” button. You should see the message: “File upload succeeded.” Now, if you look in the “uploads” folder in the root of the project folder, you should see a file with a name similar to: “08e36ff4c9d3dc106e3a9fa2367797c9”.

So, we’ve made good progress here; our example code works and we’re able to upload a file. As you can see, though, the original name of the file is not preserved, and a GUID-like name is provided. This can be helpful in that users will not overwrite a file when uploading the same-named file more than once. The downside, however, is that there’s no connection between the original file name and the one provided. So, let’s fix that.

Show the Original File Name – Example # 2

Stop the Node application and then start it again, using the second example: node index2. Now, upload a file again.
You’ll see that the original file name is preserved.
In Example # 2, we accomplished this by leveraging multer.diskStorage(). When calling that method, we provided a configuration object. The destination property told multer.diskStorage() where the uploaded file will go, and the filename property provided a way for us to specify what the name of the uploaded file will be. This method receives a second argument called file, so we use the “originalname” property of this object to set the file name. But there’s a new problem now: the user can overwrite an uploaded file by uploading a file with the same name. So let’s fix that.

Create a Dynamic File Name – Example # 3

In Example # 3, we have expanded the anonymous function passed to the filename() method. What we’ve done here is use regular expressions to extract the name of the file with and without the extension. We use Date.now() to generate what is essentially a unique value, and we piece the new file name back together. As a result, the user can upload the exact same file over and over, but each uploaded file name will be unique. For example: original-file-name_123456.jpg. So, let’s just confirm this. Stop the Node application and then start it again, using the third example: node index3. Now, upload the same file over and over. You’ll see that each uploaded file has a unique name, but the original file name is included so that it’s easy to reference the actual file that was uploaded.

Web Scraping with Node and Cheerio.js

Node.js

Node.js LogoCheerio.js allows you to traverse the DOM of a web page that you fetch behind the scenes, and easily scrape that page.

There are security rules that limit the reach of client-side JavaScript, and if any of these rules are relaxed the user may be susceptible to malicious activity. On the server side, however, JavaScript is not subject to these kinds of limitations. And, in fact, in the absence of them there’s a great deal of power, particularly in the area of web scraping, which, as it turns out, allows for one of the cool upsides of this awesome freedom.

To get started, clone the following github repository: Basic web scraping with Node.js and Cheerio.js.

You’ll find instructions on how to run this code in the Github.

The page we will target for web scraping

Lets’ take a moment to look at the example web page that we will scrape: http://output.jsbin.com/xavuga. Now, if you use your web developer tools to inspect the DOM, you’ll see that there are three main sections to the page. There’s a HEADER element, a SECTION element, and a FOOTER element, and we will target those three sections later, in some of the code examples.

The request NPM module

One of our key tools is the request NPM module, which allows you to make an HTTP request and use the return value as you wish.

The cheerio NPM module

The cheerio NPM module provides a server-side jQuery implementation, and its functionality mirrors the most common tasks associated with jQuery. There isn’t a 1:1 method replication; that was not their goal. The key point is: you can parse HTML with JavaScript on the server-side.

Caching an entire web page – Example # 1

In Example # 1, we set some variables. The fs variable references the file system node module, which provides access to the local file system. We’ll need this to write files to disk. The request variable refers to the request node module, which we discussed earlier, and the cheerio variable refers to that cheerio node module that we also discussed. The pageUrl variable is the URL of the web page that we will scrape. Now, at the highest level, there are two things that happen in this code: we define a function named scrapePage, and then we execute that function. So, now, let’s take a look at what happens inside of this function.

First, we call the request function, passing it two arguments, the first of which is the URL of the request. The second argument is a callback function, which takes three arguments. The first argument is an error object, and this “error first” pattern is common in Node.js. The second argument is the response object, and the third argument is the contents of the request, which is HTML.

Inside of the request callback, we leverage the file-system module’s writeFile method. The first argument we pass is the full path of the file name, which tells the fs module what file to write. For the second argument we pass the responseHtml variable, which is the content that we want to write to the file; this is what was returned by the request function. The third argument is a callback function, which we are using to log a message indicating that the file write to disk was successful. When you run Example # 1, you should see a new file in the HTML folder: content.html. This file contains the entire contents of the web page that we make a request to.

Caching only a part of a web page – Example # 2

In Example # 2, we have an updated version of the scrapePage function, and for the sake of brevity, I have omitted the parts of the code that have not changed. The first change to the scrapePage function is the use of the cheerio.load method, and I assigned it to the $ variable. Now we can use the $ variable much the same way we would jQuery. We create the $header variable, which contains the HTML of the HTML header element. We then use the file-system module’s writeFile method to write the HTML header element to the file: header.html.

Now, when you run Example # 2, you should see another new file in the HTML folder called header.html, which contains the entire contents of the web page that we make a request to.

Example # 3

In Example # 3, we have updated the scrapePage function again, and the new code follows the same pattern as the one in Example # 2. The difference is that we have also scraped the content and footer sections, and in both cases, we’ve written the associated HTML file to disk. So, now, when you run Example # 3, you should see four files in the HTML folder, and they are entire-page.html, header.html, content.html and footer.html.

Summary

In this article, took a look at what is possible when scraping web pages. Now, even though we only scratched the surface, we did work in some high-level areas, focusing on making a request and then parsing the HTML of that request. We used the request module to make the HTTP request, and the cheerio module to parse the returned HTML. We also used the fs (file-system) module, in order to write our scraped HTML to disk.

My hope is that this article has opened up some new possibilities in your work, and has pointed you in the right direction for pulling this all off. So, happy web page scraping!

Handling HTTP POST Requests with Express.js

Express JS

Node.js LogoLearn how to access the body of an HTTP POST request using the Express.js framework and body-parser module.

Forms are a common component in web applications. When a user submits a form, that data is sent to the back-end for processing. To process that data, the web server must understand how to access it. Popular web server languages include Java, .NET, PHP, Python and Node.js. In this article, we’ll learn how to access the POST data sent to a Node.js web server using the Express.js framework. To get started, you can go ahead and clone the following github repository: Handling POST requests with Express and Node.js.

And you’ll find instructions on how to run the code in the Github page.

package.json

The package.json for this project is pretty straightforward, and we’ll only need the body-parser and express Node.js modules. We also create a scripts property so that running the example code requires a simple command: npm start.

Requiring the modules we need – Example # 1:

In Example # 1, we’ve imported the Node.js modules that we need. The Express module takes care of the heavy lifting with regard to fulfilling web requests. NOTE: If you’re not familiar with the Express Node.js module, please see my earlier blog post on this subject:  Set up a Node / Express Static Web Server in Five Minutes.

We also import the body-parser Node.js module, which has the critical role of parsing the body of an HTTP request. When it comes to processing a POST request, this is important. And the path Node.js module helps express to construct a file path.

bodyParser.json and bodyParser.urlencoded – Example # 2:

Now, here in Example # 2, we tell express to use the bodyParser.json middleware, which provides support for parsing of application/json type post data. We also tell express to use the bodyParser.urlencoded middleware, which provides support for the parsing of application/x-www-form-urlencoded type post data.

Creating the node.js web server – Example # 3:

In Example # 3, we use express.static to set up the static assets folder, the main purpose of which is to help the working example function in a browser, with minimal effort. For more information on express.static, please see my earlier blog post in Express mentioned above. In this example, we use the app.post method, which tells the Express module to wait for an HTTP request at the /form route that leverages the POST HTTP verb. So, when the user sends a POST request to the /form route, Node.js executes the provided callback, which is the second argument passed to the app.post method.

The app.post callback takes two arguments, the first of which is the request object (i.e. “req”). The second is the result argument (i.e. “res”). We use the res.setHeader method to set the Content-Type header to application/json, which tells the user’s browser how to properly handle the returned data from the request.

NOTE: We wrap the rest of the callback code in a setTimeout, the purpose of which is to mimic a slow internet connection. Otherwise, the working example will move too fast for most to comfortably follow.

Inside the setTimeout, we use the res.send method to send the result body back to the user, and here we’re sending a serialized JSON object. To construct this object, we access the body property of the req object (i.e. the request object), which is why we have implemented the bodyParser.json middleware. And this is what allows us to parse the properties of the request body. In this example, we are expecting firstName and lastName POST parameters, which will allow us to access the req.body.firstName and req.body.lastName properties, to build the JSON for our result object.

To see this code in action, just follow these steps :

  1. Clone the git hub repository: https://github.com/kevinchisholm/video-code-examples/tree/master/node-express/handling-POST-requests-with-express
  2. Follow the instructions in the readme to set up the code
  3. Point your browser to: http://localhost:3000
  4. In the web page, enter some text into the two input boxes, and then click the “Submit” button
  5. Notice the logging statement in your node.js terminal
  6. Notice that the text you entered displayed in a browser message

You might also want to take a look at the Network tab in your Web Developer Tools, which allows you to see the actual network request that goes to the web server. You’ll be able to inspect the POST data sent, and the JSON data returned.

Viewing the working code example

Here’s what happens when you submit the data in the browser:

  1. The JavaScript in www/js/form-handler.js makes an AJAX POST call to the route: /form.
  2. The object sent in the POST request is: {firstName: XXX. lastName: XXX}. (NOTE: “XXX” is whatever value entered into the form’s text inputs.)
  3. Our Node.js web server intercepts the HTTP request to /form.
  4. Our Node.js web server parses the body of the HTTP request and constructs a JSON object.
  5. The XMLHttpRequest for the AJAX call is this JSON object.
  6. The browser displays the data from this JSON object in the browser.

Nothing too fancy here, just illustrating the “round trip” of our HTTP POST request.

Summary

In this article, we learned how to handle POST requests with the Express node.js module, and we talked about the need for bodyParser.json and bodyParser.urlencoded. We also learned how to listen for a POST request to a specific route, and how to access the POST parameters in the HTTP request body. Now, while the working example is simple, it does allow you to inspect every step of the process. If you look at your browser’s network tab, you can see the HTTP POST request go out, and then return. What happens during the server-side processing of that request is what you see in our Node.js code: server.js.

So, a lot to digest at first, but I’m hoping that this it will get you started with your next form-based Node.js application!

Introduction to Express.js, the Node.js web application framework

Express JS

Node.js Logo - expressExpress.js provides the kind of abstraction that lets you stay out of the weeds and focus on your application code.

While the low-level nature of Node can be an asset, it can also be somewhat of a curse because when you’re serving static assets, it can be tedious to detect routes and serve the correct static assets for an entire web page. Some examples of static assets are CSS files, images or JavaScript files. Now, the good news is, Express is a Node module that provides abstraction for these kinds of challenges. It’s popular, it’s used by large companies, and there’s strong community support for it, all of which make this a solid choice.

Why Express?

The main goal of Express is to provide an application framework, and getting started is simple. Take a look at the code samples, which you can clone at the following Github repository: Introduction to Express.js, the Node.js web application framework. You’ll find instructions on how to run the code in the Github

package.json

The package.json for this project is simple: the single dependency is express.

The get() Method – Example # 1

In Example # 1, we call the get() method of the app variable, and we pass the string “/” to the get method. This tells Express.js how we want to handle any GET request to the root of the application. (NOTE: GET is an HTTP verb, other examples are POST and PUT.) In Example # 1, we are sending back a simple HTML page, and we have created the HTML by constructing a string that represents that HTML code. This happens in the “HTML” variable. We then call the send() method of the result object, sending our HTML back to the user. Now run Example # 1 in your terminal with the command node example-1.js, then navigate to http://localhost:3000/ in your browser. There you will then see “This is Example # 1”.

The use() method – Example # 2

Example # 2 is much shorter than Example # 1 because we have not hard-coded our HTML. Instead, we have used the use method of the app object, which tells Express which folder we want to use for serving static assets. As a result, our JavaScript code is cleaner, and easier to read. Also, we’ve separated concerns. In other words, instead of hard-coding our HTML in our JavaScript file, we’ve put HTML where it belongs: in an HTML file.

Now notice how the web page in Example # 2 has an image. I included that to point out how Express handles this for us, even though we never had to write any JavaScript code that specifically waits for an image request. There is also a CSS file being served. In both cases, Express understands that WWW is our public web folder and it serves up static assets as needed, which certainly saves us a lot of time. Now run Example # 2 in your terminal with the command node example-2.js, then navigate to http://localhost:3000/ in your browser. There you will see “This is www/index.html”, which is a major improvement, as the HTML that the user sees is actually served from a static HTML file.

Adding Handlers for a Second Route – Example # 3

In Example # 3, we use the GET method to add a handler for when the user requests “/about“. In this case, we serve-up “/www/about.html“, which is just one example, but we could have added any specific route handlers needed. Now run Example # 3 in your terminal with the command node example-3.js, and navigate to http://localhost:3000/ in your browser. There you will see “This is www/index.html”. Now, click “About” in the upper-right-hand corner, to display the “About Us” page. You can then click “Home” and “About” over and over, to switch routes, because our JavaScript code in Example-1.js handles the alternation of these two routes.

Summary

In this article, we learned the absolute basics of Express, but in doing so, we also got to see how simple it is to use. In our discussion we saw examples of the get() method, as well as the use() method. I’m hoping that this was enough to illustrate the power behind this Node.js web application framework, and that it will get you well on your way to enjoying its usefulness.

Create a Node Websocket Server in Five Minutes

Node.js

Node.js Logo - node websocket serverLeveraging Express.js and the ws NPM module, it is possible to create a Node Websocket Server in less than ten lines of code.

The Websocket protocol provides full-duplex communication channels over a single TCP connection. In the past, web clients had to employ long-polling or the repeated pinging of a server in order to achieve this kind of “push” functionality. Now, Websocket technology eliminates the need for such outdated techniques. So, when a Websocket client connects to the server, a persistent connection is created, and the Websocket server can then push notifications to all connected clients. It is possible for the clients to send messages to the Websocket server as well, but I’ll cover that in a later article.

In this article, I’ll explain the bare-minimum code needed to create a Node Websocket server that can broadcast all incoming messages to connected clients. This should take us about five minutes, and less than ten lines of code. The beauty of Express.js is that it takes care of the heavy lifting with regard to the actual web server. The ws NPM module also plays a starring role in that it handles the Websocket communication layer, allowing us to expose an endpoint that accepts connections and messages from clients. Plus, we can broadcast messages to connected clients.

package.json

Above is the contents of package.json. There are only two dependencies: the Express.js framework and the ws module.

The Node Websocket Server – Example # 1

So, here in Example # 1 we have the entire working application. On line #s 3 through 9 we create our dependencies. I’ve grouped things in a way that I hope makes sense, but I’ll just point out that on a high level there are two things happening here. We require the modules that we need as constants: http, express, and WebSocket. Also, we create the constants app, server and websocketServer. These constants are the results of expressions. Now if you’ve ever worked with Express.js before, the app constant should be familiar to you; it’s simply an instance of the Express framework. The server constant is the result of calling http.createServer(), passing it our express.js instance (ie. “app”). And finally, the constant websocketServer represents our Websocket server.

Now let’s jump ahead for a moment to line # 30, where we start our web server. It’s not that there’s much going on here; it’s just that I wanted to point out that the server is started by calling the server.listen method, passing it the port to listen on (i.e. 3000). The second argument (the anonymous function) is optional.

Now let’s go back up to the top of the file. As you can see, the rest of the code is surprisingly simple. We create two event handlers, the first of which takes care of each Websocket client connection, and the second one processes each message that it receives from that client. On line # 12, we have the first event handler. We use the “on” method of the websocketServer instance to handler an incoming connection. This is somewhat similar to creating a handler for a GET or POST request in Express.js.

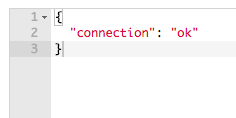
We pass the event as the first argument (i.e. “connection”), and then a function as the 2nd argument. The anonymous function that we provide contains the code that we want executed for each new Websocket client connection. This function also receives a Websocket client as its first argument. We have named this variable: “webSocketClient”. On line # 14 we provide some feedback to the Websocket client by sending it the first Websocket message: { “connection” : “ok”}. This is for demonstration purposes only, just so that we can see right away that the connection has been established.

Now inside of the anonymous callback, we set up the second event handler, which will process each message that this client receives. And similar to the connection event handler, we use the “on” method of the webSocketClient variable to handler an incoming message. We pass the event as the first argument (i.e. “message”), and then a function as the 2nd argument. The anonymous function that we provide contains the code that we want executed for each message received by this Websocket client.

Broadcasting the Message to All Websocket Clients

On line # 20, we start the process of broadcasting the incoming message to all Websocket clients. Using the forEach method of the Websocket.clients list, we iterate the list of websocket clients. And for each iteration, we provide a callback function. This callback function receives the currently iterated Websocket client as its first argument. So, we then use the send method of that client object, and send the incoming message (i.e. by sending one message to many recipients, we are “broadcasting” that message).

Testing the Websocket Server

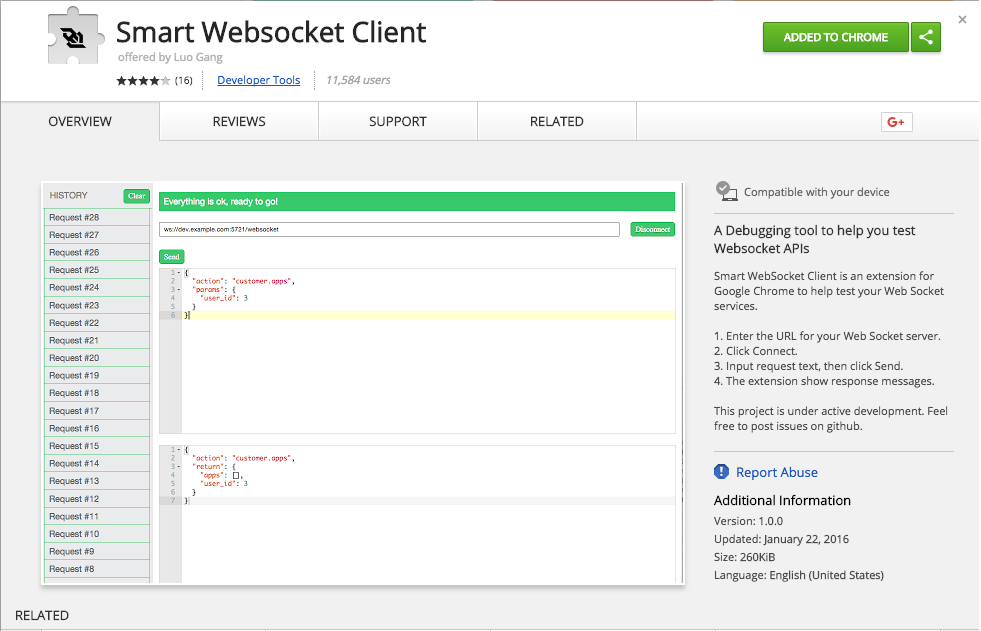
Now if you copy all of the code from Example # 1 into a file and then execute it, you’ll have a running Websocket server on port # 3000. But that isn’t enough. Now we want to test our websocket server, and an easy way to do this is to use the Smart Websocket Client plugin for Google Chrome.

So go ahead and click this link to install the plugin, and once you’ve installed it, start the plugin by clicking the icon in the upper-right-hand corner of your Chrome browser.

smart-websocket-client-icon
smart-websocket-client-1
Smart Websocket Client

Once the Smart Websocket Client is running, enter http://localhost:3000 in the address bar and then click the “Connect” button. You should see { “connection” : “ok”} in the lower window, indicating that a Websocket connection was successfully established (see example # 2).

smart-websocket-client-2
Connecting
smart-websocket-client-3
Connecting Success Message

Example # 2

In the top window, enter any text, click the “Send” button, then you’ll see your message appear in the lower window. Now open a few more instances of the Smart Websocket Client and follow the same steps. If you place your Chrome browser tabs side by side, you’ll see that every message you’ve sent has been broadcast to every Websocket client. Congratulations!  You’ve just built a working Node Websocket server.

Example # 3

Now earlier in this article, I promised that we could create our Websocket server in less than ten lines of code. Example # 1 clocks in at 32 lines of code, but this is because I used whitespace and comments to make the code as readable as possible. So, in Example # 3, I’ve provided the condensed version of our Node Websocket server. This code is not very pretty, but as promised, it is a fully functional Node Websocket server that’s set up in less than ten lines

How to Create a Node.js Web Server as an Amazon AWS EC2 Linux Instance

Amazon Web Services (AWS)

aws ec2 linux instance LogoCreating an Amazon AWS EC2 Linux instance is easier than you may think. There are few decisions to make and you can accept most default values. Once your instance is launched, it’s easy to SSH in, install Node.js and create your web server.

Creating an Amazon AWS EC2 Linux instance can be intimidating. Because AWS provides such low-level functionality, it can often feel as if you have to think-through a lot of details just to get your “Hello World!” application up-and-running. After walking through the process of spinning-up a server instance on AWS EC2, I found that the steps are not overly difficult. For the most part, there are only a few decisions to make, and in many cases you can accept the default values. Some of the concepts or terms might be difficult to understand at first, but for the most part they encompass pretty basic full-stack web development topics that you should have run across by now.

In this article, I will walk you through the steps needed to create and launch an Ubuntu Linux instance on AWS EC2. To be specific, we will create an Amazon AWS EC2 Linux Instance and then install Node.js and create an HTTP web server. Once our instance is launched, we will install Node.js and create a (very) bare-bones web server. A very important step to think about is towards the end: downloading your .pem file. This file contains the AWS credentials needed to SSH into your Linux instance. If anyone were to get their hands on this file, they could SSH into your Linux instance, which is bad. If you lost this file, then you will not be able to SSH into your Linux instance, which is bad too. So, keep that file in a safe place. For this article, I assume you already have an AWS account. If you do not have one, please take care of that first. It’s easy and there is no cost to sign up. You will need to provide a credit card, but that is for future billing purposes. Ok, let’s get started.

IMPORTANT NOTE: I kept all of the example images small for the sake of readability. Click on any thumbnail to open the full-sized image in a new window.


Creating an EC2 Instance

Go to the EC3 dashboard

You can go directly to the AWS EC2 Console: console.aws.amazon.com/ec2

Or, at the AWS Console, click “Services” in the upper-left-hand corner of the page, then click “compute”, and then “EC2”.

Click the “Launch Instance” button.

Launch Instance button


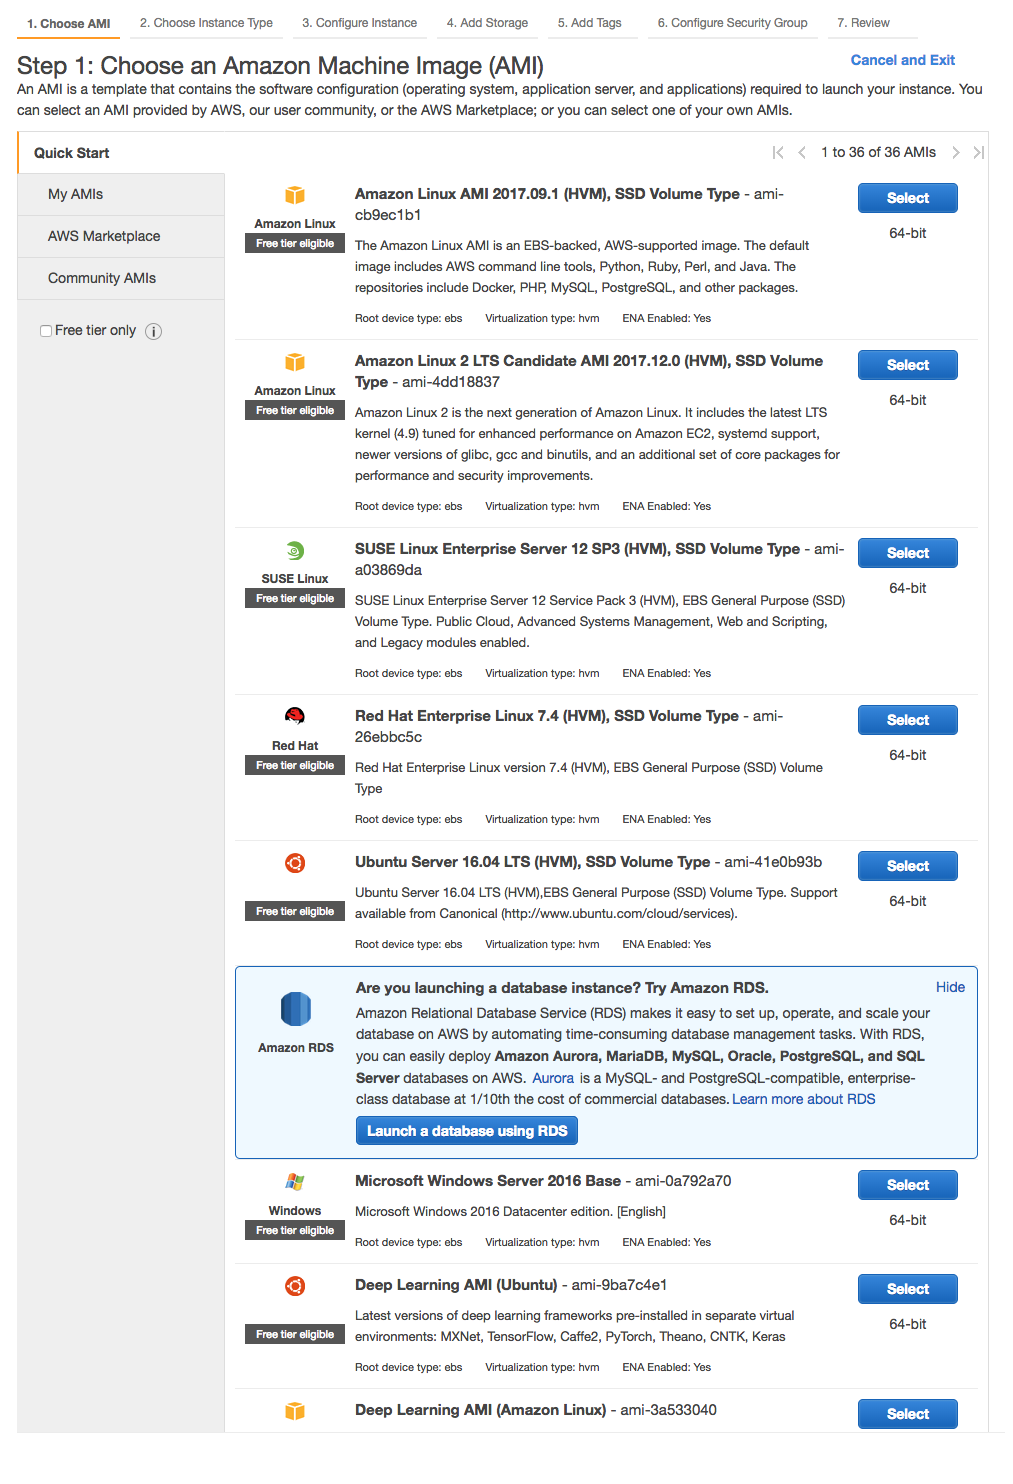
Choose an Amazon Machine Image (AMI) – Step 1

Step 1: Choose an Amazon Machine Image (AMI)

Choose Ubuntu Server 16.04 LTS (click the “Select” button)


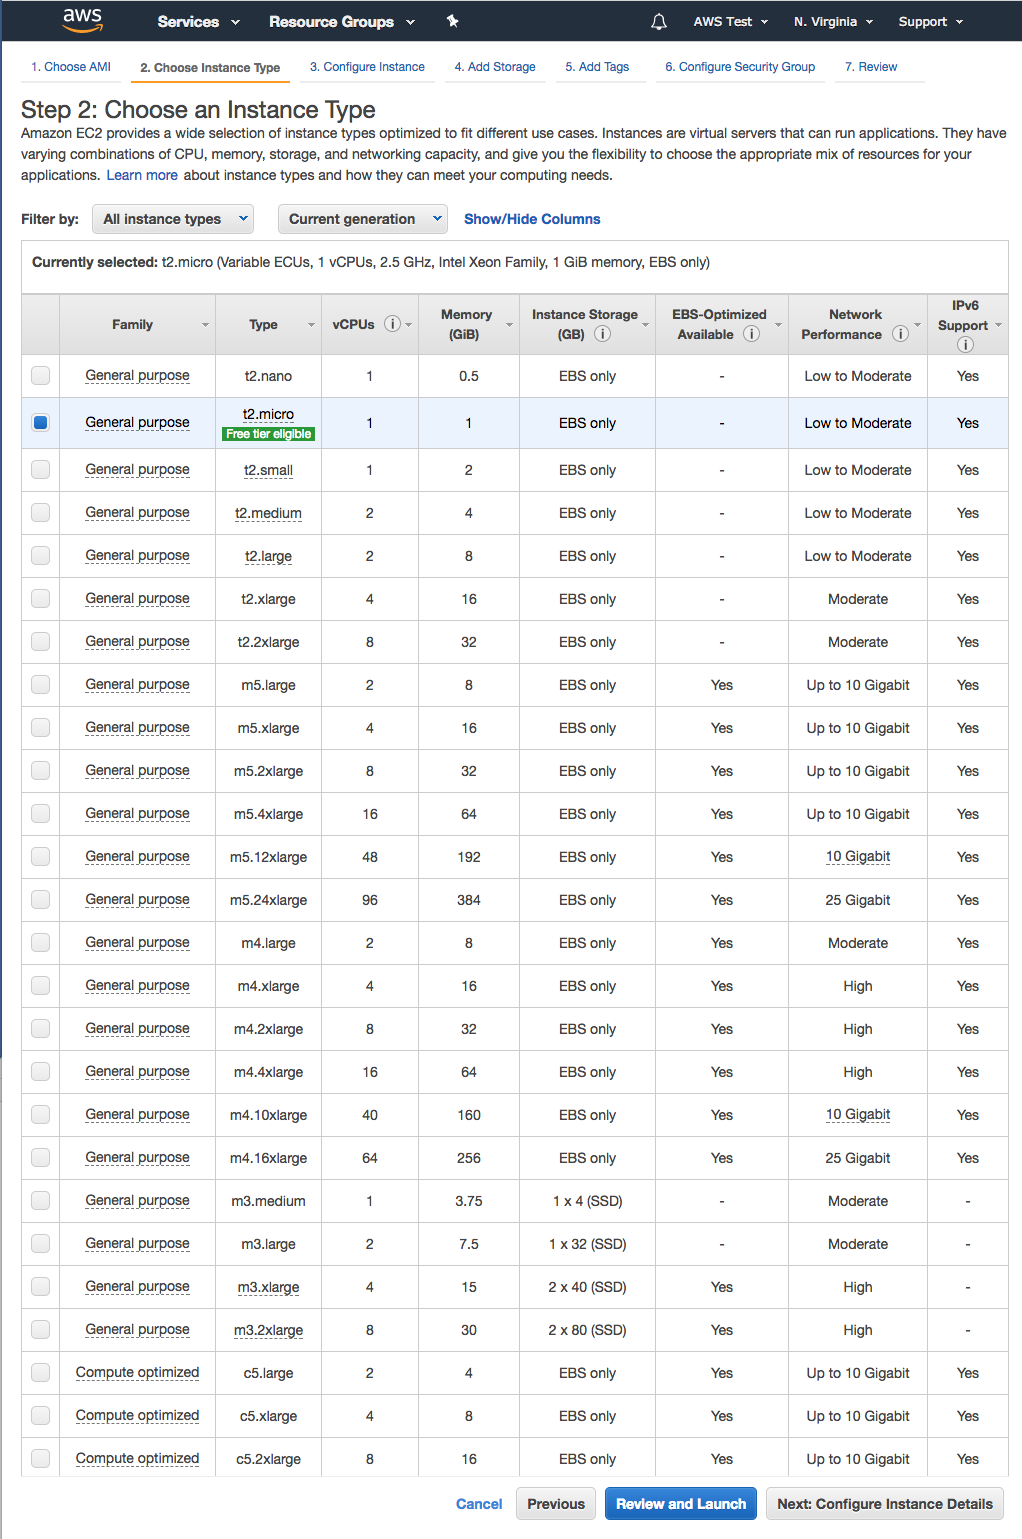
Choose an Instance Type – Step 2

Step 2: Choose an Instance Type

Choose “t2.micro”
Click “Next: Configure Instance Details”


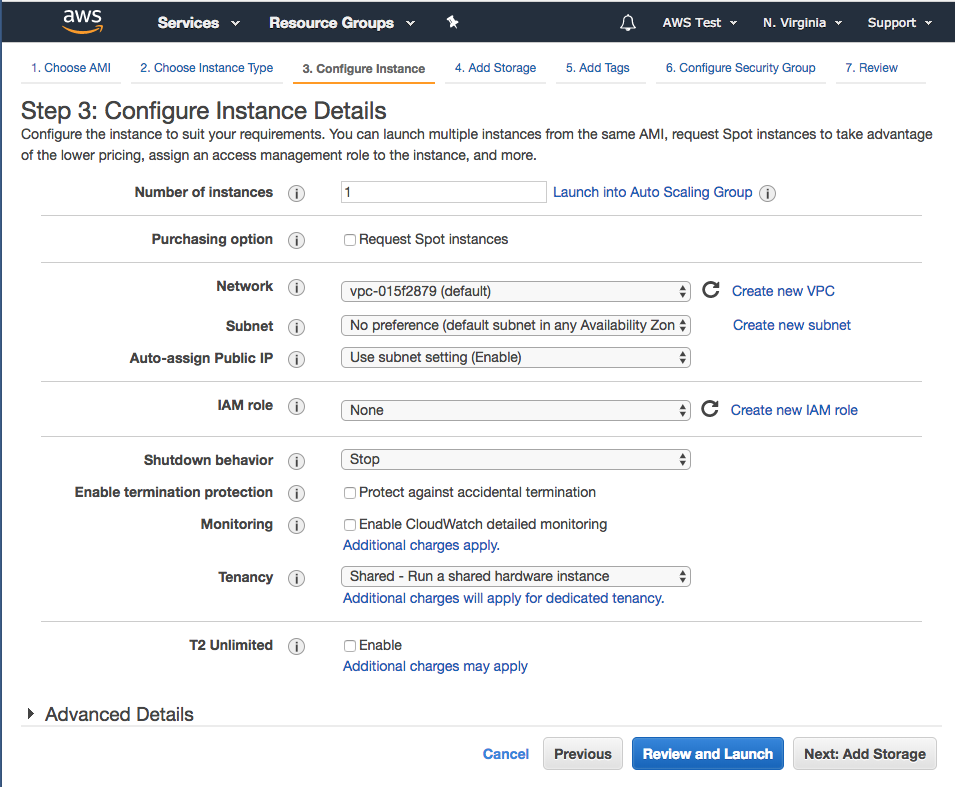
Configure Instance Details – Step 3

Step 3: Configure Instance Details

You can accept all default values on this page
Click “Next: Add Storage”


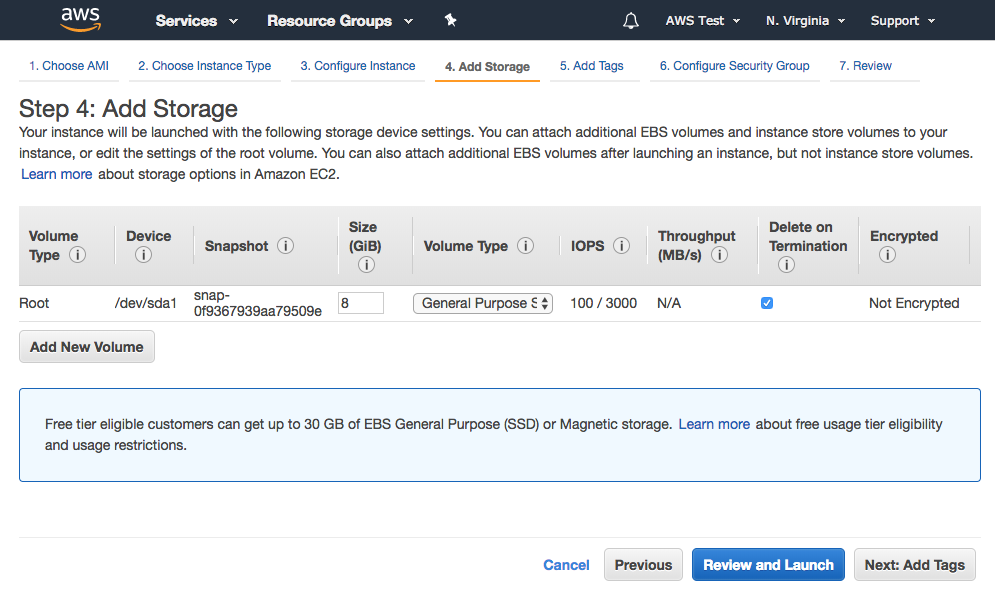
Step 4 – Add Storage

Step 4: Add Storage

Accept the default SSD side of 8GB.
Click “Next: Add Tags”


You can configure a tag here, but that is optional.
Click “Next: Configure Security Group”


Configure Security Group – Step 6

Step 6: Configure Security Group

By default, AWS configures SSH using TCP on port # 22. You will see a warning about the source value of 0.0.0.0/0. This is because right now we can SSH to our EC2 instance from any IP address in the world. Best practice is to restrict SSH access to just one or two IP address in order to maximize security, but for this article we can leave the default value. We also need to provide public HTTP access to our Node.js server via port 80.

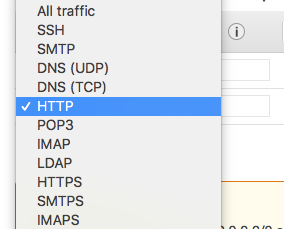
Click “Add Rule” and select the type as “HTTP”, the default settings for this will use TCP as the protocol and expose port 80 to all IPs.

Choose HTTP

To launch your EC2 instance, click “Review and Launch”, then click “Launch”.


Review Instance Launch – Step 7

Step 7: Review Instance Launch

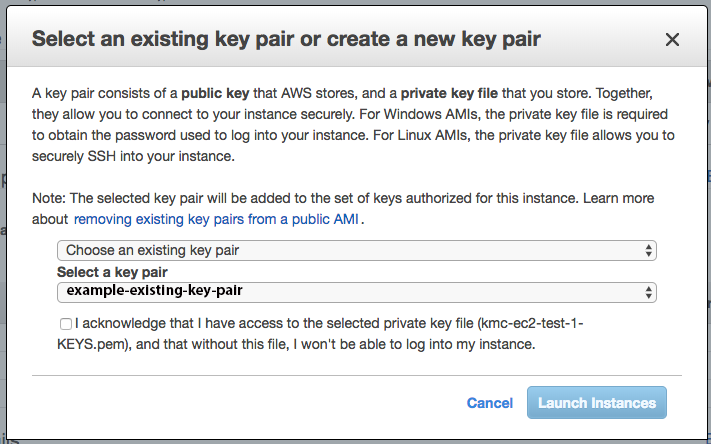
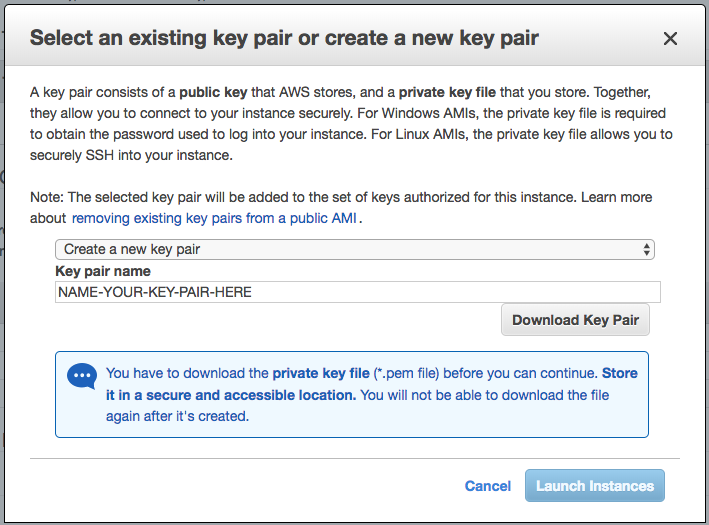
You’ll see the modal: “Select an existing key pair or create a new key pair”

You will be prompted to set up an SSH key which will give you access to your EC2 instance.

Select an existing key pair or create a new key pair modal

Choose “Create a new key pair”, and give the key a meaningful name.
After you enter a name for the key pair, click “Download Key Pair”

Download Key Pair

After you click “Download Key Pair”, a .pem file should start to download. You will need the contents of this file to create an SSH connection to your EC2 instance. It’s really important to keep this file in a safe place because anyone can SSH into your EC2 instance if they get their hands on it. Keep in mind: if you lose this file you will need to generate a new one.

After you have downloaded the .pem file, put that file in the following folder: ~/.ssh

Click “Launch Instance”


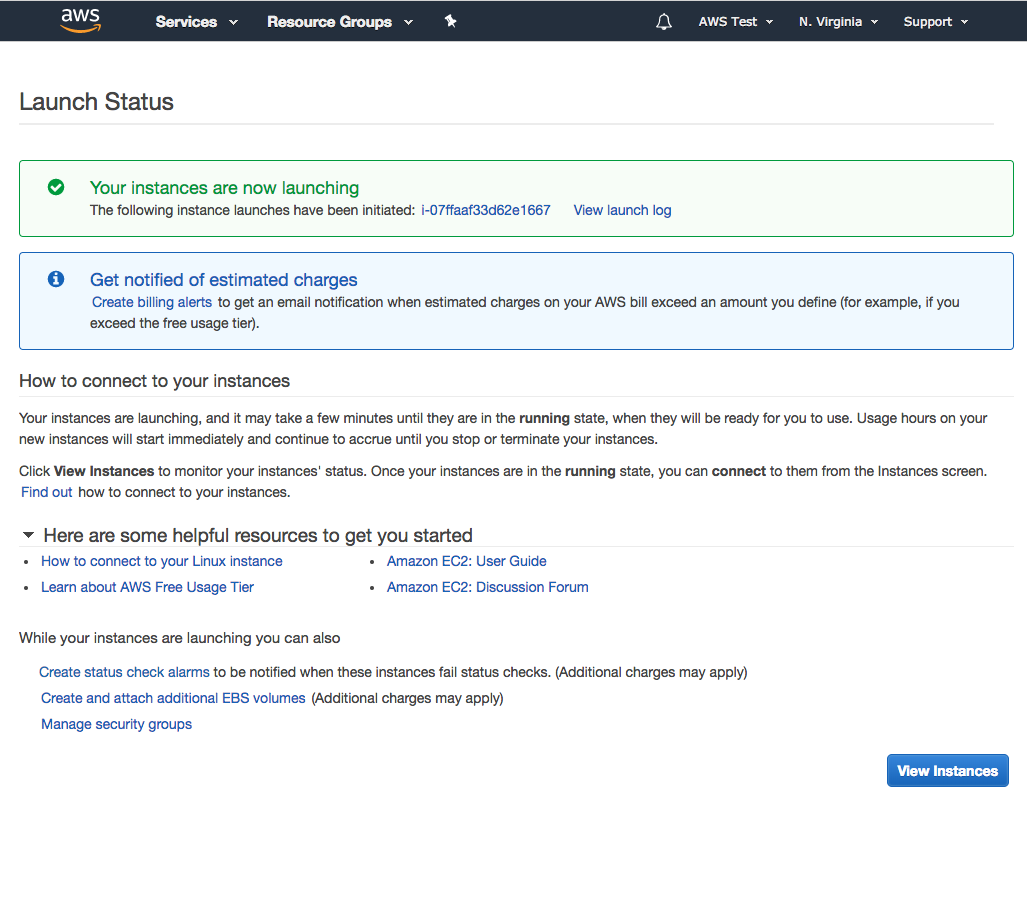
Launch Status

Launch Status

Click “View Instances”

Running Instances


SSH into your server

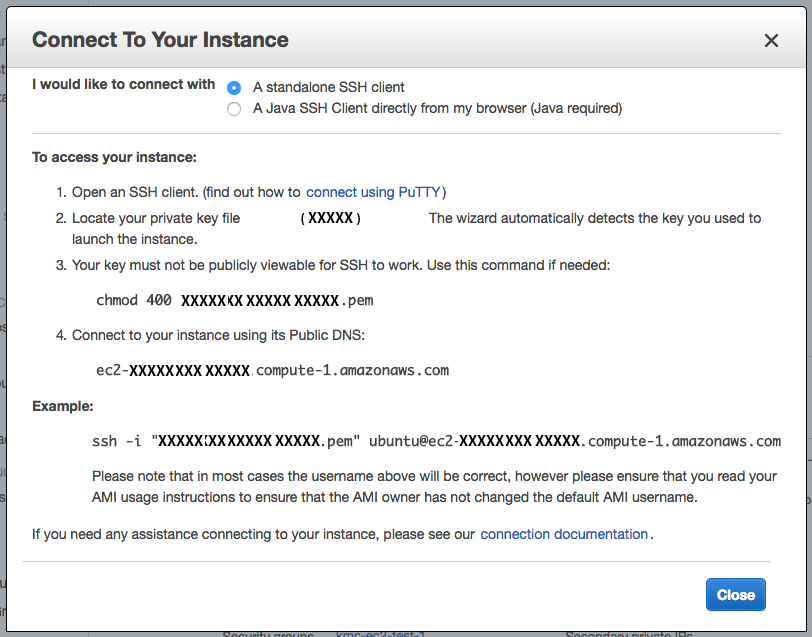
You’ll need to locate the public address of your EC2 instance. Right-click your instance and then click “Connect”. You’ll see the “Connect to Your Instance” modal

Connect to Your Instance modal

In the “Connect to Your Instance” modal, where it says: “Connect to your instance using its Public DNS”, copy the address you see.
This address should be in the following format: “ec2-1-2-3-4.compute-X.amazonaws.com”.


Open up your terminal application and execute the following command:

You will be connected to your EC2 Linux

Installing node and system dependencies

Install Node Version Manager

First we want to install NVM (Node Version Manager). Execute the following command:

Install Node

Before you install Node, you’ll need to log out and then reconnect with SSH. Log out by with the following command:

…and then re-establish your SSH connection.


Next, go to https://nodejs.org/en/ and check the latest version number of Node (for example, as of the date of this post, the latest version is: 8.9.4).
Install Node using the following command:

When the installation completes, verify the install using the following command:

Create a public HTTP endpoint

Create a new directory and move into it. For example:

Next initialize NPM with the following command:

…and accept all default values.

Now install Express.js using the following command:

Next we need to create the code for our web server. Execute this command:

This opens up the VIM editor. Press “a”, and then paste the following code into your terminal:

Now press the “esc” key, then “ : “, “w” and then “q”.

Finally, start the server:

Open Up Port 3000


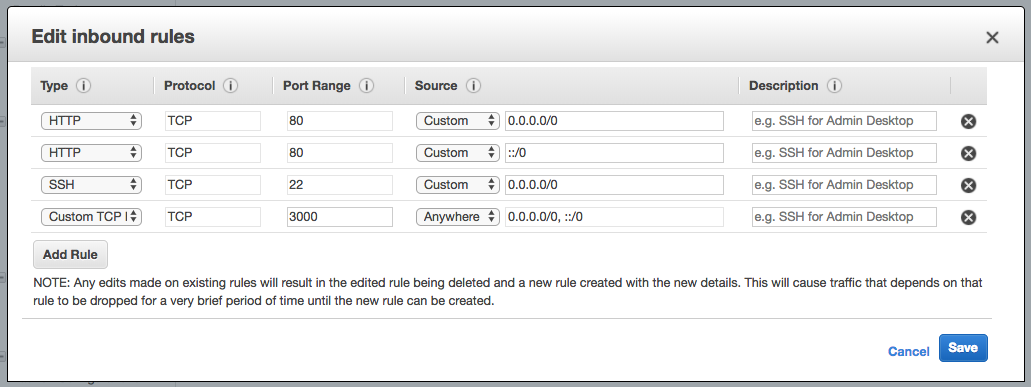
Back in the AWS EC2 Console, on the left side where it says: “NETWORK & SECURITY”, click “Security Groups”
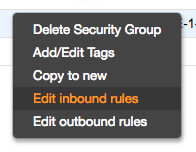
Right click the security group you set up and click “Edit inbound rules”.

Edit inbound rules

Click Add Rule.
Use a custom TCP rule on port 3000, set the “Source” to “Anywhere” and then click the “Save” button.

Edit inbound rules modal


Now you can view your EC2 instance in the browser using its Public DNS: ec2-1-2-3-4.compute-X.amazonaws.com

You should see the following message in your browser: “Your AWS EC2 Node.js Web Server is Working!”


Summary

This article covered only what you need to know in order to get your Node.js web server up-and-running. I only walked through the absolute minimum needed in order to spin-up an Ubuntu Linux instance on AWS EC2. One issue you’ll quickly run into is: uploading actual application files to your Linux instance. I’ll cover that in a new blog post. For now, I hope this article provided the information you needed to get your Amazon AWS EC2 instance launched and your new Node.js web server running.

Share Node.js code with JSApp.us

Node.js

JavaScript LogoJSApp allows you to write Node.js code in a browser, run it, and also share it with others

One of the things that makes front-end development so much fun is that you can easily create and share code. With tools such as JSFiddle, you can create an example web page and then send that JSFiddle URL to someone. Or you can even send someone the URL of a JavaScript file that you created so that they can just run $.getScript(yourJavaScriptURL) to inject your code in their page. And there are plenty of other clever ways to share / demo front-end code without a lot of fuss.

But what about Node?

Well, it’s not always so easy with Node, right? It’s server-side code, so you can’t just send someone a URL of your Node.js file to inject in their page. Github really saves the day in this case; you can create a public repo, and then send someone the Github repo URL. But that still requires the recipient to have at least git installed on their computer. And as we all know, once something takes more than 2 clicks, you start to lose your audience. That said, anyone with a reasonable attention span and a genuine interest in your code will follow the few clicks needed to clone your repo and run your code, but for quick little snippets, it sill feels like overkill sometimes.

For example, I like to write blog posts here about Node. In some cases, it does make sense to create a Github repo, especially if you have to leverage package.json, and the app requires file access, etc. But what about little examples? Just 10-20 lines of code to demonstrate a concept? Or even a simple working example?

Enter JS App!

When you navigate to jsapp.us, you immediately see some sample Node.js code. You can delete it and write your own. Then,  you simply click “test” in the sidebar (or CTRL + b), and a new browser window opens with your Node.js code running!

If you create a profile (free), you can save your code and share it with others. This is one of the most clever things I’ve seen in a long time. You can also go back and edit your files, re-name them, delete them. Really fun stuff.

If you need to create a quickie Node.js app and a Github repo would be overkill, JSApp might be just the tool you need. It’s been a while since I was this impressed but something I stumbled upon.

Bravo!

Renaming a file with Node.js

Node.js

Node.js LogoLearn how to rename a file with Node.js, in ten lines of code

I was fleshing out a few ideas on a project today and found myself trying to figure out how to rename a file with Node.js. I have no doubt that there are better ways to go about this, but I thought I’d document my findings.

The first thing I realized is that the low-level nature of Node.js offers a great deal of power, but also with that power comes the need to handle all of the details. For me, this meant getting references to four things:

  1. The name of the old file
  2. The name of the new file
  3. The full path to the old file
  4. The full path to the new file (which does not exist yet)

The first two items are easy: I just had to provide a name for the old file, and decide what to call the new file. The last two items involved a bit more effort. I needed to do three things:

  1. Get the path of the folder that contains the old file
  2. Add a trailing slash to that path
  3. Set a permanent reference to the old file

So, to accomplish all of these tasks, I decided to use the filepath Node.js module.

Example # 1A

 Example # 1B

Example # 1A shows the contents of package.json. There is only one dependency: the filepath Node.js module.

In Example # 1B, I first set references to the file system module, as well as the filepath module. Next, I provided strings for the names of the old and new files. The filepath module is then used to get the path to the current folder; I set that to the fpFolder variable (adding a trailing slash to that string, which will be needed when we append file names to that string).

The variable fpFile is used as a permanent reference to the old file (this will come in handy for Example # 3.) Finally, I build the full file paths for the old and new files. After that, a couple of console.log statements to make sure all of this work is correct.

Example # 1C

Example # 1C shows the output of the two console.log statements. Each path will vary for you a bit, so I simply put “[YOUR LOCAL PATH TO]” for the folder structure that leads up to that file in the github repo that you cloned (see “How to Demo” below).

This example does not actually rename a file. So, now I will use the file system module to make that change.

How to Demo:

  • Clone this github repo: https://github.com/kevinchisholm/video-code-examples
  • Navigate to: JavaScript/node-js/node-modules/fs/fs-rename
  • Execute the following command in a terminal prompt: npm install
  • Execute the following command in a terminal prompt: node filepath-1.js

Example # 2

In Example # 2, I use the file system module’s rename method to rename the file: “re-name-me.txt.” This method takes three arguments: a path to the old file, a path to the new file and a callback. The callback takes one argument: an error object. Inside of the callback, I check for the error object, and then output the path of the new file. So now, follow the instructions below to see this code in action. After you execute the code, the file: “re-name-me.txt” will be renamed to: “ive-been-renamed.txt.”

In order to rename Example # 2 again, you’ll need to manually rename the file: “ive-been-renamed.txt” back to: “re-name-me.txt”. After a few times back and forth, this got pretty tedious and I started to think that there must be a way to toggle the file back and forth. Meaning: If the file has been renamed, change it back to the original name, and so forth.

How to Demo:

  • Clone this github repo: https://github.com/kevinchisholm/video-code-examples
  • Navigate to: JavaScript/node-js/node-modules/fs/fs-rename
  • Execute the following command in a terminal prompt: npm install
  • Execute the following command in a terminal prompt: node filepath-2.js

Example # 3A

In Example # 3A, I use the ternary operator when setting the final path for the old and new files. In each case, I check to see if the old file exists, and then depending on the answer, I set each path accordingly.

Example # 3B

Example # 3B is the full code for the final version of this file. I combined all var statements and cleaned up the code a bit. When you follow the instructions below, you’ll see that you can keep executing node filepath-2.js over and over, and the text file will toggle between the old name and the new name.

How to Demo:

  • Clone this github repo: https://github.com/kevinchisholm/video-code-examples
  • Navigate to: JavaScript/node-js/node-modules/fs/fs-rename
  • Execute the following command in a terminal prompt: npm install
  • Execute the following command in a terminal prompt: node filepath-2.js

Summary

As I mentioned, there are probably a number of ways to do this that are more efficient. Everything I detailed here was the result of a few minutes with Google. Hopefully, this article either got you where you needed to go, or pointed you in the right direction.

Helpful Links for Renaming a File with Node.js

http://nodejs.org/api/fs.html

https://www.npmjs.com/package/filepath

Getting started with the filepath Node.js module

Node.js

Node.js LogoWhen you need to reference and work with the local file system in your Node.js program, the filepath module is quite a handy tool.

Even if your Node.js program is a web-server of some sort, working with the local file system is somewhat inevitable. While Node.js does provide low-level file system access (see the Node.js fs module), abstraction is always helpful, particularly when dealing with absolute paths.

The filepath Node.js module is a very helpful utility for simple access to file paths. You’ll need only a package.json file with this module as a dependency, an “npm install” command, and then you are up and running. This article provides a quick introduction to a few of the most common methods.

Example # 1A

Example # 1B:

In Example # 1, we first create the FP variable, which references the filepath module. Then we create the path variable, which holds the return value of the FP object’s newPath method. And finally, we output the path in the console. Example # 1B shows the terminal output when we use console.log to view the path variable. This path will vary for each user so I simply put “[YOUR LOCAL PATH TO]” for the folder structure that leads up to that file in the github repo that you cloned (see “How to Demo” below).

How to Demo:

  1. Clone this github repo: https://github.com/kevinchisholm/video-code-examples
  2. Navigate to: JavaScript/node-js/filepath
  3. Execute the following command in a terminal prompt: node filepath-1.js

Example # 2

Example # 2 demonstrates the list method. The only real difference between this code and Example # 1, is the new variable “files”, which receives the value of the list method, when called on our path variable. The files variable ends up as an array. Each element in the array is an object whose “path” property is a string that points to a file in the current directory.

How to Demo:

  1. Clone this github repo: https://github.com/kevinchisholm/video-code-examples
  2. Navigate to: JavaScript/node-js/filepath
  3. Execute the following command in a terminal prompt: node filepath-2.js

Example # 3A

Example # 3B

Example # 3C

Example # 3D

In Example # 3A, we see the recurse method in action. Just as the name implies, the recurse method will recursively list all of the files in the current directory. As a result, if one of those files is a folder, then it will list all of the files in that folder, and so on. This method differs from the previous two examples in that it takes a callback. The callback is a bit like a forEach call; it iterates over all of the files or folders in the path, and calls the callback for each one. Inside of the callback, the path variable is the current path being iterated over.

Example # 3C is the output from the code in Example # 3A.

In Example # 3C, we use the toString() method of the path object so that instead of a bunch of objects that we would need to handle, we just get the values we are after; the string representation of the path to that file or folder.

Example # 3D is the output from the code in Example # 3C.

How to Demo:

  1. Clone this github repo: https://github.com/kevinchisholm/video-code-examples
  2. Navigate to: JavaScript/node-js/filepath
  3. Execute the following command in a terminal prompt: node filepath-3.js

Summary

The filepath Node.js module has much more to offer than was demonstrated here. Hopefully, this article has demonstrated how easy it is to get started with filepath.

Helpful Links for the filepath Node.js module

https://www.npmjs.com/package/filepath

http://nodejs.org/api/fs.html

Getting started with the uglify-js Node.js module

Node.js

Node.js LogoLearn how to easily implement minification and file concatenation right in your Node.js program.

There is no doubt that tools such as grunt and gulp provide powerful front-end tooling, particularly for large-scale applications. But in some cases, you may want to “roll your own”. If you want to minify and / or concatenate files from your Node.js application, the uglify-js module offers a simple syntax yet plenty of muscle-power.

So, if you want to get serious, a quick package.json file and “npm install” command are all you need to get started. Once these two tasks are taken care of, you can minify one or more files, and concatenate the output to a new file. In this article, I will show you how to do just that in less than 20 lines of code.

Example # 1A

Example # 1B

Example # 1C

 Example # 1D

In Example # 1A we have the contents of the file: package.json. This tells npm that our program depends on the “uglify-js” module. Examples # 1B, 1C and 1D are the contents of the files we will “uglify”. The actual code has no significance. We just want to have a reference so that once we have uglified the files, we can see the difference in the output.

Example # 2A

 Example # 2B

In Example # 2A, we minify the file: file-1.js. In this case, the minified code is simply shown in the console. Example # 2B shows the minified code. It’s hard to imagine a case where we would want to minify code, but only show the result in a terminal window. Realistically, we need to write the output of the minified file to a new file.

How to Demo:

  1. Clone this github repo: https://github.com/kevinchisholm/video-code-examples
  2. Navigate to: JavaScript/node-js/uglify-js
  3. Execute the following command in a terminal prompt: npm install
  4. Execute the following command in a terminal prompt: node uglify-1.js

Example # 3


In Example # 3, we have the content of uglify-2.js. Here, we’ve moved things into a more real-world context; we save the result of the minification to a physical file. Now notice that after you execute node uglify-2.js in your terminal, there is a new file named: output.min.js, which is a minified version of file-1.js.

The first change we made was to add a reference to the “fs” module, which provides access to the file system in Node.js. The console.log statement was left in, just so you can still see the output in the console. Below that, we call the writeFile method of the fs object. We pass it three arguments:

  1. the name of the file that will contain the result of the minification process (i.e. the minified code)
  2. the content for that file (i.e. the minified code), and
  3. a callback. The callback takes one argument: an error object. In the callback, we check to see if there was an error, and if not, we send a success message to the console.

In this Example, the callback is optional as it has nothing to do with the minification process and only provides messaging as to the status of the minification attempt.

Although Example # 3 is more of a real-world context than Example # 2, it is still a bit unrealistic as we only minify one file. In a typical production workflow, one would likely want to minify and concatenate more than one file.

How to Demo:

  1. Clone this github repo: https://github.com/kevinchisholm/video-code-examples
  2. Navigate to: JavaScript/node-js/uglify-js
  3. Execute the following command in a terminal prompt: npm install
  4. Execute the following command in a terminal prompt: node uglify-2.js

Example # 4

Example # 4 shows the contents of uglify-3.js. The only change we have made is in the call to UglifyJS.minify. Instead of passing it a string, we pass an array. Each element in the array is a path to a file we want to minimize and the concatenate to the output file. In this case all of the files are in the same folder as our program, so there is no folder structure (i.e. just the file names). You can take the same exact steps to demo this example, and when you do, you will see that the file output.min.js contains the minified code of file-1.js, file-2.js and file-3.js.

Summary

The uglify-js offers a ton of options, parameters and features. For this article, I wanted to demonstrate how easy it is to set up and use this Node,js module. But if you want to understand the true power of uglify-js, there is a ton of documentation available online. Hopefully this article got you to first base!

Helpful Links for the uglify-js Node.js module

https://www.npmjs.com/package/uglify-js

https://www.npmjs.com/package/uglify-js#api-reference

http://lisperator.net/uglifyjs/

When did Walmart become so hip?

Node.js

WalmartLabs LogoWalmartLabs is doing some very cool things with Node.js. When the heck did all this happen?

Did you know that Walmart supports nearly 30 open-source modules, most of which are used in production, or that they created their own “private npm” to prevent hacks? Nope, neither did I.

I must admit, Walmart is not a company that comes to mind when I think of leading-edge web development. But like many older large-scale organizations, they have realized that they need to better leverage technology, or lose market share to companies such as Amazon. Well, it sure seems like they are very focused.

I had never heard of WalmartLabs until very recently. I kept noticing that in my Node.js-specific web-surfing, their name started to pop-up. So I took a look, and what I found was impressive.

It seems to me that Walmart has been hiring top engineering talent, and putting them to good use. They are doing some pretty cool stuff with Node and making serious contributions to the open-source community. Below are two videos I have recently viewed that are very much worth checking out. If you are interested in Node.js in the enterprise, these folks have a lot to share.

Cheerios and Fruit Loops: Frontend Node At Walmart by Kevin Decker

Walmart Senior Mobile Web Architect Kevin Decker talks about how Walmart threw out their legacy Java stack, and the many challenges of SPAs. In particular, he provides an in-depth discussion on pre-caching with Phantom.js, Thorax, the Cheerios Library, Fruit Loops (“a sugary cheerios) and Contextify.

Node.js at Walmart

Walmart Sr. Architect Eran Hammer talks about the server stack that they built on smartOs, hapi – their open-source Node framework, and custom “server partials”. He also discusses their use of Node as an orchestration layer, and some of the challenges of migrating from their legacy Java back-end.

http://nodejs.org/video/

Interesting Links related to WallmarLabs

http://www.walmartlabs.com/

https://github.com/walmartlabs

http://en.wikipedia.org/wiki/@WalmartLabs

http://www.walmartlabs.com/the-blog/

http://techcrunch.com/tag/walmartlabs/

Book Review: Node for Front-End Developers, by Garann Means

Node.js

Node for Front-End Developers, by Garann Means - CoverIf you are just getting started with server-side JavaScript, “Node for Front-End Developers” offers a fast, high-quality introduction.

The ubiquity of front-end JavaScript is undeniable. Not only has the appetite for web-based content increased dramatically, but so has the appetite for sophisticated user interfaces. More and more, visitors expect web-based content to offer complex interaction and high-performance. The explosion of mobile device use has only exacerbated this dynamic. Ryan Dahl’s Node.js turned the whole concept of JavaScript on its head by providing an open-source tool that allows the language to be leveraged on the server-side, significantly expanding the potential of this language.

Node for Front-End Developers, by Garann Means is a fast introduction to this incredibly powerful technology. The concept of creating a web-server provides a door through which clear and concise explanations present the basic concepts of server-side JavaScript. I found it particularly helpful that for such a short book, topics such as the query string, post data, path data routing, asynchronous events, templating, databases and MVC are well handled.

The book’s length is deceptive; readers will find a wealth of useful information here. While each topic represents a thread that deserves further reading, anyone who is new to Node.js will find Ms. Means’ introduction helpful. Her writing style is both relaxed and professional. From using NPM to install modules, to real-time communication with WebSockets, Node for Front-End Developers offers a range that is just enough to excite the reader, yet never too much detail. Any of the examples can be typed into your favorite text editor and fired-up with minimal effort. This is critical when delving into a new topic, and makes your introduction to Node.js disarming and fun.

  • Title: Node for Front-End Developers
  • Author: Garann Means
  • Publisher: O’Reilly Media
  • Date Published: February 7, 2012
  • Language: English
  • ISBN-10: 1449318835
  • ISBN-13: 978-1449318833

Creating a Simple JSONP API with Node.js and MongoDB

Node.js

MongoDB LogoBy leveraging the Node.js middleware “express”, we can create functionality for viewing, adding or deleting JSON data.

In a previous article: “Using Mongoose ODM to Connect to MongoDB In Your Node.js Application,” we learned the basics about connecting to a MongoDB database in a Node.js application. Because that article barely skimmed the surface of what is possible, we’ll take a few more baby steps here with our data. And for the sake of brevity, I’ll skim over the Mongoose.js details. If needed, you can refer to the article mentioned above for more details on that.

The goals for this article are:

  • Allow the user to view all data in the database
  • Allow the user to make a JSONP call to get all data
  • Allow the user to add a new name to the Sales database
  • Allow the user to delete all data in the database

When completed, this will be far from a robust or production-ready application, but we will, at minimum, learn how to view / add / delete data in our MongoDB database, using clean URLs in the browser.

Dependencies

In order to use the code in this article, you’ll need the following installed on your computer:

Node.js
MongoDB

Installation of these components is beyond the scope of this article, but if you follow the provided links, you will be pointed in the right direction.

File Structure

  • app.js
  • package.json

For this article, we will need two files: app.js and package.json. So, in your project folder, create these two empty files. The following sections will explain what to put in them.

Example # 1A

In Example # 1A, we have the contents of package.json. Note that for a more detailed discussion about package.json files you can search this blog for helpful articles. The two dependencies declared are “mongoose” and “express”. When you use node package manager to install dependencies, npm will download and install mongoose and express for us.

Example # 1B

In Example # 1B we see the command needed to install the dependencies for our application. Once you run this command, you will have everything needed to start writing code.

Getting Started

Open app.js in your text editor. From this point on, you can copy / paste the code in each example into the app.js (or you can scroll to the bottom of this page and paste the entire code listing in one step).

Example #2

In Example #2, we declare all of the top-level variables we’ll need in our script. Take note of “app”, which will be used to leverage the express middleware that we listed as a dependency. Also, “initApp”, which is called from the very end of this script. It is used to start the HTTP server.

Example #3

In Example #3, we have our database implementation. The details are identical to those in the previously mentioned article, so we’ll skip over that.

Example #4

In Example #4, we get into something new. If you remember from Example #2, the variable: “app” is an instance of the Express middleware object. We use the .get() method of that object to define what will happen when certain requests are made. When users navigate to the root of our web application, they are presented with a simple message. We accomplish this by passing two arguments to the .get() method: a string representing the requests we want to respond to (i.e. “/”), and an anonymous function. That anonymous function takes two arguments: “req” and “res”, which represent the request that was made, and the response object that we will send back. We use the .end() method of the response object, and pass in the string we want to send to the browser.

The second call to the app.get() method responds to “/json/delete”. It, in turn, calls a function named: utils.deleteAllData(), which will be explained a bit later.

Example #5

In Example #5, we use the app.get() method to respond to the request: “/json”. For this request, we want to show all of the data in the database. We start off by requesting all of the data in the database: salesMember.find({}).exec(). The anonymous function that is passed to the exec() method provides access to an error object (if there is one), and the results of our search. In this case, the result object is JSON, which contains all the data in the database, which we then stringify.

We then use the utils.isJsonCallback() method to determine if the user added a callback function name to the query string. If so, we wrap our database JSON with the named callback. We then deliver the JSON by passing it to the res.end() method.

Example #6

In Example #6, we respond to a request to add a new user to the database (i.e. “/addUser”). If you remember from the top of the script, the variable “url” allows us to leverage the same-named Node.js module, which provides programmatic access to the URL. We then use the “url” object to access the query string for the new user parameters. Once we have that information, we can leverage code that is nearly identical to the previous article, to create a new document in the collection. So just think of this as adding a row to a database table).

Once the new data has been saved, we then end the response with some HTML, informing the user of the successful data addition, and add a link that allows them to view all data or go to the home page.

Example #7

Example #7 contains all of the utility functions used throughout our code:

utils.isJsonCallback : Returns true if a callback name was provided in the query string
utils.getJsonCallbackName : Returns the name of the callback provided in the query string
utils.wrapDataInCallback : Returns the JSON data, wrapped in the callback function
utils.deleteAllData : Deletes all of the data in the database

Note: At the end of Example #7 you will also see a call to initApp(). This simply starts the HTTP server.

Example #8

So finally, in Example #8 we have the complete code for our working example. You can start the application by navigating to the root of the folder that contains app.js and entering the following command in the terminal: node app.js.

NOTE: On line # 97 of Example #8, I escape the double quotes that are part of HTML element attributes. I did this only because the color-coding of the plugin used to make code more readable was being particularly difficult for some reason. You will likely need to surround that entire string in single quotes, and remove the escape characters: “\”.

Summary

In this article we leverage MongoDB, mongoose and express middleware to create a very basic JSONP API. By using the .get() method of the express object instance, we created functions that respond to specific requests. As a result, we were able to provide the user with functionality to view all data, retrieve all data as a JSONP call, add a user to the database, or delete all data.

Using Mongoose ODM to Connect to MongoDB In Your Node.js Application

Node.js

MongoDB LogoMongoose ODM simplifies the process of connecting to your MongoDB database in your Node.js application and working with the data.

If you are a JavaScript developer, using MongoDB as your backend database is a joy. If for no other reason, you get to think of and interact with data as JSON objects. This serves to solidify the case for Node.js: those of us who live and breathe JavaScript on the client side, can now extend our skill set to include server-side development using the language we love.

The quickest way to get up and running with MongoDB in your Node.js application is to leverage Mongoose ODM. The Mongoose website defines it as a : “…straightforward, schema-based solution to modeling your application data…”. That’s a little deep for me. Suffice it to say, it makes interacting with MongoDB incredibly simple.

In this article, our goal is extremely simple: connect to MongoDB, create a record and then show that record in a web page. While we will barely scratch the surface of what is possible, we will, at minimum, accomplish our modest goal. I’m sure that, as a programmer, you’ll get halfway through this code and realize how much more is possible. You can then take this very basic code, copy and paste it into your own application and then build a more robust solution.

Dependencies

In order to use the code in this article, you’ll need the following installed on your computer:

Installation of these components is beyond the scope of this article, but if you follow the provided links, they will point you in the right direction.

File Structure

  • app.js
  • package.json

For this article, we will need two files: app.js and package.json. In your project folder, create these two blank files. The following sections will explain what to put into them.

Example # 1A


In Example # 1A, we have the contents of package.json. I won’t spend too much time on this file. For a more detailed discussion about package.json files you can search this blog for helpful articles. I will point out that the single dependency declared is “mongoose”. When you use node package manager to install dependencies, npm will download version 3.5.7 of mongoose for us.

Example # 1B

In Example # 1B we see the command needed to install the dependencies for our application. In this case, the single dependency declared is “mongoose” version 3.5.7. Once you run this command, you will have everything needed to start writing code.

Getting Started

Open up app.js in your text editor. From this point on, you can copy / paste the code in each example into the app.js (or you can scroll to the bottom of this page and paste the entire code listing in one step).

Example # 2

In Example # 2 we have the variables that we need for our application. Here are the details:

http : a module built into node.js that provides http server methods
mongoose : will be an instance of mongoose, which we listed as a dependency
dbConnString : tells mongoose where the database is running
dbport : tells mongoose which port to use
salesSchema : will be explained a bit later
salesMember : will be explained a bit later

NOTE: I define salesSchema, salesMember and salesMemberDocument at the top of the script because it is a best practice to define all of your variables at the top of your script or function, even if you are not ready to initialize them.

Example # 3

Connecting to the MongoDB Database

In Example # 3, we start out by connecting to the database. The first argument is the connection string, which tells mongoose to find the database. The second argument is a function. Because this connection is an asynchronous event, the anonymous function that we pass as the second argument allows us to safely act upon the completed connection event. Like many Node.js callbacks, this anonymous function takes two arguments: “err” and “res” (which you can of course name anything you want). In the callback, we are interested in the error argument. If the error argument is “falsy”, then we can assume it’s safe to proceed. In this case, we simply log the appropriate console messages.

Defining a Schema

Next up, we define our database schema. Again, just to keep things simple, I won’t go into this in detail. Suffice it to say that we are telling mongoose how the data we will work with will be structured.

Defining a Data Model

Now that we have defined our schema, we call the “model” method of the mongoose object, assigning the resulting value to our variable “salesMember”. When calling mongoose.model, we pass the name of the collection as the first argument (i.e. “Sales”). If the collection does not exist, then it will be created. Simple, simple, simple. The second argument is the schema that will be used, which in this case is the variable “salesSchema”.

Finally, we call the “remove” method of our “salesMember” model, which empties out the collection. This will of course delete the data that we are about to create each time you reload the page. You can safely skip this code block so that each time you run the script and create a new entry in the collection, it persists.

Example # 4

Creating a Document in the MongoDB Collection

In Example # 4, we finally get down to business. Here we overwrite the “salesMemberDocument” variable with a new instance of the “salesMember” model. We pass it an object which represents the data for MongoDB document (you can think of this as a record in a database table and our “Sales” collection as the database table). We then call the “save” method of the salesMemberDocument object. This persists the data.

Example # 5

Starting the Server and Presenting the MongoDB Data

In Example # 5, we create an HTTP server and start it, and then immediately write a “200 ok” header, with the Content-Type of ‘application/json’ (we will present our data as JSON in the browser). Next, we call the find method of the “salesMember” model, passing it an empty object. This tells the “salesMember” model to return everything (i.e. all records in the database table). That method call takes an anonymous function as an argument. We check to see that there were no errors, and if not, we send the result of our find method call to the browser, courtesy of JSON.stringify().

Example # 6

In Example # 6, we have the complete code for our Node.js application. If you paste all of this code into app.js, and be sure that you have successfully executed that file in Node.js, open a browser, and then enter “localhost:5000” in the address bar, you will see the application in action.

Running the Application

In your terminal, navigate to the application folder, and then run the following command:

Example # 7

In Example # 7, we have the JSON data returned in the browser. If you followed the instructions in each step of this article, this is what you should see (although the value of “_id” will differ).

Summary

In this article we learned how to use Mongoose ODM to make a connection to a MongoDB database in a Node.js application. We learned how to define mongoose as a dependency and install it with npm (node package manager). We also covered how to connect to the database, instantiate the schema class, and define a model. In addition, we discussed how to create a new document, save it, and then retrieve it. While this article presented the most bare-bones information on the topic, I hope that it has provided the background you need to get started with MongoDB.

Helpful Links for Mongoose ODM and MogoDB

General

MONGOOSE BASICS: STORING DATA WITH NODE.JS AND MONGODB

Mongoose ODM

http://mongoosejs.com/

http://mongoosejs.com/docs/guide.html

https://devcenter.heroku.com/articles/nodejs-mongoose

MogoDB

http://www.mongodb.org/

http://docs.mongodb.org/manual/

http://en.wikipedia.org/wiki/MongoDB

http://mrbool.com/course/introduction-to-mongodb/323