JavaScript Array.prototype.join()

Array.prototype

javascript joinThe JavaScript join method converts an array into a string.

Converting an array to a string in JavaScript may seem like an unlikely scenario at first, since they are dissimilar types, but this is not as uncommon as one might think. I’ve found that when I want to build a complex string, organizing the various parts of that string into array elements can be a helpful approach. For example: I have to build many vanilla JavaScript applications that feature custom CSS. The CSS is completely managed by the JavaScript code, but I ultimately inject a new STYLE element into the page, with the custom CSS as the content of that element. In building these custom styles, I organize each CSS rule into a string that is an element of an array. Then, after all of the custom CSS rules are created, I use the join() method to combine all of those array elements into one long string, and make that string the content of the STYLE element that is injected into the page.

At first glance, it may seem a bit odd to use a space, hyphen or forward slash as the separator, but as a developer, you are likely to find yourself in many situations in which the business requirements require you to solve unexpected problems. Converting a number of array elements to a string and separating each element with an odd character will be a challenge you will run into, so be prepared; if it has not happened yet, it will! Fortunately, the Array.prototype.join() provides an elegant solution to this problem.

If you pass no arguments to the JavaScript join method, then there will be no space between the characters of the string. Or, you can pass an argument that determines how to join the elements of the array. Which character(s) you provide is up to you. The most common practice is to use the default, which is a comma (” , “ ), but again, the choice is completely yours.

Try it yourself !

Click the JavaScript tab in the above example. We have an array with six elements: [‘a’, ‘b’, ‘c’, ‘d’, ‘e’, ‘f’]. When we call the join method on that array in the first console.log statement, it returns the string: “a,b,c,d,e,f”. This is the default behavior. That is to say: when you do not provide a separator argument, the characters in the returned string are separated by a comma  (” , “ ). In the following examples we do provide a separator argument. In each case, you will see that the separator is used to create the returned string.

Video Example Code

If you want to download the example code, visit this Github page, and then follow the instructions: bit.ly/kcv-javascript-array-join-fiddle

Summary

String manipulation in JavaScript can be tedious, as converting an array to a string is a problem that might tempt one to use a for-loop as a solution. But the Array.prototype.join() method was specifically designed to solve this problem, as it negates the need for any kind of for-loop or other iteration patterns. You can simply chain the join() method from your array reference and then pass a character as an argument, which tells the join() method how you want to separate the elements of the array when converting to a string. In the long run, it really is a smooth way to go.

Introduction to the JavaScript Array reduce() method

Array.prototype

JavaScript LogoJavaScript’s Array reduce() method can be a bit confusing. It doesn’t “reduce” any of the array elements, in fact they are not changed. This method “reduces” the array to one value.

An array is essentially a list, and in JavaScript, that list can contain any valid value. Most array-specific tasks involve “doing something” with the array, or you may need to “do something” with every array element. But what if you need to convert the array into one value? In other words, if the array contains a list of values, what one value could represent all of those values? In this article, I’ll explain how the JavaScript Array reduce() method provides a way to solve this problem.

An important concept to think about is how you can translate a list of values into one, that represents all of them. In some languages, all arrays must be “typed”. In other words, every array element must be of the same type. In JavaScript, you’re not limited in this way; a JavaScript array can contain any number of numbers, strings, arrays or any other valid JS value type.

It’s true that Typescript can limit this kind of freedom, but you’re not required to use Typescript and ultimately, Typescript compiles down to JavaScript. So, the reality of dynamic arrays in JavaScript has not changed. Therefore, if you want to reduce all of the values in your array to one, it’s important to consider the type of each element. If all of the elements in your array are of the same type, things are fairly simple. If the types vary, however, that can get complicated. Of course, that discussion is beyond the scope of this article, but I just wanted to point it out.

Using a while-loop – Example # 1

See the Pen Array.prototype.reduce() – Challenge by Kevin Chisholm (@kevinchisholm) on CodePen.

A “while” loop is a valid way to iterate a JavaScript array and that approach has worked for us here. We effectively “reduced” all of the elements of our array to the one value of 79, and we did this by adding each array element to the “getTotal” variable.

When I said that this approach “…has worked for us”, you may notice that I didn’t say that it “…worked well”. This is because the approach we took solved a problem, but created a couple of issues, the main one being boilerplate code. Most of the code in our “while” loop will be repeated if / when we need to solve the same problem elsewhere in our code. In addition to that, we have created an “i” variable to keep track of our counting during our “while” loop. It may seem innocent, but the more variables we create, the more variables we need to manage. Fewer variables is better.

Using the JavaScript Array reduce() method – Example # 2

See the Pen Array.prototype.reduce() – Solution – 1 by Kevin Chisholm (@kevinchisholm) on CodePen.

The Array reduce() method has dramatically simplified things in Example # 2. Notice how, in the getTotal the variable is now an anonymous function. In this function, we add the accumulator and currentValue arguments. Now you may be wondering: “What are the accumulator and currentValue arguments?” Well, take a look at the last line of code: milesPerDay.reduce(getTotal). What’s happening here is, we’re executing the .reduce() method of our “milesPerDay“, passing it the getTotal as an argument. This is the anonymous function that we detailed a few sentences ago.

So, the reduce method iterates the array and provides access to not only the currently iterated value (i.e. the current array element), but also the value that was returned by the previous execution of this function. This allows you to “accumulate” values across the array.

The arguments passed to the JavaScript Array reduce() method –
Example # 3

See the Pen Array.prototype.reduce() – Solution – 2 by Kevin Chisholm (@kevinchisholm) on CodePen.

Example # 3 does not provide any additional value with respect to solving the problem; the solution from Example # 2 is solid. The purpose of Example # 3 is to offer more detail about the arguments that are passed to the function provided to the Array reduce() method.

As demonstrated in the UI, the first argument is the accumulated value that’s being created as you iterate the array (i.e. the value returned by the last execution of this same function). The second argument, “currentValue”, is the value of the current array element. In the third, the index of the current array element is provided, and in the last, we see the array over which you are iterating.

I decided to show the value of the “array” argument to demonstrate that the Array reduce() method does not itself make any changes to the original. You can do that within the function passed to the Array reduce() method, but reduce() itself does not make any such changes. What you choose to do with these arguments is up to you, but just know that they’re helpful in building the logic you need to reduce your array to one final value.

Introduction to the JavaScript Array map() method

Array.prototype

JavaScript LogoJavaScript’s array map() method allows you to “do something” with each element of an array. This has always been possible, but the map() method’s syntax is simple and elegant.

When you have an array, you’ll eventually want to “do something” with it. You may, for example, want to do something with the entire array, such as showing all of its elements in the UI. But what about when you want to “do something” with each element in that array? This poses a bit more of a challenge.

First, you’ll need to iterate the array, which requires some kind of loop. Second, you’ll need to keep track of your iteration process, which requires a counter variable (which requires you to control that variable’s scope). This may seem like no big deal, but it’s work and each time you want to solve the same problem, you’re writing code that’s virtually identical, but not entirely the same, so you start to copy and paste.

This kind of repetitive boilerplate code is tedious, it must be managed, and as repeated code, it becomes a red flag. So, since this kind of coding presents unnecessary problems, what we’ll cover in this article, is how the JavaScript Array map() method solves these issues.

Using a for-loop – Example # 1

See the Pen Array.prototype.map – Challenge – 1 by Kevin Chisholm (@kevinchisholm) on CodePen.

Our first pass at this solution employs a for-loop. As mentioned above, this introduces a few problems. We have the “i” variable, for instance, which in this example is a global. In a real-world situation, however, we would want to put this code in a function so that the “i” variable does not wind up in the global scope. Also, the code in our for-loop is tedious. We need to use the “i” variable to keep track of the currently iterated rawNumbers element. There’s definitely a better way to go about this.

Using the Array map() method – Example # 2

See the Pen JavaScript Array.prototype.find() – Solution 1 by Kevin Chisholm (@kevinchisholm) on CodePen.

In Example # 2, we use the JavaScript Array map() method to solve the problems discussed. We’ve passed an anonymous function to that method, and this anonymous function takes the currently iterated number as its first argument. Inside of our function, we have some simple code that rounds the currently iterated number.

The biggest benefit to using the JavaScript Array map() method is that we no longer have the “i” variable or the for-loop. This is already a major improvement, especially the reduction of code, since it means that it’s simpler and easier to read. These are not minor details, and if this is a task that occurs multiple times in your application, you’ll soon find that the benefit gained by reducing repetitive code will quickly become significant.

Passing a function to the Array map() method – Example # 3

See the Pen Array.prototype.map – Solution – 1 by Kevin Chisholm (@kevinchisholm) on CodePen.

The approach in Example # 3 is similar, but there’s one big difference: instead of passing an anonymous function to the Array map() method, we pass to the Math.round method, which makes our code even easier to read. This is largely because we leave the implementation details to Math.round and eliminate even more code: our anonymous callback function. There are two reasons that we can do this: Math.round takes a number to round as its first argument, just like our anonymous function, and it returns the rounded number, just like our anonymous function. Simplified code is better code and in this case, we have Math.round to thank for that.

JavaScript Template Literals – Basics

JavaScript

JavaScript LogoTemplate Literals introduce a new syntax into JavaScript. The backtick character provides a way to have placeholders as well as multi-line text without special characters.

Working with strings is a daily activity for most JavaScript developers. One of the most common challenges is dealing with multi-line text. This is not an unsolvable problem, but it can certainly be painful. In this article, I’ll demonstrate how Template Literals can be used to make working with multi-line text much easier. Also, I’ll demonstrate how to use placeholders with Template Literals.

Double and single quotation marks are the way that we have always worked with strings in JavaScript. Either approach works fine; you just need to be mindful of some restrictions. For example, with valid JSON, all properties must be in double quotes. Also, backslashes must be used to escape double and single quotes, depending on which one is in use. But now we have Template Literals, which introduce a new character: the backtick. When using the backtick, you can include line breaks in your text and they will be respected when your text is rendered. You can also use the newline character: “\n”. When using the newline character, you can “programmatically” insert a new line in your text without literally doing so.

Using HTML to create new lines – Example # 1

See the Pen YeYmNb by Kevin Chisholm (@kevinchisholm) on CodePen.

For Example # 1, we’ve taken the “old school” approach: we have created text using single quotes, and used the BR HTML element to create new lines in our text. When you look at the UI for Example # 1, you see that the new lines were created just as expected. We also use string concatenation to combine the “firstPart“, “endpart” and “author” variables. This is all fine, and I can say I’ve employed this approach thousands of times. The drawback with this, however, is the need to use the BR HTML element to create new lines in our text. It works as long as we actually render the HTML in our browser, but what about a situation in which the text will be rendered in a non-browser context?

Using Template Literals – Example # 2

See the Pen JavaScript Template literals – Solution by Kevin Chisholm (@kevinchisholm) on CodePen.

Well, you’ll notice a dramatic difference in how we do things in Example # 2. Here, we’ve used Template Literals — specifically, the backtick character, to create our string. In doing so, we were able to include line breaks simply by literally using new lines in our text. You may have noticed that I’ve used a textarea HTML element to display the text, because, if I were to use a paragraph element, you wouldn’t see the line breaks. And this is because the paragraph element would simply render all of the text inside of itself. But by using a textarea HTML element, we can see that the line breaks have been preserved.

Now in Example # 2 you’ll see that there’s another new concept in play: the placeholder. On Line # 21, we create the “allText” variable, which contains the combined text contained in the “firstPart“, “endpart” and “author” variables. But instead of using string concatenation (as we did in the previous example), we use placeholders. The placeholder syntax is simple: you use a dollar sign and curly braces. Inside the curly braces, you can insert any valid JavaScript expression, which will be evaluated. In our example, we use this placeholder syntax to combine the “firstPart“, “endpart” and “author” variables.

Using the New Line Character – Example # 3

See the Pen JavaScript Template literals – Solution 2 by Kevin Chisholm (@kevinchisholm) on CodePen.

Example # 3 is identical to the previous one, with one exception: we use the newline character instead of literal new lines. The output here is exactly the same, but the method for creating the string is different. This is not necessarily a “better” or “more correct” way of doing things; it’s simply an alternative way to create new lines in your string literal. The advantage here, of course, is that the new lines are created programmatically. For example, if you had a function that generated this string, based on some dynamic logic, you might want to include a single line break or double line break, depending on the logic. The newline character makes this kind of task much easier.

JavaScript Object Literal Shorthand Syntax Basics

JavaScript

JavaScript object literal shorthand syntaxJavaScript Object Literal Shorthand Syntax is a feature that provides a path to cleanerJavaScript. Not only does it provide a way to reduce the size of your code, but it will be easier to read and understand.

Many ECMAScript 2015 features provide improved ways to solve problems. Object literal shorthand syntax is a bit unique in that it’s not so much a shiny new tool, but an improved syntax. Now it might be tempting to dismiss this kind of feature as less-than-stellar, but it’s worth working into your routine for a number of reasons. For example, an improved syntax can lead to less code, and not only that, the code you write can be easier to understand. And believe me, those who inherit your code will thank you for this. So, in this article, I’ll explain how to use object literal shorthand syntax when defining properties and methods.

Typical Object Literal Syntax – Example # 1

See the Pen JavaScript Object Literal Shorthand Syntax – Challenge by Kevin Chisholm (@kevinchisholm) on CodePen.

Let’s start with the way we’re used to working with object literals. In Example # 1 we have a getGoods() method that returns an object. The value argument is used on execution to set the value property, and the lowerValue() and raiseValue() methods lower and raise that value property. So this is all fine and everything works exactly as expected. In fact, if you look at the UI, the text that you see shows that our methods set and value property accordingly. Unlike many of the examples in this blog, there is nothing to “fix” here. Our code works fine and follows a typical syntax pattern because, as stated, I mainly wanted to establish that this is the way we normally work with object literals.

Object Literal Shorthand Syntax -Example # 2

See the Pen JavaScript Object Literal Shorthand Syntax – Solution by Kevin Chisholm (@kevinchisholm) on CodePen.

Now, in Example # 2 we do things quite differently. To start, look at Line # 3. When we set the value property, there is no colon; we simply assign the value of the “value” argument that was provided when the function was executed. This syntax is concise, thereby requiring you to write less code. Now it may seem like a very small savings here, but when you have an application with many thousands of lines of code, the savings quickly add up.

Okay, so next, look at where we define the lowerValue() and raiseValue() methods. Here, notice two things are missing: there is no colon, and we don’t need the function keyword. We simply provide the parentheses and the curly braces (as well as the code inside the curly braces). Here, too, the savings may seem small on a per-line basis, but in a large application, the difference will be dramatic. And the additional benefit, especially when defining methods, is that the code is a bit easier to read.

Introduction to JavaScript Default Parameters

JavaScript

JavaScript default parametersJavaScript functions can take arguments, but they are optional by nature. Default parameter syntax makes it easy to determine if one or more arguments have been provided and if not, initialize them.

While something like Typescript can make it easier to enforce certain practices, use is voluntary. Ultimately, you can’t force a consumer to provide one or more arguments to your function. There are ways to work around this problem, but solutions are not simple. As is often the case, for example, solutions sometimes introduce new problems. There’s good news on this front, though, and in this article, I will demonstrate the JavaScript default parameter syntax and how it solves the above-mentioned problem.

The JavaScript default parameter syntax is surprisingly simple; instead of specifying an argument in the parentheses, you initialize it. This may look a bit deceiving, and, in fact, some may think that by doing this you are absolutely setting that value. But quite the contrary: what you are saying is: “If argument X is not provided, then initialize it and set it equal to this value.” So, you’re providing a “default” value for that argument, and if that argument is provided when the function is executed, then the provided value is used.

Example # 1

See the Pen JavaScript Default Parameters – Challenge by Kevin Chisholm (@kevinchisholm) on CodePen.

In Example # 1, the addBonus() function takes one argument: “bonus.” In that function, we had to write code that checks to see if the “bonus” argument was provided. If it was, then we use the provided value. Now, this code works just fine, but there’s a problem. If we accept this solution, that means that we’ll write code that is virtually identical to it any place else in our application where the same problem needs to be solved. So, of course, it’s worth remembering here that any time we have repeated code, we know that there’s a better way to solve a problem.

Example # 2

See the Pen JavaScript Default Parameters – Solution 1 by Kevin Chisholm (@kevinchisholm) on CodePen.

Now, when you take a look at the approach in Example # 2, you’ll see an immediate improvement. We’ve leveraged default parameter syntax so that the “bonus” argument is now optional, thereby creating the biggest advantage of this approach, which is that there is no longer any repeated code. By simply initializing the “bonus” argument, we ensure that if not provided, that variable will have a value.

Understanding the difference between scope and context in a JavaScript method

JavaScript

scope and contextSometimes the concepts of scope and context are misunderstood in JavaScript. It is important to understand that they are not the same thing. This is particularly important inside of a method.

In JavaScript, the concept of scope refers to the visibility of variables. On the other hand, the concept of context is used to mean: “the object to which a method belongs”. That may sound like an odd statement, but it is accurate. The only time we care about context is inside a function. Period. Inside a function, the “this” keyword is very important. It refers to the object to which that function belongs. In other words, every function is a property of some object. In client-side JavaScript (i.e. in a browser), if you declare a function at the top of your code, then that function is a property of the window object. So, inside of that function, the “this” keyword refers to the window object. If you create a new object (let’s call it: “myObject”) and add a method (i.e. a property that happens to be a function), then inside of that function, the “this” keyword refers to the object (i.e. “myObject”).

So the main issue is that inside of a method, object properties and variables can sometimes be confused. In short; when the JavaScript “var” keyword is used, that is a variable. A variable will not be a property of an object (except in the global scope, which is for another discussion). But inside a method, any variable created using the JavaScript “var” keyword will be private to that method. So this means that it is not possible to access that variable from outside the method. But inside of a method, you have access to all of the properties of the object to which that method belongs. And you access these properties using the JavaScript “this” keyword. So, for example; if myObject.greeting = “Hello” and myObject.greet is a method, then inside myObject.greet, if I reference this.greeting, I should get the string: “Hello”. And if I have declared a variable named “speed” inside of myObject.greet, I would access it simply by referring to “speed” (i.e. I would not use the JavaScript “this” keyword). Also, a big difference between variables and properties in a method is that properties are always public. That is to say: all object properties can be seen and in most cases modified. But a private variable inside of a method is completely hidden from the outside world. And only our code inside of the method has access to that variable.

Try it yourself !

In above example, we start out by creating a property on the window object named: “foo”. This “foo” object is the result of an immediately invoked function expression (aka: “IIFE“). The reason that we take this approach is so that we can have a private variable: count. Our getCount method as access to that private count variable.

There is also a count property on the “foo” object. This property is available publicly. That is to say: we are able to make changes to the count property, whereas the count variable is not available outside of the IIFE. Our getCount method has access to the count variable, but that is the only way we can reach it.

When we call foo.getCount() without passing any arguments, then it increments the count property and returns it. This is CONTEXT. By using the JavaScript “this” keyword inside of the getCount method, we are leveraging the concept of context. Conversely, when we call foo.getCount(“scope”), then the count variable is incremented and returned. This is SCOPE. It is very important to understand the difference between scope and context in JavaScript.

JavaScript Spread Syntax – Basics

JavaScript

JavaScript Logo - spread syntaxJavaScript spread syntax provides a way to convert an array into a comma-separated list.

In this article, I will cover the basics of JavaScript spread syntax. But first, let’s start by taking a step back and thinking about how functions work in JavaScript. A function expects a comma-separated list of arguments, so, when we call a function, we need to provide zero, one or more arguments, separated by a comma. But what happens when we don’t know exactly what all of these arguments are? Now it may be tempting to simply pass an array, but then this array would be seen by the called argument as simply the first argument. In other words, argument[0] in the function would be an array. But this is not what we want; we want to pass an array to a function and for that array to be interpreted by the function as a comma-separated list of arguments.

Why is JavaScript Spread Syntax So Helpful?

So here’s where the spread syntax comes in: it allows us to put the arguments in an array, and then pass that array to the function we are calling. And, actually, this is only one example of how the JavaScript spread syntax can be helpful, but it certainly is a great way to start the conversation.

Inspect Arguments in a Function – Example # 1 A

The Output from the inspectArguments function – Example # 1 B

Inside every JavaScript function, the “arguments” keyword provides a reference to all arguments that were passed into this execution of the function. The “arguments” keyword is not an array, but an array-like object with a “length” property. Fortunately, however, this “length” property allows us to iterate the “arguments” object as if it were an array. The “inspectArguments” function from Example # 1 A contains a for-loop, which iterates over all the arguments it receives. Inside of that for-loop, we output the value of each argument.

Nothing too special there.

On the last line of Example # 1 A, we call the “inspectArguments” function, passing it: “…letters”. What’s happening here is that instead of passing the letters array, we pass “…letters”, which spreads the letters array out into a comma-separated list. Example # 1 B contains the output from Example # 1 A, and as expected, we see the contents of the letters array.

Spreading Out the Arguments – Example # 2 A

The Output Has Changed – Example # 2 B

Example # 2 A is similar to Example # 1 A, except in the way that we call the “inspectArguments” function. In other words, instead of passing just “…letters”, we pass “x, y, …letters”. This allows us to specify that the first two arguments that the “inspectArguments” function receives are “x” and “y” and the rest of the arguments is the content of the letters array. The point here is that we can mix the use of literals and the spread syntax. So as expected, Example # 2 B shows the output, which is similar to Example # 1 B, except that “x” and “y” are the first two console.log statements.

Using Spread Syntax for Both Arguments – Example # 3 A

The Output – Example # 3 B

Now, in Example # 3 A, we take things a little further. We use the spread syntax twice, which calls the “inspectArguments” function, passing the contents of both the days and letters arrays, spread out into one comma-separated list. Consequently, the output that you see in Example # 3 B is exactly as expected: the contents of the days and letters arrays.

JavaScript – For-In vs For-Of

JavaScript

JavaScript Logofor-in and for-of both provide a way to iterate over an object or array. The difference between them is: for-in provides access to the object keys ,
whereas the for-of operator provides access to the values of those keys.

Iterating over an object or array is a pretty routine task with JavaScript, in fact, it’s hard to imagine a day when you don’t’ need to perform this action. When Iterating over an array, things are a bit easier because you can leverage the array’s “length” property to set up your iteration. But when you need to iterate over the properties of an object, things get a little sticky.

Why For-In vs For-Of

In his article, I will demonstrate the difference between the for-in and for-of JavaScript operators. Now, while these two methods may seem to provide the same functionality, actually, they do not. In fact, you might say that they are polar opposites. The for-in operator returns the keys of an object of array, whereas the for-of operator provides access to the values of these keys.

For a better understanding, let’s take a look at some examples.

for-in – Example # 1

In Example # 1, we use a for-in loop to iterate over the elements of the days array. Now, since we are creating the variable: “day in days”, on each iteration of the loop, we have access to a day variable, which represents the element over which we are currently iterating. The output for this example can be seen in line #s 8-15, and the purpose of this example is to demonstrate that the for-in operator provides the keys of an object, not the values of those keys. It is possible to get ahold of these values, which we will see in a moment, but, for now, I just wanted to point out that for-in provides direct access to the keys of the object over which we are iterating.

Using Bracket Notation – Example # 2

Example # 2 is virtually identical to Example # 1, in that we leverage almost the exact same code to iterate over the days array. The difference here is that we manage to get ahold of the key values by using bracket-notation. So, instead of outputting console.log(day), we output console.log(days[day]). In a pseudocode kind of way, we are saying: “give me the value of the days property that had this key”. The output for this example can be seen in line #s 10-14, and it is exactly what we wanted: we see the value for each key. This does feel a little hackey though, so let’s see if we can do better than this.

for-of – Example # 3

In Example # 3, we’re able to achieve our goal by leveraging the for-of operator. Simply by using for-of (instead of for-in), we’re able to access the value of each key. So, not only is this a non-hackey way to approach this problem, it is also cleaner and easier to read.

JavaScript Rest Parameter – Basics

JavaScript

JavaScript LogoThe Rest Parameter allows you to do two things: (1) break out the first X arguments passed-into the function, and (2) put “the rest” of the arguments into an array.

Passing arguments to a JavaScript function is quite common. If a function expects one or more arguments, then it follows that inside of that function you’ll want to examine the incoming arguments. But things can get problematic when you’re not entirely sure exactly what the incoming arguments will be at design time. Now it’s true that inside of any function you have a local variable named “arguments” that is an array-like object, but there are two problems with this array-like “arguments” object.

First of all, it’s not an array, and while you can leverage the Array.prototype object in order to treat the “arguments” object as if it is a true array, that approach feels like a hack. Secondly, if you want to act upon the incoming arguments differently, based on their position, things can get messy. Now this is where the JavaScript Rest Parameter comes in – it’s a powerful tool that can help solve these problems.

Why Should I Care About the JavaScript Rest Parameter?

In this article, I will cover the basics of the JavaScript rest parameter. I’ll walk through the ways in which it can be used to collect the incoming arguments of a function and convert them into a true JavaScript array. I’ll also demonstrate how you can use the JavaScript rest parameter to break out the incoming arguments so that one or more of the initial arguments can be left as is, and then “the rest” of them can be put into an array.

Using the Rest Parameter – Example # 1 A

inspectArgs Output – Example # 1 B

Above we’ve created a function named “inspectArgs”, which we’ll use in the rest of the code examples for this article. In Example # 1 A, we use the JavaScript rest parameter to collect all of the arguments that are passed into the function, we and put them into an array. So, on line # 2, since theArgs translates to an array, we can use the forEach method of the “theArgs” variable to iterate that array. Inside of the anonymous callback function that we pass to the forEach method, we have access to each array element, as well as the index of that element. Now using this information, we output the value of each argument, and the index of that argument.

So, the key point here is that by placing “…theArgs” where the incoming arguments would normally go, we are saying: “take all of the arguments that are passed-into this function, put them into an array, and create a local variable for this function named theArgs”. And in Example # 1 B, you can see the output of Example # 1 A, which is exactly what we expect: the value of each argument that was passed to the inspectArgs function.

When you actually want “the rest” of the arguments – Example # 2 A

We See the First Argument, and “the rest” of them- Example # 2 B

Now, in Example # 2A, we made one small change, in order to really demonstrate the power of the JavaScript rest parameter. We changed “…theArgs” to “x, …theArgs” where the incoming arguments would normally go. So, what we are saying to the JavaScript engine here is: “let the first argument be what it is, but then take the rest of the incoming arguments and put them into an array”. So, before we use the “theArgs.forEach” method to iterate the “theArgs” variable, we take a look at the very first argument: “X” and output it.

Now if we take a look at Example # 2 B, we see the output of Example # 2 A. As expected, we see “x -> a” first, because we examined the first argument. Then we see the “rest” of the arguments, because we used the rest parameter to iterate the “rest of” the arguments that were passed into the function.

Skipping Arguments – Example # 3 A

The Second Argument Has Been Skipped – Example # 3 B


In Example # 3 A, we take an approach that’s very similar to that of Example # 2 A, by examining the first argument and outputting it to the console. But when you look at Example # 3 B, the output of this call to inspectArgs skips the second argument: “b”. This is because we specify: “x, y, …theArgs” where the incoming arguments would normally go. So now what we are saying to the JavaScript engine here is: “let the first and second arguments be what they are, but then take the rest of the incoming arguments and put them into an array”. As a result, we wind up with three local variables in this function: “a” “b” and “theArgs”. We output the value of “a” and “theArgs”, but we ignored “b”. The main point here is that we have changed the value of “theArgs” simply by specifying a “b” argument. So, as you can see, Example # 3 A truly demonstrates the power of the JavaScript Rest Parameter.

mapbox-gl Uncaught ReferenceError: t is not defined

Mapbox

JavaScript LogoMy Mapbox integration was working fine locally. But then when did a Webpack build and pushed the assets to my web server, there was a JavaScript console error

I was implementing Mapbox in an Angular 4 application and everything was going fine. I was working locally, but after getting some UI issues worked out, things seemed to be going very smoothly. But when I ran my build and then viewed the static assets remotely, I had this lovely little JavaScript error in my console: “Uncaught ReferenceError: t is not defined“.

Hmmmm. everything seemed just fine to me. I did some troubleshooting and the issue looked like it was being caused by Mapbox. How could this be? It was not a problem locally.

I found the answer here: Build fails when using mapbox-gl webpack 2 and UglifyJSPlugin #4359.

Credit really goes to zezhipeng  – whose answer was spot-on. Seems that when Webpack parses the mapbox-gl module, things do not go too well. So I just needed to add this line to my Webpack config:

(the “” is just whatever else you have in your module.exports.module object.)

And that was it, working again. Thanks zezhipeng!

What is the difference between LET and CONST in JavaScript?

JavaScript

JavaScript LogoThe JavaScript let and const keywords provide block-level scope, but there is a slight difference in how they behave. With const, you can not re-assign a value to the variable. With let,
you can.

Over time, JavaScript applications have grown in complexity. As a result of the increased code complexity programmers have been faced with a challenging dilemma: build applications that satisfy ever-evolving business requirements, yet continue to work with the same tools. It only makes sense that JavaScript would be in need of improvements, since for much of its history, functions were the only tools available to achieve scope. But, for several years, block-level scope was a feature that was sorely lacking. Then along came the ECMAScript-2015 specification that finally met that need with the let and const keywords.

The JavaScript let and const keywords are quite similar, in that they create block-level scope. However, they do differ a bit in the way that they behave. For example, the JavaScript let keyword is similar to the var keyword in that assignments can be changed. On the other hand, the JavaScript const keyword differs in that assignments can not be changed. So, once you declare a variable using the const keyword, you cannot re-assign a value to that variable. This does not mean that the variable is immutable. If you assign an object to a variable using the const keyword, you can mutate that object. You just can’t re-assign that variable with a new value. Let’s take a look at some examples.

Example # 1 A

Example # 1 B

In Example # 1 A, we have two different versions of the “i” variable. I say “two different versions” because the same variable name exists in two difference scopes, the global scope and a block scope. The block scope exists between the two curly braces: “{ }”. Then inside of the two curly braces, I used the JavaScript let keyword to declare a second “i” variable. Because we used the let keyword, that particular “i” variable is scoped to the block in which it was declared. And because of this, the console.log() statement on line # 6 outputs  50. I’ll just note here that it may seem a little odd at first to declare a variable anywhere other than at the top of the function, but this actually is the correct syntax; if we want a block-level scope variable, we use the let keyword inside of a set of curly braces.

Take a look at Example # 1 B. Notice how, in the second console.log() statement, the output is 100. This is because that second console.log() statement is in the global scope, and in that scope the “i” variable is equal to 100. So, there we have it: two different scopes without even having used a function.

Example # 2 A

Example # 2 B

Now, in Example # 2 A, there are two “j” variables.
The first “j” variable is a global, equal to 100, and the second is defined inside of the for loop. And because it’s defined inside of a block, it has block-level scope. Now look at example # 2 B. Because “i” is global, the “i” variable increments, just as we would expect. But notice that the “j” variable is always 50 in each console.log() statement, even though there is a global “j” variable. This is because on each iteration of the for loop, a block-level “j” variable is declared using the let keyword, and it is incremented (just to demonstrate that with let, we can re-assign a variable value). So in this case, with each iteration of the for loop we have a block-scoped “j” variable and it is always 51. Note that the global “j” variable is ignored on line # 12.

Example # 3 A

Example # 3 B

In Examples # 3 A and # 3 B you’ll see a similarity to Examples # 1 A and # 1 B, the only difference being the use of the use of the const keyword instead of let when declaring our block-level version of the “i” variable.

Example # 4 A

Example # 4 B

Now here in Example # 4 A, we’ve run into a problem. We tried to take the same approach as Example # 2 A, that is, we tried to increment the “j” variable declared on line # 6. The problem, though, is that when you use the JavaScript const keyword, you cannot re-assign a new value to a variable. So when you look at Example # 4 B, you’ll see that we never see the full output of the for loop that we expected, because line # 9 of Example # 4A throws a TypeError. This is because when we try to change the value of “j”, we find that this is not possible because it was created using the const keyword. In other words: it’s a constant.

Example # 5 A

Example # 5 B

Now Example # 5 A is virtually identical to Example # 4 A, except that we have not tried to increment the “j” variable. And when you look at Example # 5 B, you’ll see that we no longer have an error. In the console, the value of “j” is 50 every time.

Summary

So to recap, we now know that the JavaScript let and const keywords allow you to create block-level scope for variables, which, in turn, negates the need to always use functions to create scope. With block-level scope, all you need are the curly braces “{ }”, and within that block, any variable created using let or const is private (or local) to that block. This is particularly helpful with for-loops. And a very important thing to keep in mind: with const, you cannot re-assign values to a variable. In other words, any variable created with the const keyword is a constant and the assignment cannot be changed.

A lot to take in here, but I think it’s worth keeping on your radar, given this very functional block-level scope now increasingly available in browsers.

The Paradox of JavaScript

JavaScript

JavaScript LogoAre you getting an ECMA-Headache?

In the book: The Paradox of Choice: Why More Is Less, author Barry Schwartz argues that too many choices can dilute satisfaction. While this title spends much of its time in the context of consumer products, a similar argument can be made about the world of JavaScript. There is so much going on in the wild wild west that is JS, but is that really a good thing?

In short, I’d say  yes, it is a good thing. Even though it can be difficult to navigate the maze of libraries and frameworks, the explosion of activity breeds a world of innovation and creativity. But there is no doubt a cost; Where to begin? How to keep up? There is a lot of noise associated with the world of JavaScript. I actually feel that most of it is good noise, but it can be overwhelming.

I recently participated in an  Aquent Gymnasium webinar titled: keeping up with javascript is a full-time job, and I thought the title was brilliant. Not only are beginners feeling JavaScript anxiety, but experienced developers as well. I’ve heard many people ask the same questions: “Should I learn Angular or React”? – “If few ES-2015 features are currently supported, should I still learn them?” – “Grunt , Gulp or Webpack?” and so on.

ES6 vs ES-2015 vs ES-2016 vs ES-WTF

And speaking of ECMAScript, what is up with the naming-scheme? ES6 is AKA ES-2015, and ES7 is AKA 2016? Ok, that’s easy to remember. But what to learn? What the hell is a JavaScript symbol? And, what significance does it play in the million-and-fifty-fifth JavaScript slideshow I will have to make in my next Agile Sprint? Is this just like all that cruddy math that we had to learn in 8th grade, knowing perfectly well that we’d never ever need it in adult life?

Sigh.

So many libraries, so little time

This is where the paradox may lie. We have so many JavaScript toys to play with, but who has time to keep up with all of them? First, you have to be aware of changes in the JavaScript jungle. For example, Angular 4 is out, but there is no Angular3. Okie dokie. Next you have to understand the role of each library or framework. And then at some point, you want to learn how to use it, right?

Sometimes it is really tough to know where to invest your time. I’ve been hearing more and more about Aurelia and Vue.js. Both have enjoyed positive reviews and are gaining traction. But are they really going to take off line Angular? Am I really going to benefit in my next job interview by learning either one of these libraries or any of the other up-and-coming JavaScript libraries/frameworks ?

My answer: Bet on JavaScript every time

I’m not sure it is necessary to learn every single JavaScript framework or library that falls from the tree. We all have lives to live and there are only 24 hours in each day.

Something interesting about all of this craziness is that there is one common thread throughout: JavaScript.  JavaScript is the language used in all of these libraries/frameworks/build tools. So, you simply cannot lose by making JavaScript your top priority. If you have a free hour, spend 45 minutes studying JavaScript, and 15-minutes learning a new library. As long as your JavaScript skills continue to improve, you will always have the tools you need to learn any new library/framework/build tool. Not only that, but you will get better at picking them up. In addition, you will start to see the similarities between them and common patterns in the source code.

In short: you simply cannot lose by concentrating on JavaScript.

ECMA-Everything

Not only is it important to focus on JavaScript, but it is also key to learn the new features of the specification.  Most browsers do not support these features, but they will soon, so best to get ahead of the eight-ball. ES-6 and ES-7 features are powerful and when supported, will take much of the pain out of creating sophisticated client-side web applications. More important than Angular, more important than React, learn the newest features of JavaScript. And, Babel is your friend; it allows you to use features that browsers do not yet support. Also, the combination of Typescript/Webpack is another solid solution.

Planning is key

I can only speak to what has worked for me, and that is: always trying to decide where my time is best spent. For example, one of the biggest arguments in the JavaScript world is: “should I learn Angular or React?” Well, I’d say: learn both!

You don’t have to master each one, but learn enough to understand the differences between them as well as their strengths / weaknesses. Since, I happen to spend 90% of my professional day working with Angular2, I am a fan. But, I was worried that I was falling behind on my knowledge of React, so I spent my last Christmas holiday building an application with React. Now, I am far from a React guru, but in building a simple CRUD application that I actually use each day, I was able to gain an understanding of how it works, how it differs from Angular, and what its strengths are.

I’ve tried to take this approach with every other segment of the JavaScript ecosystem: NPM vs Yarn, Gulp vs Grunt vs Webpack, Typescript vs Vanilla JavaScript, and so on. In each case I ask myself: “What is the most important thing I need to know about this library/framework/build-tool ?” and then my goal is to be able to speak intelligently about it. Sometimes it takes a Saturday afternoon, sometimes it takes a month. Sometimes it turns out that I wind up using that particular tool heavily in my daily work. But I try to at least understand what it does, how it differs from its competitor and what it brings to the table.

Summary

In my opinion, there will always be a couple of JavaScript libraries or frameworks that you work with on a daily basis, a few that you used to work with, and then a zillion that you have heard of but have not had time to learn yet. They key from my perspective, is to accept this reality; you can’t have an expert-level knowledge of everything. But you can keep your finger on the pulse of what’s going on out there, and do your best to have a good understanding of the more popular tools and the role the play.

Why the create-react-app Node module is so awesome

React

angular2 KEYWORD

This tool is perfect for beginners as well as React experts

The JavaScript ecosystem is the wild wild west of the technology world. It seems like every year there is a new heavyweight champ. Right now, Angular and React are duking it out for the belt. They are both solid and enjoy tremendous corporate backing / community support. But they are as different as chalk and cheese. Learning new technologies can be painful. Chances are you got here because you have decided to take the dive into the world of React. Depending on your level of experience, this can be a challenge. The create-react-app Node module can definitely help.

Abstraction

The create-react-app Node module protects you from all of the pain involved with setting-up a React application. Granted, there are tons of JSFiddle links out there that show you how you can spin-up a React application simply by adding to script tags to your web page. Yes, but this kins of setup is not going to cut it in the real world. These are examples that help you get up-and-running and learn.

If you are going to build a real production-ready React application, even a small one, you need some kind of workflow. This is where the pain is: front-end tooling. The create-react-app Node module takes care of all of that for you, literally. Once you have cloned the github repo, you simply execute the following command: create-react-app YOUR_APP_NAME.

Yep, that’s it!

The create-react-app  module takes care of all your Webpack, Babel & ESLint configuration and setup. The funny thing is: you don’t see it. Under the hood there is one main dependency: the react-scripts Node module. This module is like your personal front-end engineer. It sets-up Webpack and Babel  and configures it. You never have to write one line of configuration code for any of this. After you run that create-react-app YOUR_APP_NAME command,  you cd YOUR_APP_NAME, and the npm install. After the npm install is complete, npm start is your last terminal command and your local instance is alive in the browser.

Why this is so amazing

The beauty of all this is: you can get a production-ready React application setup in about 3 minutes. Not only that, this setup was created by the Facebook React team and sanctioned by them. So, you have a great template to start with. The actual application itself is literally a static “Hello World” HTML page. Before you complain, keep in mind that if you are going to learn React, you have to actually write a little code! But the really amazing part is that the most painful aspect of setting up a React application is taken care of for you. You can clone, create, install in a couple of minutes and then start writing code.

Ejecting

Finally, there is the “Eject” command. When you run npm run eject, the create-react-app Node module will un-wrap all of the abstraction. What this means is: all of the front-end tooling remains in-tact and continues to work perfectly, but you are no longer protected from it. Tools such as Webpack and Babel are now available to you and completely customizable. The advantage to this approach is that you can customize your application however you like. It’s also a great way to learn about front-end tooling: you can really see the recommended ways that these tools are configured.

Down sides

There are a few downsides to the create-react-app Node module. The biggest one is that there is no consideration for CSS pre-processors such as LESS and SASS. Also, you cannot configure your application when creating it. You are stuck with the configuration and tooling that is provided. Of course you can use the eject command to reveal all of that detail and do as you wish, but that brings us to the final downside: when you eject, you can never go back.

Helpful Node.js Education Links

Node.js

JavaScript LogoNode.js is growing fast. This is a great problem. While is means that JavaScript lovers have a rosy future, it can sometimes be difficult to keep up with what is going on with Nodes.js

Here are a list of links that you might find helpful in your Node.js travels. In each case, I’ve provided a brief description of the link / organization / article, so that you have a sense of where you are are headed. If you feel that there is a Node.js link that I should have included in this article, please contact me at: kevin@kevinchisholm.com.

Critical Node.js Links


Node.js Logo

Title: nodejs.org

Link: nodejs.org

Description: Since this is the home page for Node.js, you cannot go wrong here.


Node.js Logo

Title: Node.js v6.6.0 Documentation

Link: nodejs.org/api

Description:The official documentation for Node.js. Very well organized and easy to read. Almost the most important Node.js documentation you can read if you are getting started.


Node.js Logo
Title: npm – Home of the package manager for JavaScript.

Link: www.npmjs.com

Description: It’s hard to imagine doing anything with node without the use of NPM. This is the official home page of NPM, and a great starting point.


Node.js Logo

Title: Homebrew. The better way to install Node.js on Mac OSX

Link: brew.sh

Description: I’m being a little opinionated here (ok. I’m being a lot opinionated). But, for Mac users, Homebrew is the way to go when you install Node.js (sorry Windows users, you are stuck with scoop : – )


Node.js Logo

Title: Built in Node.js – startups, apps, projects using Node

Link: builtinnode.com

Description: A great way to learn about who is using Node.


Node.js Newsletters

Node.js Logo

Title: npm Weekly

Link: www.npmjs.com/npm-weekly

Description: Find out what npm has been working on, thinking about, and talking about every week. A great newsletter if you are into NPM.


Node.js Logo

Title: node weekly

Link: nodeweekly.com

Description: A free, once–weekly e-mail round-up of Node.js news and articles. Another awesome newsletter if you are into Node.


Other Helpful Node.js Links

Node.js Logo

Title: Node Tutorials on scotch.io

Link: scotch.io/tag/node-js

Description: scotch.io tutorials are very easy to read. The site is in general a great resource for learning about a number of web development technologies. Fortunately, they are passionate about Node!

Share Node.js code with JSApp.us

Node.js

JavaScript LogoJSApp allows you to write Node.js code in a browser, run it, and also share it with others

One of the things that makes front-end development so much fun is that you can easily create and share code. With tools such as JSFiddle, you can create an example web page and then send that JSFiddle URL to someone. Or you can even send someone the URL of a JavaScript file that you created so that they can just run $.getScript(yourJavaScriptURL) to inject your code in their page. And there are plenty of other clever ways to share / demo front-end code without a lot of fuss.

But what about Node?

Well, it’s not always so easy with Node, right? It’s server-side code, so you can’t just send someone a URL of your Node.js file to inject in their page. Github really saves the day in this case; you can create a public repo, and then send someone the Github repo URL. But that still requires the recipient to have at least git installed on their computer. And as we all know, once something takes more than 2 clicks, you start to lose your audience. That said, anyone with a reasonable attention span and a genuine interest in your code will follow the few clicks needed to clone your repo and run your code, but for quick little snippets, it sill feels like overkill sometimes.

For example, I like to write blog posts here about Node. In some cases, it does make sense to create a Github repo, especially if you have to leverage package.json, and the app requires file access, etc. But what about little examples? Just 10-20 lines of code to demonstrate a concept? Or even a simple working example?

Enter JS App!

When you navigate to jsapp.us, you immediately see some sample Node.js code. You can delete it and write your own. Then,  you simply click “test” in the sidebar (or CTRL + b), and a new browser window opens with your Node.js code running!

If you create a profile (free), you can save your code and share it with others. This is one of the most clever things I’ve seen in a long time. You can also go back and edit your files, re-name them, delete them. Really fun stuff.

If you need to create a quickie Node.js app and a Github repo would be overkill, JSApp might be just the tool you need. It’s been a while since I was this impressed but something I stumbled upon.

Bravo!

What are the Five Ways to Create an Angular Service?

Angular Services

Angular.js LogoThere is a lot of confusion over the difference between the angular’s factory, service and provider methods. This article explains the different ways that an Angular service can be created.

The official Angular 1.4.0 documentation page describes services as: “…substitutable objects that are wired together using dependency injection (DI)” Stating: “You can use services to organize and share code across your app.” While a bit dry, I think this is actually a perfect description. I think that many who are new to Angular are confused about which of the many methods available should be used when creating a service. Fortunately, the answers are fairly simple and straightforward.

Five Ways to Create an Angular Service

The angular.value method

The value method, one the most overlooked approaches, is most commonly used to turn a global into an injectable Angular service. While the approach is simple, the application is powerful: the value of your service is testable and can be shared across your application.

Example # 1A

 Example # 1B

Examples 1A and 1B use the exact same syntax when creating an Angular service. The only difference is their value. Example # 1A’s “speed” service is a primitive: the number 100. Example # 1B’s value is an object with a “title” property.

The angular.constant method

This works the same as the angular.value method. The difference is that it is available during the configuration phase of your Angular application. Also, the value of a this constant can never be changed.

Example # 2

 The angular.factory method

The angular.factory method takes two arguments: a string and a function. The string represents the name of the service, which will be used to gain access to this service (e.g. to inject this service into a controller as a dependency). The anonymous function that you provide as the second argument provides the actual implementation. When you register your service, Angular will execute this function.

The only difference between angular.factory and angular.service is that the callback function you provide with the service is instantiated. With the factory method, it is executed.

Its return value is cached and will be shared with any component of your application that injects the service. It is important to note that this function will only be executed once.

This is the scenario most are thinking of when they intend to create an Angular service, and probably the most common approach.

Example # 3

In Example # 3, we create a service named “myService”. Any component that lists this service as a dependency will receive the object that you see returned. This object has one method: “sayHello”.

The angular.service Method

This approach is similar to the angular.factory method with one big exception: the function that you provide is treated as a constructor and is instantiated. It is important to note that this function is instantiated only once and every component that injects your service as a dependency shares the same exact cached object that this instantiation returns.

Example # 4

Example # 4 is very similar to Example # 3, except that the latter uses the JavaScript “this” keyword when defining the properties and methods of the object that the service returns. The reason is: the function provided when registering the service is instantiated (i.e. treated as a constructor), not just executed.

The angular.provider method

This approach is the most complex of the five. The angular.provider method is actually used under the hood by all four of the other service registration approache. While this approach is more verbose, it provides a powerful feature that the others do not: the service you are registering is available to your application during its configuration phase. This is useful when creating a service that will be shared across multiple applications and needs to be configured in order to work properly.

When using angular.provider, there are two important details to keep in mind:
  1. The callback function that you pass to the angular.provider method will be treated as a constructor – This means that the callback will be instantiated for each application that it is registered with, and its return value will be shared by all components that inject that service.
  2. The callback function that you pass to the angular.provider method must have a $get method – When you inject a service into a component that was created using the provider method, Angular will call that services’ $get method to retrieve the object to inject.

Example # 5

In Example # 5, we have created an angular service named “helloWorld”. This service is available during the configuration phase of your application. After registering the service, we call the app.config method, passing the “helloWorld” service as an argument to the anonymous callback function. Inside of that callback, we use the services “setName” method to set the value of its “name” property. We could use the “helloWorld” service in a different application and set that “name” value to something different, as needed.

Summary

Most of the time, the angular.factory method is the approach that is desired / used. This does not mean it is the “right” way to create an Angular service. The approach you take should be driven by the problem you are looking to solve. angular.value and angular.constant are often helpful when you need to share a simple value across your application (keeping in mind that the value returned by angular.constant cannot be changed). The angular.service method is helpful when you want your service to be instantiated, and the angular.provider method provides a way to configure your service before any component gains access to it.

Helpful Links for Understanding the Different Ways to Create an Angular Service

https://docs.angularjs.org/guide/services

http://blog.pluralsight.com/angularjs-step-by-step-services

https://blog.codecentric.de/en/2015/03/five-ways-to-write-better-angular-services/

Getting Started with Gulp.js – Creating Multiple Tasks

Gulp.js

Gulp.js Logo
Learn how to create multiple Gulp.s tasks

In the article: “Getting Started with Gulp.js – Introduction,” I discussed the absolute basics needed to set up a Gulp.s task.  In that article’s gulpfile.js, we had only one task named “default”. One of the great features of Gulp, is that it will look for a task named “default”, and execute it automatically. This is fine if you have only one task, but as soon as you have two or more, it makes sense to give each one its own name.

When you have one or more named Gulp tasks, you’ll want to execute those tasks from the default task.

Figure # 1 – The folder structure before running Gulp

File structure - before

In Example # 1, you’ll see the folder structure before running gulp. So, if you look in the BUILD folder, you’ll see two sub-folders: JS and CSS. The file main.scss will be compiled into CSS and the output will go into the BUILD/CSS folder. The file: SRC/JS/main.js will be uglified and the output will go in the BUILD/JS folder. The file SRC/COFFEE/global.coffee will be compiled and the output will also go in the BUILD/JS folder.

Example # 1 – gruntfile.js

In Example # 1, we have the contents of gruntfile.js. You’ll notice that there are four tasks: default, uglify, sass and coffeescript. The default task is executed automatically. So that task simply executes the other three tasks.

How to Demo the Code Example

  1. Clone this repository: https://github.com/kevinchisholm/gulp-basics-tutorial-multiple-tasks
  2. Install node_modules with this command: npm install
  3. Run gulp: gulp
  4. Look in the following folder: BUILD/CSS, you will see the file: main.css
  5. Look in the following folder: BUILD/JS, you will see the files: main.js and global.js

Figure # 2 – The folder structure after running Gulp

File structure - after

Summary

One of the key features of Gulp is the ability to have a default task. This task is always executed by default. In this article, I demonstrated how to execute one or more named Gulp tasks from within the default task. While I chose to uglify JavaScript, compile SASS and compile coffeescript, you can create Gulp tasks for any need you might have. I hope that this article has made it easy for you to understand how to run multiple Gulp tasks.

Getting Started with Gulp.js – Introduction

Gulp.js

Gulp.js LogoLearn how to automate your front-end build process using this streaming build system

A while back, I posted an introduction to Grunt, the JavaScript task-runner. I also posted an article about the basics of concatenation and minification with Grunt. Grunt is an excellent tool, and still enjoys a large audience. That said, the most common complaint against Grunt is that its configuration-based syntax can become tedious and cryptic. In this article, I will introduce you to Gulp.js, an excellent streaming JavaScript built tool that has become quite popular in recent years. For this article, I will not discuss the details of installing Node or Gulp. There are plenty of articles available that will provide full details on that. Instead, I will provide a very gentle introduction to Gulp and how to create a simple Grunt task.

Code over configuration

Gulp’s success has to a large degree been based on the fact that it provides a powerful alternative to Grunt’s configuration-based approach. Gulp leverages actual JavaScript code in order to accomplish its tasks. With Gulp, you read files into memory, do things to the files, and then output the files from memory to a specified destination folder.

Easy Setup

Gulp is a node module. Installation and setup could not be simpler. On a very high-level, the steps needed are:

  1. Using npm (node package manager), install Gulp
  2. Create a file named: gulpfile.js or gulpfile.coffee (coffeescript)
  3. Execute the following command in a terminal: gulp

That’s it!

Gulp is simple

One of the things that amazed me most when first looking into Gulp was the fact that there are only four APIs. Yep, four. But there is a great deal of power lurking beneath the hood.

gulp.task – Defines a task
gulp.src – Reads files into memory
gulp.dest – Writes files from memory to disk
gulp.watch – Watches the files defined by gulp.src for changes

Note: The official Gulp documentation states that there are four APIs, but I find it odd that the .pipe method is not counted amongst these.

A Simple Example

I think many people might wonder: “…what would I use Gulp for?” A very common task in front-end tooling is concatenation; you may have three JavaScript files and want them to be combined into one JavaScript file that will be used in your web page. In this example, we will take three JavaScript files, concatenate them, and then output one file that consists of those three files.

Where to Get the Example Code

Clone this repository: https://github.com/kevinchisholm/gulp-basics-tutorial-introduction

Example # 1A – package.json

In Example # 1A, we have the contents of package.json. This file tells Node that we need the following modules: gulp, and gulp-concat.

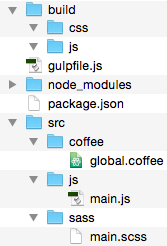
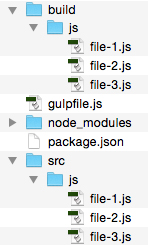
Figure # 1: Project File Structure

Project File Structure

In Figure # 1, we have the folder structure of our first example. Notice that in the SRC/JS folder there are three JavaScript files. These are the files that we will concatenate into one file. The BUILD/JS folder is empty, but that is where the final concatenated file will be written.

Now, before going any further, let’s install the node modules which our code will need. Navigate to the example-1 folder with your terminal application and then execute the following command: npm install

When running npm install, you’ll notice some activity in the console (don’t worry about the “warn” message), and then there will be a “node_modules” folder. These are the node modules specified in package.json. npm has downloaded them for us and put them in the “node_modules” folder. A detailed explanation for npm and the “node_modules” folder is beyond the scope of this article. A few google searches on either topic will yield plenty of links for further reading.

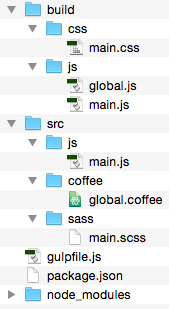
Figure # 2: Project File Structure with “node_modules” folder.

Project file structure after installing node dependencies

In Figure # 2, you’ll see that we now have a “node_modules” folder. Let’s take a look at gulpfile.js.

gulpfile.js

This is the file where the Gulp code goes. Gulp does support Coffeescript, so gulpfile.coffee is also a valid file name, but for the sake of simplicity, I will only cover the JavaScript implementation.

Example # 1B – gulpfile.js

In Example # 1B, there are two things happening: First we create to variables, each representing a module that we need. Second, we create a gulp “task”. The gulp.task method takes two arguments: 1) a task name, which is a string, and 2) a callback function, which contains the code that defines the actual task. Here is where Gulp’s real power lies: a gulp task is driven by JavaScript code (i.e. code over configuration).

Returning a File Stream

A Gulp task always returns a file stream. This is to say that gulp will read a file into memory and you want to return that in-memory file object from your task’s callback function. In-between those two tasks, you “pipe” that file to one or more plugins that manipulate the file in some way.

gulp.src

In Example # 1B, we use the gulp.src method to read one or more files into memory. In this case, it is the three JavaScript files in our SRC/JS folder. We then chain the pipe method, passing a call to gulp.dest as an argument. The call to gulp.dest takes a string as its sole argument: the path to our output directory: BUILD/JS.

Executing the Gulp Task

In order to actually execute our Gulp task, simply type the following in your terminal: gulp

Yep, that’s it! Because our task is named “default”, we do not need to specify a task name. Gulp assumes that we want to run the “default” task, looks for it, and then executes it. Now when you look in the JS/BUILD folder, you should see three files: file-1.js, file-2.js, and file-3.js.

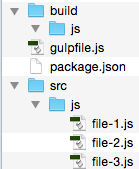
Figure # 3: Non-Concatenated Files in the BUILD/JS Folder.

Build output

In Figure # 3, you’ll see that there are now three files in the JS/BUILD folder.

You may be wondering why our output is three files, and not one concatenated file. This is because we did not actually concatenate the files inside of our task. In Example # 1, I wanted to demonstrate the basic flow of a Gulp task: using gulp.src to read files into memory, and then using gulp.dest to write those files from memory to disk. Now let’s update our Gulp task so that it actually concatenates the files.

Example # 2 A – Add the Contact Module to Our Gulp Task

In Example # 2 A, we have added a new line to our Gulp task: .pipe(concat(‘scripts-all.js’)). This line takes the in-memory files, pipes them to the concat module (which concatenates them into one file named: “scripts-all.js”), and returns that in-memory file. That’s really it. Now, navigate to the folder: “example-2” in your terminal, and then run Gulp again, so see the output: gulp

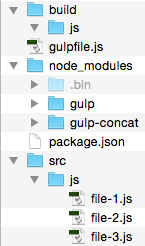
Figure # 4: Concatenated Files in the BUILD/JS Folder.

The concatenated JavaScript file

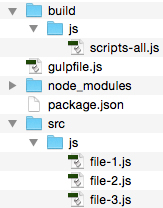
In Figure # 4, you’ll see that instead of three files, there is one file: scripts-all.js.

Example # 2 B – scripts-all.js

Example # 2B shows the contents of scripts-all.js. The details of the actual code are not important. What matters is that by piping the three source files to the concat module, our output is now one file that consists of the contents of all three source files.

Summary

The fact that there are only four APIs is a testament to the fact that Gulp.js is a simple yet powerful tool for running JavaScript tasks. There is a strong and growing community behind Gulp with thousands of existing plugins. The beauty of Gulp is that since it is code, you can leverage plain old JavaScript to make your gulpfile as powerful and efficient as needed. You are only limited by your imagination. While the examples in this article were very simple, there is a great deal of depth to Gulp and plenty of details / features that you can look into. I hope that this article was a helpful introduction and provided the tools you need to understand Grunt and easily start implementing it in your project.

Helpful Links for Gulp.js Basics

http://gulpjs.com/

https://github.com/gulpjs/gulp

https://www.npmjs.com/package/gulp

https://github.com/gulpjs/gulp/blob/master/docs/API.md

https://github.com/gruntjs/grunt-contrib-concat

https://www.codefellows.org/blog/quick-intro-to-gulp-js