Angular2 Http double subscribe

Angular

stack overflow logoI working on a new Angular 2 service today that wraps the HTTP class. The purpose of this service is to intercept errors, and log the user out when the HTTP status code of the error object is 401.

Everything seemed fine until I realized that each GET and POST was firing twice. After a lovely hair-pulling session, I realized that it was the 2nd observable subscription that was causing the double network calls. Messy stuff.

If you find yourself wresting with the same problem, this Stack Overflow answer nails it. Cheers to dfsq for his great answer:

http://stackoverflow.com/questions/35397710/angular2-http-double-subscribe

How to Center in CSS

CSS

CSS3-logo

Centering in CSS is a giant pain in the neck. Depending on the scenario, there are multiple ways to go about it, but it’s never fun.

How to Center in CSS is a code generator that consolidates all the possible techniques and gives you the code you need for each situation. Well Done!

howtocenterincss.com

Share Node.js code with JSApp.us

Node.js

JavaScript LogoJSApp allows you to write Node.js code in a browser, run it, and also share it with others

One of the things that makes front-end development so much fun is that you can easily create and share code. With tools such as JSFiddle, you can create an example web page and then send that JSFiddle URL to someone. Or you can even send someone the URL of a JavaScript file that you created so that they can just run $.getScript(yourJavaScriptURL) to inject your code in their page. And there are plenty of other clever ways to share / demo front-end code without a lot of fuss.

But what about Node?

Well, it’s not always so easy with Node, right? It’s server-side code, so you can’t just send someone a URL of your Node.js file to inject in their page. Github really saves the day in this case; you can create a public repo, and then send someone the Github repo URL. But that still requires the recipient to have at least git installed on their computer. And as we all know, once something takes more than 2 clicks, you start to lose your audience. That said, anyone with a reasonable attention span and a genuine interest in your code will follow the few clicks needed to clone your repo and run your code, but for quick little snippets, it sill feels like overkill sometimes.

For example, I like to write blog posts here about Node. In some cases, it does make sense to create a Github repo, especially if you have to leverage package.json, and the app requires file access, etc. But what about little examples? Just 10-20 lines of code to demonstrate a concept? Or even a simple working example?

Enter JS App!

When you navigate to jsapp.us, you immediately see some sample Node.js code. You can delete it and write your own. Then,  you simply click “test” in the sidebar (or CTRL + b), and a new browser window opens with your Node.js code running!

If you create a profile (free), you can save your code and share it with others. This is one of the most clever things I’ve seen in a long time. You can also go back and edit your files, re-name them, delete them. Really fun stuff.

If you need to create a quickie Node.js app and a Github repo would be overkill, JSApp might be just the tool you need. It’s been a while since I was this impressed but something I stumbled upon.

Bravo!

What are the Five Ways to Create an Angular Service?

Angular Services

Angular.js LogoThere is a lot of confusion over the difference between the angular’s factory, service and provider methods. This article explains the different ways that an Angular service can be created.
The official Angular 1.4.0 documentation page describes services as: “…substitutable objects that are wired together using dependency injection (DI)” Stating: “You can use services to organize and share code across your app.” While a bit dry, I think this is actually a perfect description. I think that many who are new to Angular are confused about which of the many methods available should be used when creating a service. Fortunately, the answers are fairly simple and straightforward.

Five Ways to Create an Angular Service

The angular.value method

The value method, one the most overlooked approaches, is most commonly used to turn a global into an injectable Angular service. While the approach is simple, the application is powerful: the value of your service is testable and can be shared across your application.

Example # 1A

 Example # 1B

Examples 1A and 1B use the exact same syntax when creating an Angular service. The only difference is their value. Example # 1A’s “speed” service is a primitive: the number 100. Example # 1B’s value is an object with a “title” property.

The angular.constant method

This works the same as the angular.value method. The difference is that it is available during the configuration phase of your Angular application. Also, the value of a this constant can never be changed.

Example # 2

 The angular.factory method

The angular.factory method takes two arguments: a string and a function. The string represents the name of the service, which will be used to gain access to this service (e.g. to inject this service into a controller as a dependency). The anonymous function that you provide as the second argument provides the actual implementation. When you register your service, Angular will execute this function.

The only difference between angular.factory and angular.service is that the callback function you provide with the service is instantiated. With the factory method, it is executed.

Its return value is cached and will be shared with any component of your application that injects the service. It is important to note that this function will only be executed once.

This is the scenario most are thinking of when they intend to create an Angular service, and probably the most common approach.

Example # 3

In Example # 3, we create a service named “myService”. Any component that lists this service as a dependency will receive the object that you see returned. This object has one method: “sayHello”.

The angular.service Method

This approach is similar to the angular.factory method with one big exception: the function that you provide is treated as a constructor and is instantiated. It is important to note that this function is instantiated only once and every component that injects your service as a dependency shares the same exact cached object that this instantiation returns.

Example # 4

Example # 4 is very similar to Example # 3, except that the latter uses the JavaScript “this” keyword when defining the properties and methods of the object that the service returns. The reason is: the function provided when registering the service is instantiated (i.e. treated as a constructor), not just executed.

The angular.provider method

This approach is the most complex of the five. The angular.provider method is actually used under the hood by all four of the other service registration approache. While this approach is more verbose, it provides a powerful feature that the others do not: the service you are registering is available to your application during its configuration phase. This is useful when creating a service that will be shared across multiple applications and needs to be configured in order to work properly.

When using angular.provider, there are two important details to keep in mind:
  1. The callback function that you pass to the angular.provider method will be treated as a constructor – This means that the callback will be instantiated for each application that it is registered with, and its return value will be shared by all components that inject that service.
  2. The callback function that you pass to the angular.provider method must have a $get method – When you inject a service into a component that was created using the provider method, Angular will call that services’ $get method to retrieve the object to inject.

Example # 5

In Example # 5, we have created an angular service named “helloWorld”. This service is available during the configuration phase of your application. After registering the service, we call the app.config method, passing the “helloWorld” service as an argument to the anonymous callback function. Inside of that callback, we use the services “setName” method to set the value of its “name” property. We could use the “helloWorld” service in a different application and set that “name” value to something different, as needed.

Summary

Most of the time, the angular.factory method is the approach that is desired / used. This does not mean it is the “right” way to create an Angular service. The approach you take should be driven by the problem you are looking to solve. angular.value and angular.constant are often helpful when you need to share a simple value across your application (keeping in mind that the value returned by angular.constant cannot be changed). The angular.service method is helpful when you want your service to be instantiated, and the angular.provider method provides a way to configure your service before any component gains access to it.

Helpful Links for Understanding the Different Ways to Create an Angular Service

https://docs.angularjs.org/guide/services

http://blog.pluralsight.com/angularjs-step-by-step-services

https://blog.codecentric.de/en/2015/03/five-ways-to-write-better-angular-services/

Getting Started with Gulp.js – Creating Multiple Tasks

Gulp.js

Gulp.js Logo
Learn how to create multiple Gulp.s tasks

In the article: “Getting Started with Gulp.js – Introduction,” I discussed the absolute basics needed to set up a Gulp.s task.  In that article’s gulpfile.js, we had only one task named “default”. One of the great features of Gulp, is that it will look for a task named “default”, and execute it automatically. This is fine if you have only one task, but as soon as you have two or more, it makes sense to give each one its own name.

When you have one or more named Gulp tasks, you’ll want to execute those tasks from the default task.

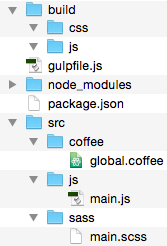
Figure # 1 – The folder structure before running Gulp

File structure - before

In Example # 1, you’ll see the folder structure before running gulp. So, if you look in the BUILD folder, you’ll see two sub-folders: JS and CSS. The file main.scss will be compiled into CSS and the output will go into the BUILD/CSS folder. The file: SRC/JS/main.js will be uglified and the output will go in the BUILD/JS folder. The file SRC/COFFEE/global.coffee will be compiled and the output will also go in the BUILD/JS folder.

Example # 1 – gruntfile.js

In Example # 1, we have the contents of gruntfile.js. You’ll notice that there are four tasks: default, uglify, sass and coffeescript. The default task is executed automatically. So that task simply executes the other three tasks.

How to Demo the Code Example

  1. Clone this repository: https://github.com/kevinchisholm/gulp-basics-tutorial-multiple-tasks
  2. Install node_modules with this command: npm install
  3. Run gulp: gulp
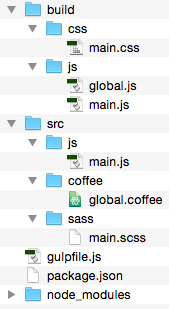
  4. Look in the following folder: BUILD/CSS, you will see the file: main.css
  5. Look in the following folder: BUILD/JS, you will see the files: main.js and global.js

Figure # 2 – The folder structure after running Gulp

File structure - after

Summary

One of the key features of Gulp is the ability to have a default task. This task is always executed by default. In this article, I demonstrated how to execute one or more named Gulp tasks from within the default task. While I chose to uglify JavaScript, compile SASS and compile coffeescript, you can create Gulp tasks for any need you might have. I hope that this article has made it easy for you to understand how to run multiple Gulp tasks.

Getting Started with Gulp.js – Introduction

Gulp.js

Gulp.js LogoLearn how to automate your front-end build process using this streaming build system
A while back, I posted an introduction to Grunt, the JavaScript task-runner. I also posted an article about the basics of concatenation and minification with Grunt. Grunt is an excellent tool, and still enjoys a large audience. That said, the most common complaint against Grunt is that its configuration-based syntax can become tedious and cryptic. In this article, I will introduce you to Gulp.js, an excellent streaming JavaScript built tool that has become quite popular in recent years. For this article, I will not discuss the details of installing Node or Gulp. There are plenty of articles available that will provide full details on that. Instead, I will provide a very gentle introduction to Gulp and how to create a simple Grunt task.

Code over configuration

Gulp’s success has to a large degree been based on the fact that it provides a powerful alternative to Grunt’s configuration-based approach. Gulp leverages actual JavaScript code in order to accomplish its tasks. With Gulp, you read files into memory, do things to the files, and then output the files from memory to a specified destination folder.

Easy Setup

Gulp is a node module. Installation and setup could not be simpler. On a very high-level, the steps needed are:

  1. Using npm (node package manager), install Gulp
  2. Create a file named: gulpfile.js or gulpfile.coffee (coffeescript)
  3. Execute the following command in a terminal: gulp

That’s it!

Gulp is simple

One of the things that amazed me most when first looking into Gulp was the fact that there are only four APIs. Yep, four. But there is a great deal of power lurking beneath the hood.

gulp.task – Defines a task
gulp.src – Reads files into memory
gulp.dest – Writes files from memory to disk
gulp.watch – Watches the files defined by gulp.src for changes

Note: The official Gulp documentation states that there are four APIs, but I find it odd that the .pipe method is not counted amongst these.

A Simple Example

I think many people might wonder: “…what would I use Gulp for?” A very common task in front-end tooling is concatenation; you may have three JavaScript files and want them to be combined into one JavaScript file that will be used in your web page. In this example, we will take three JavaScript files, concatenate them, and then output one file that consists of those three files.

Where to Get the Example Code

Clone this repository: https://github.com/kevinchisholm/gulp-basics-tutorial-introduction

Example # 1A – package.json

In Example # 1A, we have the contents of package.json. This file tells Node that we need the following modules: gulp, and gulp-concat.

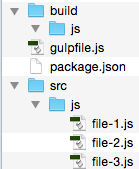
Figure # 1: Project File Structure

Project File Structure

In Figure # 1, we have the folder structure of our first example. Notice that in the SRC/JS folder there are three JavaScript files. These are the files that we will concatenate into one file. The BUILD/JS folder is empty, but that is where the final concatenated file will be written.

Now, before going any further, let’s install the node modules which our code will need. Navigate to the example-1 folder with your terminal application and then execute the following command: npm install

When running npm install, you’ll notice some activity in the console (don’t worry about the “warn” message), and then there will be a “node_modules” folder. These are the node modules specified in package.json. npm has downloaded them for us and put them in the “node_modules” folder. A detailed explanation for npm and the “node_modules” folder is beyond the scope of this article. A few google searches on either topic will yield plenty of links for further reading.

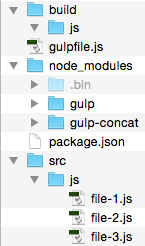
Figure # 2: Project File Structure with “node_modules” folder.

Project file structure after installing node dependencies

In Figure # 2, you’ll see that we now have a “node_modules” folder. Let’s take a look at gulpfile.js.

gulpfile.js

This is the file where the Gulp code goes. Gulp does support Coffeescript, so gulpfile.coffee is also a valid file name, but for the sake of simplicity, I will only cover the JavaScript implementation.

Example # 1B – gulpfile.js

In Example # 1B, there are two things happening: First we create to variables, each representing a module that we need. Second, we create a gulp “task”. The gulp.task method takes two arguments: 1) a task name, which is a string, and 2) a callback function, which contains the code that defines the actual task. Here is where Gulp’s real power lies: a gulp task is driven by JavaScript code (i.e. code over configuration).

Returning a File Stream

A Gulp task always returns a file stream. This is to say that gulp will read a file into memory and you want to return that in-memory file object from your task’s callback function. In-between those two tasks, you “pipe” that file to one or more plugins that manipulate the file in some way.

gulp.src

In Example # 1B, we use the gulp.src method to read one or more files into memory. In this case, it is the three JavaScript files in our SRC/JS folder. We then chain the pipe method, passing a call to gulp.dest as an argument. The call to gulp.dest takes a string as its sole argument: the path to our output directory: BUILD/JS.

Executing the Gulp Task

In order to actually execute our Gulp task, simply type the following in your terminal: gulp

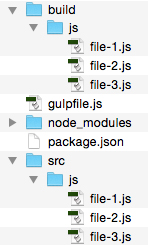
Yep, that’s it! Because our task is named “default”, we do not need to specify a task name. Gulp assumes that we want to run the “default” task, looks for it, and then executes it. Now when you look in the JS/BUILD folder, you should see three files: file-1.js, file-2.js, and file-3.js.

Figure # 3: Non-Concatenated Files in the BUILD/JS Folder.

Build output

In Figure # 3, you’ll see that there are now three files in the JS/BUILD folder.

You may be wondering why our output is three files, and not one concatenated file. This is because we did not actually concatenate the files inside of our task. In Example # 1, I wanted to demonstrate the basic flow of a Gulp task: using gulp.src to read files into memory, and then using gulp.dest to write those files from memory to disk. Now let’s update our Gulp task so that it actually concatenates the files.

Example # 2 A – Add the Contact Module to Our Gulp Task

In Example # 2 A, we have added a new line to our Gulp task: .pipe(concat(‘scripts-all.js’)). This line takes the in-memory files, pipes them to the concat module (which concatenates them into one file named: “scripts-all.js”), and returns that in-memory file. That’s really it. Now, navigate to the folder: “example-2” in your terminal, and then run Gulp again, so see the output: gulp

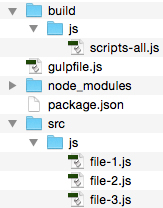
Figure # 4: Concatenated Files in the BUILD/JS Folder.

The concatenated JavaScript file

In Figure # 4, you’ll see that instead of three files, there is one file: scripts-all.js.

Example # 2 B – scripts-all.js

Example # 2B shows the contents of scripts-all.js. The details of the actual code are not important. What matters is that by piping the three source files to the concat module, our output is now one file that consists of the contents of all three source files.

Summary

The fact that there are only four APIs is a testament to the fact that Gulp.js is a simple yet powerful tool for running JavaScript tasks. There is a strong and growing community behind Gulp with thousands of existing plugins. The beauty of Gulp is that since it is code, you can leverage plain old JavaScript to make your gulpfile as powerful and efficient as needed. You are only limited by your imagination. While the examples in this article were very simple, there is a great deal of depth to Gulp and plenty of details / features that you can look into. I hope that this article was a helpful introduction and provided the tools you need to understand Grunt and easily start implementing it in your project.

Helpful Links for Gulp.js Basics

http://gulpjs.com/

https://github.com/gulpjs/gulp

https://www.npmjs.com/package/gulp

https://github.com/gulpjs/gulp/blob/master/docs/API.md

https://github.com/gruntjs/grunt-contrib-concat

https://www.codefellows.org/blog/quick-intro-to-gulp-js

Telestream ScreenFlow – Fast and Easy Screen Capture for Mac

Videos

Telestream Screenflow LogoIf you are in the business of making screencasts or training videos, consider Telestream ScreenFlow, an affordable product that is easy to use and comes with a decent array of features

I’m sure it’s pretty obvious that I like to blabber endlessly about front-end web development, especially JavaScript. Recently, I have tried to ratchet-up my JavaScript ramblings a level by adding videos to my blog posts. When planning this, I knew I would have to eventually choose a screen capture software package that would make high-quality screen casts easy (I have a very short attention span when it comes to some things).

I fumbled around a bit with Snagit and Quicktime. I even took a shot at Corel VideoStudio Pro. That was a bit of a disaster (tons and tons of features, but at the end of the day, exporting to MP4 seems to be yet a pipe-dream). I had heard a bit about  Telestream ScreenFlow, so I thought I’d give it a shot.

After reading tons of reviews, I plunked-down $99 and downloaded the software. I’ll spare you the feature-by-feature rundown, and get right to the most important point: It’s simple, easy to use, and easy to export videos. That alone for me sealed the deal.

I will say that the ScreenFlow is quirky for sure, a sentiment that many reviews will echo. The good news is that you only need a few minutes with Google search in order to find the answer to most of your questions. Capturing your screen in one shot and then exporting to MP4, is very easy. When you want to edit your video, however, you will probably find yourself scratching your head a bit as tasks that seem to me fairly common, are buried in an odd workflow.

Summary

I’ve been using Screenflow for a few months now and could not be happier. Once you get used to it, things move pretty quickly. They also sell a few add-ons which enable you to take things to the next level with regard to professional-looking screencasts or training videos. In short, if you are looking for a screen-capture software package for your Mac, and have fairly simple production needs, I highly recommend Screenflow from Telestream.

Helpful Links for Telestream ScreenFlow

http://www.telestream.net/screenflow/

http://www.telestream.net/screenflow/overview.htm

http://www.telestream.net/telestream-support/screen-flow/support.htm

http://www.telestream.net/screenflow/stories.htm

Reviews

http://www.macworld.com/article/2039696/review-screenflow-4-a-great-but-quirky-video-capture-and-edit-tool.html

http://www.maclife.com/article/reviews/screenflow_4_review

http://mac.appstorm.net/reviews/video/screenflow-4-professional-screencasting-on-your-mac/

What Are the Best Links for Learning About ECMAScript 6 ?

JavaScript

ECMAScript 6 LogoLike it or not, ECMAScript 6 is coming soon to a browser near you (and what’s not to like about that?). Learning about new additions to the specification is only a few clicks away.

Being in a “feature frozen” status since August of this year, ECMAScript 6 is on its path towards becoming a part of daily life. While the speed with which each browser manufacturer will implement these features will vary, adoption is inevitable.

I won’t waste pixels discussing why ECMAScript 6 is such a big deal. I’m assuming that you are aware of some of the more well-known features and are excited about them. But understandably, it can sometimes be difficult to decide where to jump in. I’ve gone through the tons of ECMAScript 6 bookmarks that have piled-up in my Google Docs and detailed the best ones below. This is by no means an exhaustive list; I tried to limit it to articles or videos that I felt were the most well-presented.

ECMAScript 6 Introduction

ECMAScript Language Specification ECMA-262 6th Edition – DRAFT

https://people.mozilla.org/~jorendorff/es6-draft.html

It doesn’t get much drier than this. But sometimes dry is good. There are many links out there that will be more enjoyable to read (and possibly more helpful), but when you really need to drill-down on a particular topic, the specification is always a source worth considering.

ECMAScript 6 with Kit Cambridge

Kit does a really nice job here. He starts out with a history of JavaScript that is worth the price of admission alone. Instead of just regurgitating key dates and facts, he helps you understand why the ECMAScript standard has evolved the way it has (did you know that ECMAScript 4 never survived beyond “draft” status?). He then prioritizes some of the less “sexy” features such as: the Spread operator, Default parameters, the Destructuring Assignment, Symbols and Generators. This guy is pretty young, but he is incredibly smart, super-technical, and presents himself very well.

Kit Cambridge, “EcmaScript Next: The Subtleties of ES 6” at W3Conf 2013

This is technically the same exact presentation as the previous video. But I must say, just like watching a good band perform the same song on two different occasions, it is still worth watching, even if you have seen the previous video.

Announcing Understanding ECMAScript 6 | NCZOnline

http://www.nczonline.net/blog/2014/03/26/announcing-understanding-ecmascript-6/

https://leanpub.com/understandinges6/read/

https://github.com/nzakas/understandinges6

OK, the first link is actually promoting his book: “Understanding ECMAScript 6”. But I wanted to include it because Nicholas C. Zakas is a JavaScript developer who is really worth listening to. I think the intro blog post is worth a read. The second link is where you can read the current state of the book.  The third link is the GitHub repository for the book, in case you want to follow his work in real-time.

Toward Modern Web Apps with ECMAScript 6 | Blog | Sencha

http://www.sencha.com/blog/toward-modern-web-apps-with-ecmascript-6/

Ariya Hidayat presents a clear and well-thought-out overview of some of ECMAScript 6’s most exciting features.

ECMAScript 6 Features

While there is much to shout about, it can also be a bit overwhelming. Here are the ECMAScript 6 features you are most likely to experiment with, or be asked about in an interview.

Arrow Functions

Functions have gotten a significant injection of new functionality: Greater control over lexical “this” binding and streamlined syntax.

Arrow functions – JavaScript | MDN

https://developer.mozilla.org/en-US/docs/Web/JavaScript/Reference/Functions/Arrow_functions

ECMAScript Wiki – Arrow Functions

http://tc39wiki.calculist.org/es6/arrow-functions/

Understanding ECMAScript 6 arrow functions | NCZOnline

http://www.nczonline.net/blog/2013/09/10/understanding-ecmascript-6-arrow-functions/

Kevin Chisholm – Blog

http://blog.kevinchisholm.com/javascript/ecmascript-6/getting-started-with-ecmascript-6-arrow-functions-basic-syntax/

http://blog.kevinchisholm.com/javascript/ecmascript-6/getting-started-with-ecmascript-6-arrow-functions-parameters/

http://blog.kevinchisholm.com/javascript/ecmascript-6/getting-started-with-ecmascript-6-arrow-functions-the-this-keyword/

Block-Level Scope

Learn about how the new “let” and “const” keywords break the “functions-only” paradigm with regard to managing scope.

https://developer.mozilla.org/en-US/docs/Web/JavaScript/Reference/Statements/let

http://www.sitepoint.com/preparing-ecmascript-6-let-const/

Rest parameters

If you’ve ever written a function that needs to take a variable number of arguments, you’ve probably used the Array.prototype.slice.call approach to convert the arguments object into a true array, or designed the function so that it expects an array. ECMAScript 6’s Rest Parameters removes this pain and makes for more concise code.

Rest parameters – JavaScript | MDN

https://developer.mozilla.org/en-US/docs/Web/JavaScript/Reference/Functions/rest_parameters

Default and Rest Parameters in ES6

http://www.htmlxprs.com/post/24/es6-functions-default-and-rest-parameters

ECMAScript 6 and Rest Parameter

http://ariya.ofilabs.com/2013/03/es6-and-rest-parameter.html

Spread Operator

A yang to the Rest Parameter’s ying, the Spread Operator allows you to pass the elements of an array to a function as individual arguments in one shot, without the need to iterate that array.

Spread operator – JavaScript | MDN

https://developer.mozilla.org/en-US/docs/Web/JavaScript/Reference/Operators/Spread_operator

ECMAScript 6 and Spread Operator

http://ariya.ofilabs.com/2013/03/es6-and-spread-operator.html

Classes

Although constructors provide a way to implement classes JavaScript, ECMAScript 6 introduces a syntax that more closely resembles languages such as Java and PHP, not only in the way you create a class, but also in how you inherit from it.

An introduction to ES6 classes

http://javascriptplayground.com/blog/2014/07/introduction-to-es6-classes-tutorial/

Use ECMAScript 6 Today – Tuts+ Code Article

http://code.tutsplus.com/articles/use-ecmascript-6-today–net-31582#class


Getting Started with Mongo Shell Scripting – Basic CRUD Operations

MongoDB

mongoDB Logo - mongo shell scriptingLearn how to create a JavaScript file that executes mongo shell commands
Why Mongo Shell Scripting ?

In the article: “Getting Started With the Mongo Shell – Basic CRUD Operations“, I covered the basics needed to perform CRUD operations on a MongoDB database, using the mongo shell. All of the examples in that article were in real-time. This is perfectly acceptable, and there may be cases in which you will want to perform administrative tasks manually. But it is also possible (and more likely) that you’ll want to create a script that executes a batch of mongo shell tasks. So, since JavaScript is the language used to interact with the mongo shell, we can pass a JS file to the mongo command in a terminal. This is mongo shell scripting.

This functionality offers a great deal of potential. For example, in this article I will provide a very simple demonstration that performs basic CRUD operations (“Create, Read, Update, Delete”).

An important note about the following examples:

If you want to run these examples locally, you have two options:

  1. Clone this GitHub repo and follow the instructions: https://github.com/kevinchisholm/mongo-shell-scripting-basic-crud-operations 
  2. Scroll down to the section: “How to Demo“, and then follow the instructions

Creating a Database

Create the “madMen” database – Example # 1

In Example # 1, we create the “madMen” database and establish a connection to it. The “allMadMen” variable is set to null for now, but will indeed be used in the next example.

Adding Data to / Reading Data from a Database

Create the “names” collection – Example # 2

In Example # 2, we create the “names” collection and then add four documents to it. We then use the “allMadMen” variable to store a reference to the names collection, and then iterate it. The purpose of the iteration is to allow you to see in your terminal that the madMen database has actually been populated with documents. Example # 2 demonstrates both the “Create” part of our CRUD operations, and  the “Read” part as well.

Updating A Collection Document

Let’s make a change to “Donald Draper” – Example # 3

Example # 3 is the “U” in our CRUD operation; in other words: “Update”. Here we use the forEach method of the names collection to iterate and find the document whose “name” property is set to: “Don Draper”. So, once we find that document, we update its “name” property to: “Dick Whitman”.

Deleting A Collection Document

Let’s delete “Dick Whitman.” – Example # 4

In Example # 4, we delete the document whose “name” property is set to: “Dick Whitman.

Dropping a Database

Drop the “madMen” database – Example # 5

db.dropDatabase();

In Example # 5, we drop the “madMen” database.

The Entire App – Example # 6A

In Example # 6A, we have the completed example code. To demonstrate, numerous print and printjson statements have been added so that the terminal output makes a bit more sense.

The Output – Example # 6B

In Example # 6B, we have the terminal output from the code in Example # 6A.

How to Demo:

  • Make sure the MongoDB database server is running
  • Create a file named: “create-db.js”.
  • Copy the entire contents of Example # 6 to “create-db.js
  • In a terminal window, execute the following command: “mongo create-db.js

Summary

In summary, we learned how to perform basic CRUD operations on a MongoDB database by leveraging mongo shell scripting.

Helpful Links for Mongo Shell Scripting

Getting Started With the Mongo Shell – Basic CRUD Operations | Kevin Chisholm – Blog

http://docs.mongodb.org/manual/administration/scripting/

Getting Started With the Mongo Shell – Basic CRUD Operations

MongoDB

mongoDB logoLearn how to perform CRUD operations on a MongoDB database, using the mongo shell

While it is likely that you will want to leverage MongoDB for your Node.js application, the mongo shell is an incredibly useful administrative tool that should not be overlooked. The definition provided by mongodb.org is: “The mongo shell is an interactive JavaScript shell for MongoDB, and is part of all MongoDB distributions.” It really is that straightforward: you can interact with your MongoDB database using JavaScript, in a command shell. Brilliant.

In this article I will demonstrate how to create a MongoDB database, add documents to the database, update a document, delete a document, and then delete your database. All of this will be done using a command prompt and JavaScript.

NOTE: I assume that you already have MongoDB installed globally. If you do not have MongoDB installed and need assistance with that, please see the “Installation Links” section at the end of this article.

Starting the Mongo shell

Before you can interact with a MongoDB database using the mongo shell, you’ll need to have the MongoDB database server running. In order to start the MongoDB server, execute: “mongod” in your terminal window. The output you see should be similar to this:

Starting the Mongo shell couldn’t be easier. Open a second terminal window, and then execute the command: “mongo”. You should see the following output in your terminal window:

You may be surprised to see that you are connected to “test”, but that is the default database. In order to see a list of existing databases, execute the following command:

You should see the following output in your terminal window:

Creating a MongoDB Database

In order to create a new database, use the “use” command. Execute the following command:

You should see the following output in your terminal window:

Now take a look at the existing databases again by executing the command: “show dbs”. You may be wondering why the new database “madMen” does not show up in the list of existing databases. This is because it has no data. Let’s add some data to that database.

Adding Documents to a Collection

With MongoDB, we can create collections on the fly when we add data. For example, the new database “madMen” is empty. We can add a “names” collection and insert a document into that collection all in one command.

Execute this command:

You should see the following output in your terminal:

Now, let’s take another look at the list of databases. Execute the command: “show dbs”.

You should see the following output in your terminal:

The reason you now see the madMen database in the list is because it contains some data. Let’s add three more documents to the “names” collection. Execute the following commands:

If you executed the previous JavaScript, the “names” collection should now have four documents. Let’s talk about how you can view all the documents in a collection.

Iterating Over the Documents in a Collection

If you want to view all of the documents in a collection, using the mongo shell, it is at minimum, a two-step process. First, obtain a reference to the collection, and then iterate over the collection using the next() method. In the following example, we’ll create a while loop. The hasNext() method will be used as the condition of the loop, and then inside of the loop, we’ll use the next() method to get the “next” document in the collection. The return value of that method will be passed to the printJson function, which is specific to mongo.

Execute this code:

In the previous example, we set the variable “allRecords” equal to the result of “db.names.find()”. The “allRecords” variable then has a reference to all of the documents in the “names” collection. We then use a while loop to iterate over the collection. On each iteration, the next method of the allRecords variable is passed to the printjson function. The output in your terminal should be similar to this:

The values of each document’s “_id” property will differ in your terminal because these are unique IDs, generated by the instance of MongoDB. The rest of the data should be the same.

Updating a Document

Now that we have four documents in the “names” collection, let’s update one of those documents. We do this by using the “save” method of the collection object. We’ll need to pass the “_id” of the document that we want to update, as well as the new data. Let’s change “Don Draper” to “Dick Whitman”.

You should see the following output in your terminal:

Now, let’s use the while loop we created earlier to inspect all records of the “names” collection:

You should see the following output in your terminal:

As you can see, the document that contained “Don Draper” has now been changed to “Dick Whitman”.

Deleting a Document

Let’s delete the same document that we just updated. In order to do that, we’ll use the “remove” method of the collection object, passing it the “_id” of the exact document that we want to delete:

You should see the following output in your terminal:

Now let’s take a look at all the documents in the database again:

As you can see, the document that we deleted no longer exists.

Deleting a Database

While not something you are likely to do too often, deleting a database is a perfectly valid MongoDB operation. The syntax could not be more simple; use the “dropDatabase” method of the db object.

You should see the following output in your terminal:

Now, execute the command: “show dbs”. You should see the following output in your terminal:

 Summary

In this article, we learned about basic CRUD operations in Mongo Shell. We learned how to start the database server, start the shell and view a list of all databases. We also covered steps needed to create a database, add documents to that database, update a document, delete a document and delete a database. There is a mountain of topics when it comes to the Mongo Shell. I hope this article helped you in getting started.

Helpful Links for the mongo shell

General Links

http://www.mongodb.org/

http://try.mongodb.org/

http://docs.mongodb.org/manual/crud/

http://docs.mongodb.org/v2.2/mongo/

http://www.tutorialspoint.com/mongodb/

Installation Links

Install MongoDB on OS X — MongoDB Manual 3.0.1
http://docs.mongodb.org/manual/tutorial/install-mongodb-on-os-x/

Install MongoDB on Windows — MongoDB Manual 3.0.1
http://docs.mongodb.org/manual/tutorial/install-mongodb-on-windows/

Install on Linux — MongoDB Manual 3.0.1
http://docs.mongodb.org/manual/administration/install-on-linux/

Getting Started with Highcharts Part II: Formatting the Y Axis

JavaScript

Highcharts chartLearn how to properly format the “y” axis values of your Highcharts chart.

In “Getting Started with Highcharts Part I: Basic Charts,” we covered the absolute basics of how to use the Highcharts jQuery plugin. In that article, we demonstrated that with minimal effort, we can render a professional looking chart in our web page. So the final example was a column chart that provided a data visualization of total 2014 sales in the Acme Widgets company.

But when you look at that final jsFiddle.net link, there are a few areas that could use additioal effort. The first area I wanted to focus on is the “y” axis (aka the “up and down” dimension of our chart). We have properly labeled that axis “US Dollars,” but this approach is inefficient, and the actual dollar amounts are not formatted correctly.

Example # 1

So, in Example # 1, we have a column chart that is borrowed from the previous article in this series. The “y” axis is labeled as “US Dollars,” which is ok, but not very efficient. The actual numbers do not have dollar signs next to them, which minimizes the visual impact. Also, if we format these numbers correctly, we shouldn’t need to use the word “Dollar” in the label. So something like “Sales” would be more efficient and visually cleaner.

HERE IS THE JS-FIDDLE.NET LINK FOR EXAMPLE # 1: http://jsfiddle.net/gf9d3pq4/1/

Example # 2

In Example # 2, we made two changes: 1) We simplified the label as: “Sales”, 2) We aded a “labels” property. This property is an object with one value: “format”. The value is a string which provides a template for how the “y” axis values should be formatted. In this case, we have added a dollar sign to the left of the number. This is great, but there is still one problem: the highest value on the “y” axis is “1100”. This number is not formatted correctly for most locals. Using the United States as an example, there should be a comma after the “1”. So let’s fix this.

HERE IS THE JS-FIDDLE.NET LINK FOR EXAMPLE # 2: http://jsfiddle.net/gf9d3pq4/2/

How to Demo:

  • Click the jsfiddle link
  • Change the values of the “yAxis” property and then click the “Run” button in the upper-left-hand corner of the screen to see how your changes affect the appearance of the chart.

Example # 3

In Example # 3, we updated the labels.format value so that a comma is added for thousands. We also specified no decimal places. The comma is a big improvement, making four-digit numbers display correctly for the United States numbering syntax (proper syntax for other locals will vary).

HERE IS THE JS-FIDDLE.NET LINK FOR EXAMPLE # 3: http://jsfiddle.net/gf9d3pq4/3/

How to Demo:

  • Click the jsfiddle link
  • Change the values of the “yAxis” property and then click the “Run” button in the upper-left-hand corner of the screen to see how your changes affect the appearance of the chart.

Summary

In this article we learned how to format the “y” axis of a Highcharts chart. We discussed the “yAxis” property of the configuration object, the “labels” property, and how to add a dollar sign to properly convey US currency. We also demonstrated how to add a comma so that four-digit numbers are properly formatted.

Helpful Links for How to format the Highcharts “y” Axis

http://api.highcharts.com/highcharts#yAxis.labels

http://stackoverflow.com/questions/19810931/highcharts-y-axis-thousands-separator

Getting Started with Highcharts Part I: Basic Charts

JavaScript

Highcharts ChartLearn how to incorporate data visualization into your web page with just a few links of JavaScript

The data visualization trend shows no signs of slowing down, and charting is a key skill in that area. Highcharts is a jQuery plugin that provides a simple interface for creating great looking charts. There is a tremendous amount of muscle under the hood, which means that complex charts are not only within reach, but they do not require a degree in advanced mathematics. If you want to use Highcharts for a personal or non-profit project, then it is available without cost under the Creative Commons Attribution-NonCommercial 3.0 License.

In this article, I will cover the absolute basics of Highcharts. I will keep the deeper features for a later post, and instead focus on the bare minimum needed to leverage this super-powerful jQuery plugin and quickly spin up a chart on your web page.

Since Highcharts is a jQuery plugin, rendering a chart in your web-page could not be more simple:

So that’s it! Of course this little snippet of code has no use because highcharts knows nothing about the chart that we want to create. As simple as this library is to use, you do need to provide a few details so that Highcharts knows what to do. There are plenty of defaults that are provided so that you can worry about only the most critical details, but at minimum, Highcharts needs the data that powers your chart.

Example # 1A

Example # 1B

In Example # 1A, we have the base HTML for the rest of the examples in this article. For the sake of brevity, I will not include the HTML in further examples, only the JavaScript. Just keep in mind that the JS in the rest of the examples will go where you see the comment: “highcharts code will go here.”

In Example # 1B, we have the bare-minimum JavaScript needed to invoke the highcharts jQuery plugin. We passed an object to the highcharts method, which contains a “series” property. The value of this property is an array. There are multiple options when it comes to this series property, for now we will keep things very simple; the array has one element and that element is an object. This object has a “data” property whose value is an array. The element of that array has numbers, and the numbers in that array are the key to your chart.

HERE IS THE JS-FIDDLE.NET LINK FOR EXAMPLE # 1B: http://jsfiddle.net/u4wke4vo/1/

How to Demo:

  • Click the jsfiddle link
  • Change the data in the “series” property’s array and then click the “Run” button in the upper-left-hand corner of the screen to see how your changes affect the appearance of the chart.

X and Y Axis

Now it might be a good idea to take a moment to discuss the concept of the x and y axis. Although this article is focused on the absolute basics of Highcharts, there is little to accomplish here without a firm understanding of how data is represented visually. The “x” axis represents the horizontal dimension of the chart, and the “y” axis represents the vertical dimension. Another way of looking at this is: the “x” axis is the “left to right”, and the “y” axis is the “up and down”.

When you look at the jsfiddle link for Example # 1B, you’ll notice that the “x” axis doesn’t really offer too much value. What do the numbers 150, 900, 675 and 400 mean when they are mapped to an “x” axis of 0 to 3? For this article, I am using a “Total Sales” context so that each example will present the total sales for a group of three representatives of the Acme Widget Company. The “x” axis is the sales reps. So instead of displaying arbitrary numbers, the “left to right” dimension of our chart will display names of the sales reps.

Example # 2

Here in Example # 2, we’ve added a second property to the configuration object named “xAxis.” The xAxis property is an array of strings, and each string provides a label for the “x” axis. So, in our case, that “left to right” dimension of the chart represents the Acme Widget company’s sales representatives.

HERE IS THE JS-FIDDLE.NET LINK FOR EXAMPLE # 2: http://jsfiddle.net/u4wke4vo/2/

How to Demo:

  • Click the jsfiddle link
  • Change the data in the “series” property’s array and then click the “Run” button in the upper-left-hand corner of the screen to see how your changes affect the appearance of the chart.

Notice that Example # 2 is a line chart. That is the default chart type that Highcharts presents when you do not provide enough specifics. It looks nice, but it does not make a great deal of sense in this context because visually, it gives the impression of “data over time”. Our “Total Sales” context represents a series of set values for a year, so we need a chart type that better represents that kind of thought process. So, in my opinion, a column chart is a perfect example.

Example # 3

Here, in Example #3, we’ve added a new property to the configuration object called “chart”, which is an object. This object has one property: “type”. This is where you tell Highcharts whether you want a “pie” chart, a “bar” chart, or a “line” chart, etc. For our examples, a “column” chart makes much more sense than a line chart.

HERE IS THE JS-FIDDLE.NET LINK FOR EXAMPLE # 3: http://jsfiddle.net/u4wke4vo/3/

How to Demo:

  • Click the jsfiddle link
  • Change the data in the “series” property’s array and then click the “Run” button in the upper-left-hand corner of the screen to see how your changes affect the appearance of the chart.

You may have noticed that the chart’s title is: “Chart Title”, the “y” axis label is: “Values” and the “x” axis label is: “Series 1.” These are defaults that Highcharts provides when you have not specified them. While a helpful feature, it is likely that you’ll want to specify those kinds of labels. Let’s take care of that now.

Example # 4

So, now we’ve changed a few things in Example # 4. The “title” and “subtitle” properties are self-explanatory. The “yAxis” property is an object, whose “title” property is yet another object with a “text” property. This determines the label for the “up and down” dimension of our chart. The sole object in the “series” property’s array now has a “name” property. This provides the label for the “x” axis, or “left to right” dimension of our chart. In this case, it indicates that all sales figures represent sales in the United States only.

HERE IS THE JS-FIDDLE.NET LINK FOR EXAMPLE # 4: http://jsfiddle.net/u4wke4vo/4/

How to Demo:

  • Click the jsfiddle link
  • Change the values of the various properties and then click the “Run” button in the upper-left-hand corner of the screen to see how your changes affect the appearance of the chart.

Summary

In this article, I covered the bare minimum needed to render a Highcharts chart in your web page. We covered the simple syntax for instantiating the jQuery plugin, and how to pass-in the configuration object. We also covered how to provide data, the x and y axis, and how to label them. We also discussed how to specify the type of chart that should be rendered.

Helpful Links for getting started with HighCharts

http://www.highcharts.com/

http://www.highcharts.com/docs

http://www.highcharts.com/demo

Renaming a file with Node.js

Node.js

Node.js LogoLearn how to rename a file with Node.js, in ten lines of code

I was fleshing out a few ideas on a project today and found myself trying to figure out how to rename a file with Node.js. I have no doubt that there are better ways to go about this, but I thought I’d document my findings.

The first thing I realized is that the low-level nature of Node.js offers a great deal of power, but also with that power comes the need to handle all of the details. For me, this meant getting references to four things:

  1. The name of the old file
  2. The name of the new file
  3. The full path to the old file
  4. The full path to the new file (which does not exist yet)

The first two items are easy: I just had to provide a name for the old file, and decide what to call the new file. The last two items involved a bit more effort. I needed to do three things:

  1. Get the path of the folder that contains the old file
  2. Add a trailing slash to that path
  3. Set a permanent reference to the old file

So, to accomplish all of these tasks, I decided to use the filepath Node.js module.

Example # 1A

 Example # 1B

Example # 1A shows the contents of package.json. There is only one dependency: the filepath Node.js module.

In Example # 1B, I first set references to the file system module, as well as the filepath module. Next, I provided strings for the names of the old and new files. The filepath module is then used to get the path to the current folder; I set that to the fpFolder variable (adding a trailing slash to that string, which will be needed when we append file names to that string).

The variable fpFile is used as a permanent reference to the old file (this will come in handy for Example # 3.) Finally, I build the full file paths for the old and new files. After that, a couple of console.log statements to make sure all of this work is correct.

Example # 1C

Example # 1C shows the output of the two console.log statements. Each path will vary for you a bit, so I simply put “[YOUR LOCAL PATH TO]” for the folder structure that leads up to that file in the github repo that you cloned (see “How to Demo” below).

This example does not actually rename a file. So, now I will use the file system module to make that change.

How to Demo:

  • Clone this github repo: https://github.com/kevinchisholm/video-code-examples
  • Navigate to: JavaScript/node-js/node-modules/fs/fs-rename
  • Execute the following command in a terminal prompt: npm install
  • Execute the following command in a terminal prompt: node filepath-1.js

Example # 2

In Example # 2, I use the file system module’s rename method to rename the file: “re-name-me.txt.” This method takes three arguments: a path to the old file, a path to the new file and a callback. The callback takes one argument: an error object. Inside of the callback, I check for the error object, and then output the path of the new file. So now, follow the instructions below to see this code in action. After you execute the code, the file: “re-name-me.txt” will be renamed to: “ive-been-renamed.txt.”

In order to rename Example # 2 again, you’ll need to manually rename the file: “ive-been-renamed.txt” back to: “re-name-me.txt”. After a few times back and forth, this got pretty tedious and I started to think that there must be a way to toggle the file back and forth. Meaning: If the file has been renamed, change it back to the original name, and so forth.

How to Demo:

  • Clone this github repo: https://github.com/kevinchisholm/video-code-examples
  • Navigate to: JavaScript/node-js/node-modules/fs/fs-rename
  • Execute the following command in a terminal prompt: npm install
  • Execute the following command in a terminal prompt: node filepath-2.js

Example # 3A

In Example # 3A, I use the ternary operator when setting the final path for the old and new files. In each case, I check to see if the old file exists, and then depending on the answer, I set each path accordingly.

Example # 3B

Example # 3B is the full code for the final version of this file. I combined all var statements and cleaned up the code a bit. When you follow the instructions below, you’ll see that you can keep executing node filepath-2.js over and over, and the text file will toggle between the old name and the new name.

How to Demo:

  • Clone this github repo: https://github.com/kevinchisholm/video-code-examples
  • Navigate to: JavaScript/node-js/node-modules/fs/fs-rename
  • Execute the following command in a terminal prompt: npm install
  • Execute the following command in a terminal prompt: node filepath-2.js

Summary

As I mentioned, there are probably a number of ways to do this that are more efficient. Everything I detailed here was the result of a few minutes with Google. Hopefully, this article either got you where you needed to go, or pointed you in the right direction.

Helpful Links for Renaming a File with Node.js

http://nodejs.org/api/fs.html

https://www.npmjs.com/package/filepath

Getting started with the filepath Node.js module

Node.js

Node.js LogoWhen you need to reference and work with the local file system in your Node.js program, the filepath module is quite a handy tool.

Even if your Node.js program is a web-server of some sort, working with the local file system is somewhat inevitable. While Node.js does provide low-level file system access (see the Node.js fs module), abstraction is always helpful, particularly when dealing with absolute paths.

The filepath Node.js module is a very helpful utility for simple access to file paths. You’ll need only a package.json file with this module as a dependency, an “npm install” command, and then you are up and running. This article provides a quick introduction to a few of the most common methods.

Example # 1A

Example # 1B:

In Example # 1, we first create the FP variable, which references the filepath module. Then we create the path variable, which holds the return value of the FP object’s newPath method. And finally, we output the path in the console. Example # 1B shows the terminal output when we use console.log to view the path variable. This path will vary for each user so I simply put “[YOUR LOCAL PATH TO]” for the folder structure that leads up to that file in the github repo that you cloned (see “How to Demo” below).

How to Demo:

  1. Clone this github repo: https://github.com/kevinchisholm/video-code-examples
  2. Navigate to: JavaScript/node-js/filepath
  3. Execute the following command in a terminal prompt: node filepath-1.js

Example # 2

Example # 2 demonstrates the list method. The only real difference between this code and Example # 1, is the new variable “files”, which receives the value of the list method, when called on our path variable. The files variable ends up as an array. Each element in the array is an object whose “path” property is a string that points to a file in the current directory.

How to Demo:

  1. Clone this github repo: https://github.com/kevinchisholm/video-code-examples
  2. Navigate to: JavaScript/node-js/filepath
  3. Execute the following command in a terminal prompt: node filepath-2.js

Example # 3A

Example # 3B

Example # 3C

Example # 3D

In Example # 3A, we see the recurse method in action. Just as the name implies, the recurse method will recursively list all of the files in the current directory. As a result, if one of those files is a folder, then it will list all of the files in that folder, and so on. This method differs from the previous two examples in that it takes a callback. The callback is a bit like a forEach call; it iterates over all of the files or folders in the path, and calls the callback for each one. Inside of the callback, the path variable is the current path being iterated over.

Example # 3C is the output from the code in Example # 3A.

In Example # 3C, we use the toString() method of the path object so that instead of a bunch of objects that we would need to handle, we just get the values we are after; the string representation of the path to that file or folder.

Example # 3D is the output from the code in Example # 3C.

How to Demo:

  1. Clone this github repo: https://github.com/kevinchisholm/video-code-examples
  2. Navigate to: JavaScript/node-js/filepath
  3. Execute the following command in a terminal prompt: node filepath-3.js

Summary

The filepath Node.js module has much more to offer than was demonstrated here. Hopefully, this article has demonstrated how easy it is to get started with filepath.

Helpful Links for the filepath Node.js module

https://www.npmjs.com/package/filepath

http://nodejs.org/api/fs.html

Getting started with the uglify-js Node.js module

Node.js

Node.js LogoLearn how to easily implement minification and file concatenation right in your Node.js program.

There is no doubt that tools such as grunt and gulp provide powerful front-end tooling, particularly for large-scale applications. But in some cases, you may want to “roll your own”. If you want to minify and / or concatenate files from your Node.js application, the uglify-js module offers a simple syntax yet plenty of muscle-power.

So, if you want to get serious, a quick package.json file and “npm install” command are all you need to get started. Once these two tasks are taken care of, you can minify one or more files, and concatenate the output to a new file. In this article, I will show you how to do just that in less than 20 lines of code.

Example # 1A

Example # 1B

Example # 1C

 Example # 1D

In Example # 1A we have the contents of the file: package.json. This tells npm that our program depends on the “uglify-js” module. Examples # 1B, 1C and 1D are the contents of the files we will “uglify”. The actual code has no significance. We just want to have a reference so that once we have uglified the files, we can see the difference in the output.

Example # 2A

 Example # 2B

In Example # 2A, we minify the file: file-1.js. In this case, the minified code is simply shown in the console. Example # 2B shows the minified code. It’s hard to imagine a case where we would want to minify code, but only show the result in a terminal window. Realistically, we need to write the output of the minified file to a new file.

How to Demo:

  1. Clone this github repo: https://github.com/kevinchisholm/video-code-examples
  2. Navigate to: JavaScript/node-js/uglify-js
  3. Execute the following command in a terminal prompt: npm install
  4. Execute the following command in a terminal prompt: node uglify-1.js

Example # 3


In Example # 3, we have the content of uglify-2.js. Here, we’ve moved things into a more real-world context; we save the result of the minification to a physical file. Now notice that after you execute node uglify-2.js in your terminal, there is a new file named: output.min.js, which is a minified version of file-1.js.

The first change we made was to add a reference to the “fs” module, which provides access to the file system in Node.js. The console.log statement was left in, just so you can still see the output in the console. Below that, we call the writeFile method of the fs object. We pass it three arguments:

  1. the name of the file that will contain the result of the minification process (i.e. the minified code)
  2. the content for that file (i.e. the minified code), and
  3. a callback. The callback takes one argument: an error object. In the callback, we check to see if there was an error, and if not, we send a success message to the console.

In this Example, the callback is optional as it has nothing to do with the minification process and only provides messaging as to the status of the minification attempt.

Although Example # 3 is more of a real-world context than Example # 2, it is still a bit unrealistic as we only minify one file. In a typical production workflow, one would likely want to minify and concatenate more than one file.

How to Demo:

  1. Clone this github repo: https://github.com/kevinchisholm/video-code-examples
  2. Navigate to: JavaScript/node-js/uglify-js
  3. Execute the following command in a terminal prompt: npm install
  4. Execute the following command in a terminal prompt: node uglify-2.js

Example # 4

Example # 4 shows the contents of uglify-3.js. The only change we have made is in the call to UglifyJS.minify. Instead of passing it a string, we pass an array. Each element in the array is a path to a file we want to minimize and the concatenate to the output file. In this case all of the files are in the same folder as our program, so there is no folder structure (i.e. just the file names). You can take the same exact steps to demo this example, and when you do, you will see that the file output.min.js contains the minified code of file-1.js, file-2.js and file-3.js.

Summary

The uglify-js offers a ton of options, parameters and features. For this article, I wanted to demonstrate how easy it is to set up and use this Node,js module. But if you want to understand the true power of uglify-js, there is a ton of documentation available online. Hopefully this article got you to first base!

Helpful Links for the uglify-js Node.js module

https://www.npmjs.com/package/uglify-js

https://www.npmjs.com/package/uglify-js#api-reference

http://lisperator.net/uglifyjs/

Getting Started with HTML5 Drag and Drop Part IV: Multiple Draggables and Multiple Droppables

HTML5

HTML5 LogoOnce you know how to successfully drag one HTML element and drop it on another one, there is a new UX challenge: multiple elements that can be dragged and then dropped on any one of multiple droppables.

In Parts I, II and III of this series, we covered the critical concepts needed to implement HTML drag and drop. There, we talked about the dragstart event, the dataTransfer object, originalEvent object, drop event, dragenter event, dragleave event, and setDragImage method. These concepts got us to the point where we could drag one HTML element, and then drop it on another. All of this, with some UX considerations such as setting a custom drag image, updating the droppable element when something is dragged over it or when something is dropped on it.

When I was taking a deep dive into HTML5 drag-and-drop, I wanted to be able to wire-up a scenario where there were multiple “draggable” elements, and multiple “droppable” elements. So from a UX standpoint, my goals were:

  1. Any draggable could be dropped on any droppable
  2. Each droppable would change appearance when an element was dragged over it
  3. Each droppable would change appearance when an element was dropped onto it
  4. Each droppable would accept only one dropped element at a time
  5. The container that originally held the droppables would change appearance when empty
  6. The container that originally holds the droppables could accept any one or all of the droppables if they are dragged back to it

When I first attempted this, I got to a point where this all seemed like a lot of moving parts. Fortunately, a substantial portion of the challenge has been solved in parts I, II and III of this series, and I hope that if you have already read those articles, you have a solid understanding of how to do the following:

  1. Make an element draggable
  2. Set a custom drag element
  3. Make an element droppable
  4. Update the droppable when an element is dragged over it
  5. Update the droppable when an element was dropped onto it

So with that knowledge, our task list shrinks a bit:

  1. Any draggable can be dropped on any droppable
  2. Each droppable will accept only one dropped element at a time
  3. The container that originally held the droppables will change appearance when empty
  4. The container that originally held the droppables will accept any one or all of the droppables if they are dragged back to it

From here on, I will walk through the steps I took to accomplish these goals. There are probably other ways to go about solving these problems, but I am sharing the approach I took.

Task # 1: Any draggable can be dropped on any droppable

Well this was the easiest step. In parts I, II and III of this series, all of the JavaScript event binding was accomplished using classes instead of IDs. Because of this, adding more draggables and droppables in the HTML solved this problem. The existing JavaScript worked fine.

Task # 2: Each droppable will accept only one dropped element at a time

There are two things I needed to do in order to solve this problem: 1) create two separate “drop” event handlers, one for the multiple droppable HTML elements and another for the container that originally held the droppables; 2) in “drop” event handlers of the multiple droppables, check to see if the droppable element already has a child element.

Before I discuss the fix for task # 2, take a look at this JSFiddle link: http://jsfiddle.net/v9hawcof/5/

That link demonstrates the behavior that I do NOT want: more than one draggable can be dropped onto a droppable.

Base HTML

So in the code example above, we have the base HTML for the rest of the examples in this article. For brevity’s sake, I’ve stripped out all but the most essential areas of the markup so that you can focus on the technologies demonstrated in this article. When you view the page source for the final working example, you will see that there is more HTML, but it is for presentational purposes only.

Example # 1

Here is the JSfiddle link for Example # 1: http://jsfiddle.net/v9hawcof/6/

Now in Example # 1, I’ve added a new function called: “dropHandlerSingle”. This event handler is dedicated to the four light brown boxes at top (i.e. the “multiple droppables”). In the function I check to see if the droppable element has any children. If so, then I exit immediately. You may also notice that I trigger this custom event: “custom:dropEvent”. That will be explained shortly.

Task # 3: The container that originally held the droppables will change appearance when empty

Example # 2

Here is the JSfiddle link for Example # 2: http://jsfiddle.net/v9hawcof/7/

In Example # 2, you see the event handler for “custom:dropEvent”. The reason I used the setTimeout method, is because of timing challenges. When the drop event occurs, the DOM is not in the state needed in order to query it and figure out what is going on (i.e. which droppable elements have children). This event handler for “custom:dropEvent” will check each droppable element, and if it has no children, it removes the CSS class that gives it a “hasChildren” appearance (i.e. the background color changes from dark brown to light brown).

Task # 4: The container that originally held the droppables will change appearance when empty

Example # 3A

Example # 3B

Example # 3C

 Here is the JSfiddle link for Example # 3: http://jsfiddle.net/v9hawcof/8/

In Example # 3A, I bind an event handler for the container that originally held the droppables. In Example # 3B you’ll see that event handler: the “dropHandlerMultiple” function. The “dropHandlerMultiple” event handler does pretty much the same thing as the “dropHandlerSingle” event handler. The only difference is that the “dropHandlerMultiple” function does not check to see if it has children already. This is the critical step in accomplishing task # 4. In Example # 3B, you’ll see the code that tells the dragenter event handler to exit immediately if an element is dragged over the container that originally held the droppables. This is not a critical feature. I suppose I could have allowed the dragenter UX to apply to that container as well.

Here is the working example for this article: http://examples.kevinchisholm.com/html5/drag-and-drop/part-iv.html

Here is the JavaScript for this article’s working example: http://examples.kevinchisholm.com/html5/drag-and-drop/js/part-iv.js

Summary

As you can see, everything in this article is really a matter of personal choice. What I’ve done is detail how I decided to solve a particular UX challenge. Now how you approach this same set of tasks is completely up to you. I found that while attempting all of this, I learned a few things about HTML5 drag and drop. I hope you will too.

Node.js Basics – Command-Line Arguments

Node.js

Node.js LogoLearn how to access command-line arguments passed to your node.js file

When you use Node.js as a command-line tool, you most likely type the following into your terminal application: node some-file.js. Once your application grows to even a modest level of complexity or sophistication, you will probably want to accept arguments on the command line. So, in this article, I will explain the basics of how to gain access to the arguments that are passed to your node application on the command line.

The key to accessing command-line arguments lies in the argv property of the process global. The process object is a global object, which means that you can access it from anywhere in your program. The argv property is an array that contains all arguments provided when you executed your program on the command line.

Example # 1A

Example # 1B

Example # 1C


In Example # 1A, we have the contents of the file: showArgs-1.js. Then this line simply inspects the argv property of the process objet. The output will go straight to the terminal window the moment you execute your program.

In Example # 1B, we have the actual command you use to execute the program; first node (the executable for Node.js), and then the name of the file we want to execute: showArgs-1.js.

Example # 1C shows the output of this program. So, in the console, you will see an array. The first element of that array is node, and the second element is the path to the program. This path will vary for each user so I simply put “[PATH TO]” for the folder structure that leads up to that file in the github repo that you cloned (see “How to Demo” below).

How to Demo:

  1. Clone this github repo: https://github.com/kevinchisholm/video-code-examples
  2. Navigate to: node/cli-arguments-basics
  3. Execute the following command in a terminal prompt: node showArgs-1.js

Example # 2A

Example # 2B

 Example # 2C


In Example # 2B, you’ll see that we passed some additional arguments to our program: “arg2”, “arg3” and “arg4”. I used the numbers 2, 3, and 4 because they make more sense, due to the 0-based nature of this arguments array. Remember: arguments 0 and 1 are node and the file that contains your program, so the additional arguments here are indexed as 2, 3 and 4.

Since we know that the first two arguments will be the same every time, let’s try to get rid of those first two arguments.

How to Demo:

  1. Clone this github repo: https://github.com/kevinchisholm/video-code-examples
  2. Navigate to: node/cli-arguments-basics
  3. Execute the following command in a terminal prompt: node showArgs-1.js arg2 arg3 arg4

Example # 3A

 Example # 3B

 Example # 3C


In Example # 3A, we use the Array.prototype.slice method to remove the first two elements of the arguments array. Specifically, process.argv is an array, so we use its slice method to remove the first two elements of the array, and assign that return value to the variable args. We then inspect the args array using a console.dir statement.

In Example # 3B, we execute our program, passing three arguments: “arg0”, “arg1” and “arg2’. Example # 3C shows the output, which is an array containing only the arguments that we passed to the program.

How to Demo:

  1. Clone this github repo: https://github.com/kevinchisholm/video-code-examples
  2. Navigate to: node/cli-arguments-basics
  3. Execute the following command in a terminal prompt: node showArgs-2.js arg0 arg1 arg2

Example # 4A

Example # 4B

Example # 4C


In Example # 4A, we make the output a bit easier on the eyes. Instead of a simple console.dir statement, we use the forEach method of the args array for iteration. Inside of each iteration, we use a console.log statement to output a more human-friendly message that shows the argument that is contained in that element.

How to Demo: 

  1. Clone this github repo: https://github.com/kevinchisholm/video-code-examples
  2. Navigate to: node/cli-arguments-basics
  3. Execute the following command in a terminal prompt: node showArgs-3.js arg0 arg1 arg2

Summary

While the examples here were quite basic, they are perfectly valid and could be used in your code. There are Node.js modules that provide powerful abstractions when it comes to Node.js command-line arguments. The one I have probably heard about the most is minimist. So, if you are writing an application that has even a moderate level of complexity, you will likely want to use something like minimist. That said, understanding how things work on a low level is always a good idea. Hopefully, this article has provided a helpful introduction to this concept.

Helpful Links for Node.js Command-Line Basics

http://nodejs.org/api/process.html

http://nodejs.org/api/process.html#process_process_argv

https://www.npmjs.com/package/minimist

Getting Started with HTML5 Drag and Drop Part III: Setting a Custom Drag Image

HTML5

HTML5 LogoLearn how to set a custom drag image for a better drag and drop UX.

In previous articles of this series: “Getting Started with HTML5 Drag and Drop Part I: Introduction,” and “Getting Started with HTML5 Drag and Drop Part II: The dragenter and dragleave Events,” we covered the basics needed to implement HTML5 drag and drop. The second article focused on the UX for dropping a dragged element. In this article, we will cover a UX consideration for dragging: setting a custom drag image.

When dragging a draggable HTML element, the default drag image is the element being dragged. In most cases, this is probably just fine. But what about if you want to snazz-up the UX and specify a custom image for the drag operation?

Using an image that already exists on the page

When using an image that already exists in the page as your custom drag image, there are two restrictions:

  1. The image must exist in the DOM (i.e. it cannot have its “display” property set to “none,” or “visibility: hidden.”
  2. The image must be visible on the page (i.e. it must be visible without scrolling)

Example # 1

(for the base HTML, please refer to either Part I or Part II of this series; they both provide that markup).

Here is the JSfiddle link for Example # 1: http://jsfiddle.net/v9hawcof/3/

The setDragImage Method

In Example # 1, we have set the HTML5 logo as the custom drag image. We do this by using the document.getElementsByClassName method. Since this method returns an HTMLcollection, we reference the element by using the [0] property as we know we will only get one element back (yes, we could have used the document.getElementbyId method, but I wanted to keep the HTML clean).

There are a couple of drawbacks to this approach

  1. The HTML5 logo must be visible in the DOM, which is a bit restrictive
    Some browsers (e.g. Firefox) will display the image in its native size, whereas others (e.g. Google Chrome) might display it using the dimensions defined by its current CSS
  2. Using an external image for the custom drag image

Example # 2

Here is the JSfiddle link for Example # 2: http://jsfiddle.net/v9hawcof/4/

In Example # 2, we use an external image for our custom drag image. In this case it’s a silly image of Bart Simpson on his surfboard, but you can certainly use any image you desire. The advantage here is that we have much more control over the experience. We can use any image we like, and we don’t need to worry about whether or not the image we use is part of or visible in the DOM; it’s external to the DOM. Of course, you can use an image that already exists in the DOM, but you gain the greatest control when you create a new image, rather than use a reference to a DOM element.

Here is the working example for this article: http://examples.kevinchisholm.com/html5/drag-and-drop/part-iii.html

Here is the JavaScript for this article’s working example: http://examples.kevinchisholm.com/html5/drag-and-drop/js/part-iii.js

Summary

Setting a custom drag image may seem like icing on the cake, but it is not an uncommon case. In this article we discussed two options: using a reference to an existing image element in the DOM, as well as using an external image. There is no right or wrong answer as to which approach is best, but I hope this article has not only explained how to do this, but the pros and cons of each method.

Helpful Links for the HTML5 Drag and Drop setDragImage Method

https://developer.mozilla.org/en-US/docs/Web/API/DataTransfer#setDragImage.28.29

http://help.dottoro.com/ljdpgfkx.php

http://stackoverflow.com/questions/16894049/feature-detection-for-setdragimage-of-html5-drag-and-drop

Getting Started with HTML5 Drag and Drop Part II: The dragenter and dragleave Events

HTML5

HTML5 LogoGetting HTML5 drag and drop to work is a great start, but taking this to production requires certain UX considerations.

In the previous article of this series: “Getting Started with HTML5 Drag and Drop Part I: Introduction,” we covered the bare minimum code needed to make an HTML element draggable, and droppable onto another element. So, in Part II of this series, I will talk about two events that allow for better UX with regard to any element onto which you might drop something.

When I say: “…..any element onto which you might drop something,” I am referring to the fact that dragging something does not always mean that you will definitely drop it. In most drag and drop scenarios, you have one or more elements to drag, but also multiple places where you may drop them. Therefore, it is most often a good idea to give the user some indication that the element that they are dragging could be dropped in a particular location. Consequently, this involves setting up a hover-like behavior where the droppable element reacts to the fact that a draggable element has been dragged over it, or dragged away from it.

HTML Base

In the code example above, we have the base HTML for the rest of the examples in this article. For brevity’s sake, I’ve stripped out all but the most essential areas of the markup so that you can focus on the technologies demonstrated in this article. When you view the page source for the final working example, you will see that there is more HTML, but it is for presentational purposes only.

Example # 1

Here is the JSfiddle link for Example # 1: http://jsfiddle.net/v9hawcof/

The dragenter Event

In Example # 1A, we bind an anonymous function to the dragenter events of the droppable HTML element. In this event handler, we add the class: “dragEnter,” which changes the background color of that element. The reason for doing this is to tell the user: “If you want, you can drop the element that you are dragging.” But if you click the link above for the JSFiddle example, you’ll see that we have a problem. Although we add the dragEnter class when the user drags an element over the droppable element, we have not set a handler for when the user drags that element away; we can’t always assume that the user will drop the dragged element. So, we have to handle the case in which the user drags the element over the droppable element, but does not drop it, and then drags away.

Example # 2

The dragleave Event

Here is the JS fiddle link for Example # 2: http://jsfiddle.net/v9hawcof/1/

In Example # 2, we bind an anonymous function to the dragleave event of the droppable element. In that event handler, we simply remove the “dragEnter” class from the droppable element. If you click the jsFiddle link for Example # 2, you’ll see that the user experience is much better; when you drag the small blue box over the larger tan box, the droppable element turns green. So, if you choose not to drop the blue box, and drag it away, the droppable element turns back to tan.

Here is the working example for this article: http://examples.kevinchisholm.com/html5/drag-and-drop/part-ii.html

Here is the JavaScript for this article’s working example:
http://examples.kevinchisholm.com/html5/drag-and-drop/js/part-ii.js

Summary

It is hard to imagine a case in which you would not want to notify the user in some way of the various events that take place during a drag and drop operation. In this article, we focused on the case in which the user drags an element over a droppable one, but does not drop it, and then drags the draggable element away. By attaching event handlers to the dragenter and dragleave events, we have a window of opportunity in which the UI can be updated accordingly. How you prefer to handle the UX in this and similar cases is up to you, but it is an important area to consider.

Helpful Links for HTML5 Drag and Drop dragenter and dragleave Events

dragenter

https://developer.mozilla.org/en-US/docs/Web/Events/dragenter

dragleave

https://developer.mozilla.org/en-US/docs/Web/Events/dragleave

Getting Started with HTML5 Drag and Drop Part I: Introduction

HTML5

HTML5 LogoWhile there are plenty of JavaScript libraries that take the pain out of drag-and-drop, understanding how to implement this feature of HTML5 is not only possible, it’s easier than you may think.

So let’s face facts: drag and drop is something that most of us take for granted. Ever since the late ‘80s, we’ve been able to drag something on the screen and then drop it somewhere as a way of saying: “I want this.” or “ ….do something to this.” In recent years, that kind of functionality has become more and more commonplace in desktop browsers. It’s hard to believe, but drag-and-drop was originally supported in Microsoft Internet Explorer 5. Yep, the XMLHttpRequest object is not the only game-changing feature originally dreamed-up at Microsoft. Ironically, our good friend IE is the only major browser whose support is limited. IE 10 seems to be fairly in line with regard to the most critical features, but IE 9 and below lack features that make native drag and drop implementation frustrating.

Let’s close our eyes for a moment, and pretend we don’t need to support Microsoft Internet Explorer

Fortunately, the HTML5 specification includes a fairly robust API for drag and drop. Making HTML elements draggable and droppable is painless, and managing the related events is possible. The key to all of this is understanding the bare minimum needed in order to properly manage this functionality.

But isn’t everything “draggable” these days?

No, not quite. According to the HTML5 Drag and Drop specification, only images and anchor links are draggable by default (and the anchor must have an href attribute). So, if you want to drag any other kind of HTML element, there is a bit of work to do.

Wait, aren’t there a gazillion JavaScript libraries that make drag and drop a snap?

Yep, there sure are. So, if you merely want to download a library or jQuery plugin and simply “dragify” as needed, this article probably isn’t for you. But if you want to understand how native HTML5 drag and drop functionality works, read on!

HTML Base

In the code example above, we have the base HTML for the rest of the examples in this article. For brevity sake, I’ve stripped out all but the most essential areas of the markup so that you can focus on the technologies demonstrated in this article. When you view the page source for the final working example, you will see that there is more HTML, but it is for presentational purposes only.

Making an Element Draggable

In order to make an element draggable, you need only add a “draggable” attribute to that element, and set its value to “true”. This can be done by including the “draggable” attribute in the original html, or via JavaScript.

Example # 1A

In Example # 1A, we have made an HTML draggable by adding a “draggable” attribute to that element, and setting its value to “true”. While I could have simply added a “draggable” attribute to the HTML, I chose to do so using JavaScript in order to illustrate how much control you have over this.

The dragstart Event

While the code in Example # 1A is completely valid, unless the element in question is an image, or an anchor tag (with an href attribute), there is a bit more work to do. Providing a “draggable” attribute alone is not enough to make an element draggable. There is at minimum, a second step: provide an event handler for the dragstart Event.

The dataTransfer Object

The dataTransferobject is used to hold the data that is being dragged during a drag and drop operation.

Even in the most basic drag and drop implementation, the dataTransfer object is important. The reason for this is the core logic behind drag and drop: why would you want to drag something if you did not plan to eventually drop it? (At first I found this frustrating; I felt that the “draggable” attribute alone should suffice when you want to be able to drag an element. But the more I delved into the specification, the more the logic started to make sense.)

In order to drag an element, you’ll need to provide some data to the dataTransfer object. Ultimately, it does not matter what data you provide; you just need to use the setData method of the dataTransfer object to set some data. You must do this in the dragstart event. After your dragstart event handler returns, you cannot modify the dataTransfer object.

I bet I know what you are thinking now:

Aaaaaaaaaaaaahhhhhh, c’mon Kevin, another friggin’ object I gotta learn about? In the Intro you said something about this whole thing being “…easier than you may think” !!

I know. I kinda lied. But aren’t you glad you’re halfway across the river?

(Seriously, this is all no big deal. Considering how cool drag and drop is, learning about a few objects and methods is a small price to pay.)

The originalEvent Object

When thinking about drag and drop events, it becomes necessary to consider multiple event objects. For example, when you start dragging an element, it fires a “dragStart” event. But then consider the element that you might drop this element on. It fires a number of events as well. When handling any of these events, you will need access to the original event that fired, as a way to refer to the HTML element that was dragged. So, in your dragstart event handler, you’ll want to create a reference to the dragged HTML element itself. This way, in any of the events fired by the droppable element, you can obtain a reference to the element that was dragged (i.e. the element that you might want to drop onto the droppable element).

Example # 1B

In Example # 1B, we bind an event handler for the dragstart event of the HTML element that we plan to drag. That handler is the function: dragStartHandler. The dragStartHandler function takes the current event as its first argument. We then use the setData method of the originalEvent’s dataTransfer object. The originalEvent object is a property of the current event. In this case, the originalEvent is the dragStart event. When calling the setData method, we pass “Text” as the first argument. That simply tells the setData method what type of data we are about to set. The second argument is the ID attribute of the element that is being dragged. This is accomplished by referencing the target object of the event, which is the element that is being dragged, and then use the target object’s getAttribute method to retrieve the ID attribute of the target element.

Setting Up the Droppable Element

You don’t need to do anything special to allow one HTML element to be dragged over another. Once an element is properly “draggable,” you can drag it anywhere you like. But just like playing cards with Kenny Rogers, that gets old pretty quick. The next logical step in implementing HTML5 drag and drop is setting up the droppable element(s) so that you can handle the various events that fire during the process.

The dragover and drop Events

Example # 2

The dragover Event

In Example # 2, we have bound two event handlers to the droppable HTML element. The allowDragover function is bound to that element’s dragover event, and as you can see, it has little functionality: it simply prevents any default behavior that the browser might implement. Surprisingly, this is critical; the drop functionality will not work correctly without it. This is one event handler that you have to simply “set and forget.”

The drop Event

In Example # 2, we bind the dropHandler function to the drop event of the droppable element. This is where the real action should take place.

Example # 3

In Example # 3, we’ve added some functionality to the dropHandler function. First, we prevent any default behavior that the browser might have implemented. Next, we retrieve the ID of the HTML element that was dragged, leveraging the work that we did in the dragStartHandler function. The steps here are virtually the opposite of those taken to set the ID of the dragged element: we use the getData method of the originalEvent’s dataTransfer object, which itself is a property of the event object’s originalEvent property.

Next, we add the class “hasChild” to the element that received the drop. This is for presentational purposes only, but it does allow us to provide a better user experience by changing the appearance of the element that received the drop. Then we “move” the element simply by appending it to the droppable element, and then change the dragged element’s innerHTML to “Dropped”. Just like changing the appearance of the droppable element, this kind of approach usually makes for a better user experience.

Example # 4

In Example # 4, we have the full code for our working example.

Here is the working example for this article: http://examples.kevinchisholm.com/html5/drag-and-drop/part-i.html

Here is the JavaScript for this article’s working example: http://examples.kevinchisholm.com/html5/drag-and-drop/js/part-i.js

Summary

This article barely scratches the surface of what is possible with HTML5 Drag and Drop. My goal was to provide an introduction to the topic that focused on the bare essentials needed to get started. Below are links that provide much more in-depth information on the subject.

Helpful Links for HTML5 Drag and Drop

http://www.w3.org/TR/2011/WD-html5-20110113/dnd.html

http://html5demos.com/drag

http://www.webdesignerdepot.com/2013/08/how-to-use-html5s-drag-and-drop/

https://developer.mozilla.org/en-US/docs/Web/API/DataTransfer

https://developer.mozilla.org/en-US/docs/Web/Events/dragstart

http://tutorials.jenkov.com/html5/drag-and-drop.html