Problems Making JSONP Calls in JSFiddle – PROBLEM SOLVED

JavaScript

JS Fiddle LogoAll the JavaScript you write in the JSFiddle “JavaScript” box gets wrapped in an anonymous function and assigned to the window.onload event of an iframe that is shown when you click the “Run” button.

Last week I published this post: Problems Making JSONP Calls in JSFiddle 

As I was testing out some code, I noticed that JSONP calls were failing when using JsFiddle.net. I took a look at it and just found the answer. It wasn’t too big a deal, just needed to understand how JsFiddle executes the JavaScript code that you put in the lower-left-hand box (i.e. the “JavaScript” box).

Here is the code I testing, that was failing:

In this code, I use the “var” keyword to declare “myCallback” as a function expression, just like I was told in JavaScript summer camp back in the 70s. But even when using the “var” keyword, any variable declared in the global scope becomes a property of the window object. Anyhooo, I confidently assumed that my variable “myCallback” (or window.myCallback) would be available to the script that is loaded by the JSONP call. But that code failed and the following message appeared in the console: “myCallback is not defined”. Bummer.

Well, after a few minutes poking around in Google Chrome Web Inspector, I found the issue:

As I had suspected, JsFiddle executes your JavaScript code in an iframe. What I did not realize at first, is that it wraps all of that code in an anonymous function, that is assigned to the window.onload event. So by using the “var” keyword, my “myCallback” variable became private to the anonymous function. Here is the code that is actually executed by JsFiddle when I clicked “run”:

As a result, my “myCallback” variable (i.e. the function expression) is private, and not available to the outside world.

The answer was simple. I just had to force my “myCallback” variable to be global by removing the “var” keyword:


This forces “myCallback” to be an implied global, which in-fact becomes a property of the window object. It’s the exact same thing as if I had written: “window.myCallback – function()….”

Here is the JsFiddle.net link for the code that fails: http://jsfiddle.net/DQHax/

Here is the JsFiddle.net link for the fixed code: http://jsfiddle.net/DQHax/1/

Same thing, only let’s avoid implied globals, and explicitly attach “myCallback” to the window object: http://jsfiddle.net/DQHax/2/

Again, no big deal. But if you found yourself pulling your hair out and were googling for an answer, hopefully I saved you a few strands of hair.

: – )

Kevin


Using jQuery Deferred to Manage Multiple AJAX calls

jQuery

jQuery LogoOnce you have become accustomed to making AJAX calls and consuming the contents of the data returned by the server, it is tempting to fall into a laid-back mind set: “hey, AJAX is AJAX right?… I mean… you open the request, you send the request, you wait for the server’s response, and then you do something with the response… no big deal, right?”

Well, yes, but… because of the asynchronous nature of an AJAX call, it does not take long for more complex scenarios to arise. What happens when you need to know about a group of AJAX calls? How can we treat a series of asynchronous events as a single value that we need to act upon once there is a collective “success” value?

Enter the jQuery.when() method. This handy dandy little tool allows you to treat multiple asynchronous events as a single value. The syntax is quite simple:

var B = $.get(serverPage.xyz); var C = $.get(serverPage.xyz); $.when(A,B,C).done(funtion(){ //act upon the collective success of A,B and C });

Some might find this a bit unusual. Normally, an AJAX call is something you simply “do,” not something you assign to a variable. jQuery allows us to treat an AJAX call as a value. This value translates to an object that has properties and methods. The $.when() method knows how to recognize and act upon these objects, so it presents a perfect way to handle multiple asynchronous events as a single value.

Example # 1

In Example # 1, we create the variable “aj1”, and set it to equal the result of an AJAX call. This variable becomes a jQuery “jqXHR” object. When we immediately inspect the object, we see that it has a number of methods. This is interesting, but not super interesting.

If you open your JavaScript console and then run this code, you will see the AJAX call in progress, and the contents of the jQuery “jqXHR” object. But if you wait a few seconds, and then after the AJAX call completes, you once again run the code: console.dir(aj1), you will see that this object has changed a bit. The “readyState” property is equal to 4, the “responseText” property contains some HTML from the server, the “status” property is equal to 200, and the statusText is: “OK”. Because the AJAX request has completed, this jqXHR object has properties that reflect this new state.

Example # 2

In Example # 2, we use the jQuery.when() method to act upon the completed state of the AJAX request. When using this syntax, the completed state of each request is a corresponding argument in the anonymous function that is passed to the .done() method. Now we have something interesting, because what we see is that each one of these success objects is an array. The first element is the response text of the request, the second element is the status of the request, and the third element is the original “jqXHR” object.

Example # 3

In Example # 3, we set up three AJAX calls. Normally, one might create a success handler for each AJAX call. In this case, we simply want to know when all three calls have completed successfully. We pass all three AJAX calls (i.e. the three variables that have been assigned the return value of each AJAX call), as arguments to the .when() method. Then we pass an anonymous function to the .done() method that is chained to the .when() method’s return value.

Just as with Example # 2, we take the success object for each call as the corresponding argument of the .done() method call. Inside of the .done() method’s callback, we take action; the contents of the $(‘#target’) element is removed, and we append the server response messages to that element.

Here is the full working example: http://examples.kevinchisholm.com/jquery/when/example-1/

Summary

If you have not had to wrestle with a scenario like this, you soon will. You’ll find that as web pages become more complex, AJAX is leveraged in more complex ways. When asynchronous activity is involved, any complexity is magnified. So, fortunately, the jQuery.when() method is an easy and effective way to handle multiple AJAX calls as one collective value.

Helpful Links for the jQuery.when() method

http://api.jquery.com/jQuery.when/

http://api.jquery.com/category/deferred-object/

http://stackoverflow.com/questions/5280699/jquery-when-understanding


Making a Simple HTTP Server with Node.js – Part IV

Node.js

Node.js Logo

Setting the right value for the “Content-Type” header is a critical task for any web server

In Part III of this series, we built out our Node.js server to serve up any file that is requested, or gracefully return a 404 / “Not Found” header, as well as a custom HTML page informing the user that the requested file was not found. But the only problem is that we are not setting headers for each request. So, it’s important that HTML, CSS, JavaScript and image file, have the appropriate “Content-Type” header set.

In order to demonstrate all of this, we will include a CSS file and a JavaScript file in our web page. I won’t bother including the CSS file in an example; it’s just some silly CSS… nothing too interesting. But I will include the source of our JavaScript file in Example # 1, just so we can see that the second blue box in the web page is created via JavaScript.

TO SAVE TIME, THE FULL WORKING VERSION OF THE CODE EXAMPLES CAN BE CLONED HERE: HTTPS://GITHUB.COM/KEVINCHISHOLM/SIMPLE-HTTP-SERVER-WITH-NODE-PART-IV

Example # 1

Example # 1 simply shows the contents of the JavaScript file: “script.js” that we will request in our pages.

Example # 2

Example # 2 is the source code for index.html.

Example # 3

Example # 3 is the source code for about.html, a second web page that we can request from our Node.js web server.

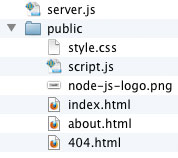
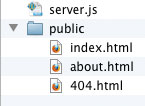
Before we go any further, let’s take a  moment to discuss the folder structure. Just as in Part III of this series, the folder that our server.js file sits in has a sub-folder named “public”. This is where our assets will go. It is this “public” folder that the world will have access to and all requested files will be in there. See Figure # 1.

Folder structure
Figiure 1: The folder structure for this article’s example.

Example # 4

In Example # 4, we have a JavaScript object that contains a list of mime-types that we will support. Each of the object’s properties represents a file extension that we plan to support, and the corresponding value is the mime-type string that will be used for the “Content-Type” header.

Example # 5

In Example # 5, we have added a new line to the variable declarations for the requestHandler() function. The variable “ext” contains a string copy of the requested file’s extension (e.g. “.html” for a web page, “.js” for a JavaScript file, and so on). So we will use that string to check all properties of the “extensions” object from Example # 4. Don’t worry if you feel like you are getting lost; we’ll piece everything together nicely at the end. For now, just know that we have so far provided a hard-coded list of file extensions that we will allow, and the mime-type string values for each one, and we have the variable: “ext” that tells us what the file type is.

Example # 6

In Example # 6, we see if the extensions object has a property that matches the value of the “ext” variable. If not, we write a 404 header, and return a simple HTML page, informing the user that the requested file type is not supported.

Example # 7

In Example # 7, we add a new argument to the getFile() function call. We pass-in the value of the property in the extensions object that matches the file extension of the user’s request. In a nutshell, we are telling the getFile() function what type of mime-type to set in the response header.

Example # 8

In Example # 8, we have expanded the res.writeHead() function call. Where previously we only set the 200 / “OK” response code, we now set the “Content-Type” and “Content-Length” headers. The “Content-Type” property is mapped to the value of the mimeType variable, which was passed-in as an argument to the function. So the fruits of our labor in this article all become apparent in this example. The value of the mimeType variable will be set accordingly, for the file type.

Example # 9

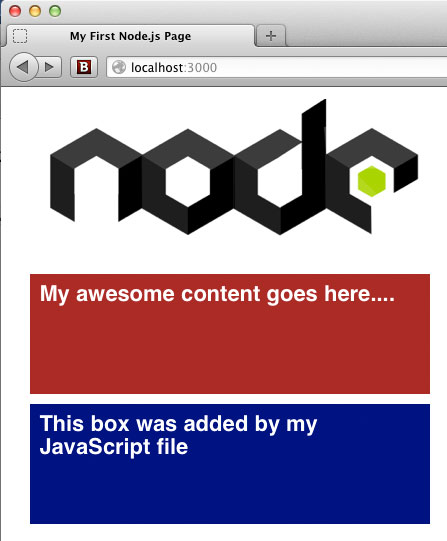
Example # 9 is a complete code-listing for this article. In Figure # 2, we see the results of http://localhost:3000/index.html. So, as you can see, we are serving not only HTML, but also an image file, a CSS file and a JavaScript file. The JavaScript file dynamically creates the blue box you see on page load (simply to demonstrate that our JavaScript file is served correctly from our Node.js web server, and works).

index.html page
Figure # 2: Our index.html page.

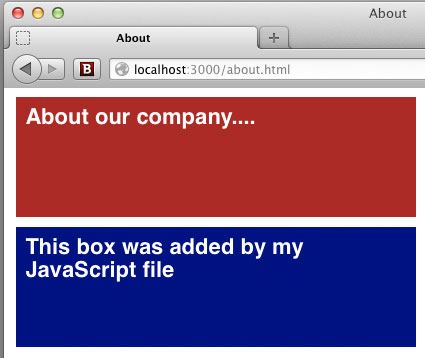
In Figure # 3, we see that our “about.html” page works, and also pulls in the CSS and JavaScript files with no problems.

about.html
Figure # 3: about.html

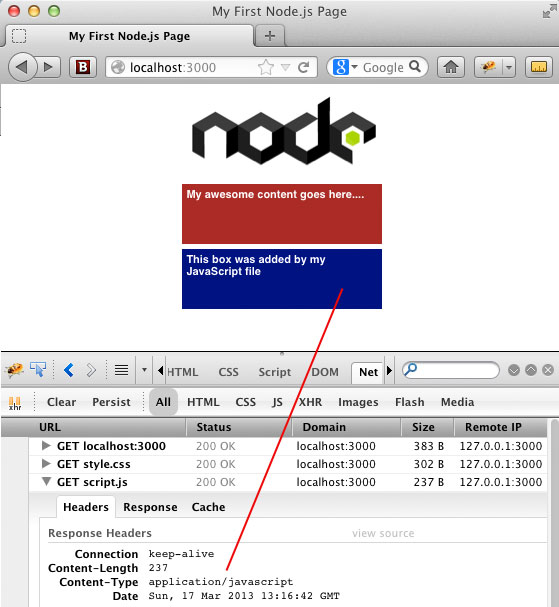
In Figure # 4, we inspect the JavaScript file call in the “net” tab of FireBug and can see that the “Content-Type” header is set accordingly.

The FireBug
Figure # 4: Inspecting the call to script.js in FireBug’s “net” panel

Summary

In this article we learned how to set the appropriate “Content-Type” header for each request, based on the file extension of the requested file. We demonstrated how to use the extname() method of the path module, to return the extension of the requested file. We also applied some logic, to handle scenarios in which the requested file-type is not supported.

Helpful Links for the Node.js path module

http://nodejs.org/api/path.html

http://docs.nodejitsu.com/articles/file-system/how-to-use-the-path-module

Helpful Links for HTTP header fields

http://en.wikipedia.org/wiki/List_of_HTTP_header_fields

http://www.w3.org/Protocols/rfc2616/rfc2616-sec14.html

Helpful Links for mime-types

http://en.wikipedia.org/wiki/MIME_type

http://en.wikipedia.org/wiki/MIME

Making a Simple HTTP Server with Node.js – Part III

Node.js

Node.js LogoIn Part II of this series: Making a Simple HTTP Server with Node.js – Part II we learned how to use the “path” and “file system” modules. By leveraging these Node.js modules, we were able to read the path of the HTTP request that our server received, and read from the file system of the web server. We also learned about the “__dirname” keyword, which provides an abstract reference to the folder in which the currently executing JavaScript file exists.

That version of our HTTP server simply checked to see if the request was for the file “index.html”, and if so, served it up. That was progress over Part I, but still not robust enough.

In this article, we will expand our Node.js HTTP server so that the following services are provided:

  • If an asset is requested, and it exists, it will be returned
  • If an asset is not specified, then “index.html” will be returned
  • If an asset is requested, and it does not exist, our custom 404.html page will be returned

We will make every effort to keep our three-step paradigm, which will, we hope, continue to illustrate that creating an HTTP web server with Node.js is at its core, quite simple. What we have to take a closer look at, is the fact that, as we ask more of our little web server, we have to roll up our sleeves and write the code that provides that very functionality.

So the good news is: It’s just more JavaScript. Yay!

Example # 1

In Example #1, we have the three-step core of our HTTP web server. We have already discussed each step in detail, so let’s just quickly re-cap:

Step # 1: Use the require() method to gain access to the Node.js modules that we need
Step # 2: Use the createServer() method of the HTTP module, and pass it a reference to our “requestHandler” function
Step # 3: Listen for a request on port # 3000

Simple, simple, simple.

Next, let’s look at two functions: our updated requestHandler() function, and then our new getFile() function.

Example # 2

In Example # 2, we first look at the request, and if no file was requested (i.e. the user simply typed http://somedomain.com into their browser), then we prepare to serve up “index.html”.

As we learned in Part II, the __dirname keyword provides an abstract reference to the folder in which the currently executing JavaScript file resides. We then create a variable named “page404”, which will provide a reference to our custom “404 / Not Found” page, should we need it.

Now we have everything we need, so we call the getFile() function, passing it the path and name of the asset we want (i.d. index.html), the response object, and then the reference to our custom 404 page.

Example # 3

In Example # 3, there are some new things happening. First, we use the exists() method of the file system object that was returned by the “fs” module, and assigned to our variable: “fs”. This method takes two arguments: a path to the file, and an anonymous function. That anonymous function takes one argument: “exists” (call it whatever you like). That single argument provides a helpful “truthy/falsy” flag against which we can test.

Folder Structure
The folder structure of this article’s example code

So if you take a moment to think about this, you’ll find that it’s quite cool: baked into the Node.js “fs” module is a method that simply tells us whether or not a named file exists. This is a perfect example of the brilliance of Node.js modules. Imagine how much heavy lifting you’d have to do if you needed to provide this kind of implementation yourself. Fortunately, someone did it for you. And that module can be used over and over again… a zillion more times if you like.

So moving along, if the “exists” argument returns a “truthy” value, we use the fs.readFile() method to literally read the physical file from the local file system. We have a little error checking to make sure that the file read operation did not fail, and if it did not fail, we send the contents of that file back to the user.

If the requested file was not found (i.e. the “exists()” method told us that the named file does not exist), then we serve up the custom 404.html file that we still have a reference to.

Example # 4

Example # 4 simply puts all our code examples together, to provide some context.

Summary

In this article we expanded our simple Node.js HTTP web server. We leveraged the exists() method of the “fs” (file system) object, to determine if the requested file actually exists, and provided logic that handles cases in which the requested file does not exist.

Helpful Links for the Node.js path and fs Modules

http://nodejs.org/api/fs.html

https://github.com/jprichardson/node-fs-extra

http://docs.nodejitsu.com/articles/file-system/how-to-write-files-in-nodejs

Book Review: Instant Dependency Management with RequireJS How-to

Asynchronous Module Definition
Instant Dependency Management with RequireJS How-to
Instant Dependency Management with RequireJS How-to from Packt Publishing

Greg Franko’s book, Instant Dependency Management with RequireJS How-to, from Packt Publishing, strives to cut through the clutter and introduce you to AMD through Require.js

Asynchronous Module Definition is a term that can be intimidating. Even worse, it can potentially discourage JavaScript programmers from learning about and implementing the AMD API.  Fortunately, this book can be helpful.

The initial areas of discussion. are what you might expect: learning how to load Require.js both synchronously and asynchronously, as well as setting Require.js configuration values. But what becomes apparent is that implementing AMD patterns does not mean having to abandon the tools you use. Mr. Franko does a nice job of illustrating how jQuery can be exposed in your pages as an AMD module, as well as Jasmine unit tests and client-side JavaScript templating. All of this is accomplished by leveraging Require.js. A logical extension of this journey is a discussion of JavaScript libraries that do not expose themselves as AMD modules such as Backbone.js and jQueryUI Widget Factory. In these cases, a thorough explanation details how to work around this challenge, and keep tight control of your JavaScript resources. There is also helpful content here for mobile web developers.

Instant Dependency Management with RequireJS How-to may not be the definitive “go-to” resource for those who are completely new to the concept of AMD or Require.js. While key concepts are well served, this book’s strength is its ability to broaden one’s perspective with regards to what Require.js is capable of. By illustrating jQuery’s ability to be exposed as an AMD module, the power and flexibility of Require.js becomes increasingly apparent.

I would recommend this book for JavaScript developers who are already familiar with the concept of asynchronous module definition and understand in general how Require.js works. For this audience, Mr Franko’s direction will deliver a great deal of value with regards to the numerous architectural solutions that are detailed. In each case it is easy to see that Reqiure.js is more than simply a sophisticated script loader. This library exposes a number of properties and methods that help you to leverage AMD as broadly as possible, even when some of the libraries in use are not AMD compliant.

Instant Dependency Management with RequireJS How-to is available in paperback, or eBook format.

  • Author: Greg Franko
  • File Size: 100 KB
  • Print Length: 42 pages
  • Publisher: Packt Publishing
  • Publish Date: May 22, 2013
  • Language: English
  • ASIN: B00CXRTC1Q

Making a Simple HTTP Server with Node.js – Part II

Node.js

Node.js Logo

OK, enough “Hello World!” Let’s serve up an HTML file, dagnabbit.

In Part I of this series: “Making a Simple HTTP Server with Node.js – Part I“, we learned the bare-bones steps needed to create an HTTP server with Node.js. While it was fun to see our text message make its way from our server-side JavaScript file, at the end of the day we sent a hard-coded text message. Not too sexy.

In this article, we will invite the user to type “index.html” into their browser window and prepare to be amazed. Ok, the user has to be on your local DEV machine, and type “http://localhost:3000/index.html”, but we have to start somewhere, right?

Example # 1

There are a few new things happening in Example # 1, when compared to the examples from Part I of this series. The biggest change is that we’ve expanded “Step # 1” and are requiring two new Node.js modules: “path” and “fs”.

The “path” module provides a number of methods that help you to examine and parse file paths. The “fs” module is short for “File System”. This module provides access to the file system. So here is where the fun stuff starts: Writing JavaScript that has access to the local file system? Yep. You bet. We have not even begun to scratch the surface of what is possible.

Next, our helper function has grown a bit as well. We use the basename() method of the path module to return the name of the file that was requested by the user (i.e. index.html). We then leverage the “__dirname” keyword, which provides a quick and easy handle to the folder that your server-side JavaScript file resides in.

After that, we check to see if the user has requested “index.html”, and if so we will return it. The fs.fileRead() method takes two arguments: a path to the physical file that we want to return to the user, and an anonymous function. That anonymous function takes two arguments: an error object, and the content of the file that is to be returned. So just to play it safe, we check to see if there is an error: if ( !err ). If there is none, then we use the res.end() method to return the contents of index.html and then close the request. If there was an error, for now we are piping it to the console for our own troubleshooting.

If none of that worked out, then we set a “404 / Not Found” header, and send some markup back, letting the user know. Step # 2 and Step # 3 haven’t changed since our last article: Create the server, and then listen for a request.

Phew!

That was a lot, but our Node.js HTTP server has grown up quite a bit. Instead of just sending back a plain text message or some hard-coded HTML, we are now serving up an actual HTML file. We could change that file any time, which would change what the user sees in the browser. It’s not exactly Facebook, but hey, we are creating an HTTP web server using nothing but JavaScript!

For Part III, we will smarten things up and enhance our server so that it will serve up any static content that is requested.

Summary

In this article we learned how to use the “path” and “file system” Node.js modules. By leveraging the modules, we were able to read the path of the HTTP request, and read from the file system. We also learned about the “__dirname” keyword.

Helpful Links for the Node.js path and fs Modules

http://nodejs.org/api/path.html

http://docs.nodejitsu.com/articles/file-system/how-to-use-the-path-module

http://nodejs.org/api/fs.html

http://jspro.com/nodejs/accessing-the-file-system-in-node-js/

http://docs.nodejitsu.com/articles/file-system/how-to-read-files-in-nodejs

Making a Simple HTTP Server with Node.js – Part I

Node.js

Node.js LogoThe beauty of creating an HTTP server with Node.js is that you are doing so using a language that you already know: JavaScript.

If you work with JavaScript, then you’ve probably heard about Node.js. What makes Node.js such an amazing technology is that it turns web-development on its head: a historically client-side language is now being used as a server-side language. I’m sure I don’t have to tell you how insanely cool this is.

When I first started looking at Node.js, my first question was: “Ok, server-side JavaScript. Got it. So what the heck can I do with it?”

Short answer: A lot.

Probably the most obvious and easiest to comprehend application for Node.js is to make a web server. Node handles all the low-level ugliness and let’s you just write code. The code you write is not too much different than the client-side JavaScript that you are used to. The biggest differences come in when you start to realize that you have access to the file system. You can do things with Node that are completely off-limits on the client side. When it comes to creating a simple HTTP server, the amount of code you need to write for proof of concept is amazingly minimal. The examples that follow are very basic. They don’t offer any real-world usefulness, but they do illustrate the small amount of effort needed to get up and running. In Part II of this series, we will look at more realistic HTTP server code for Node.js.

Example # 1 A

In Example # 1, we have the absolute bare minimum needed to set up an HTTP web server using Node.js. The very first line tells Node.js that we need to use the “http” module. Using Node’s “require” method, we assign the return value of the “HTTP” module to the variable “http”. This was Step # 1.

(A detailed discussion of the require() method is beyond the scope of this article, but a topic that plays an important role in Node.js. If you are not familiar with the Modules/AsynchronousDefinition proposal from Common.js, I highly recommend reading up on that topic. For any client or server-side JavaScript developer, it’s a biggie.)

The only part that might seem a bit confusing to some is the callback that is passed into the createServer() method. This callback is executed each time the server receives an HTTP request.

For Step # 2, we call the createServer() method of the http object. We pass that method an anonymous function which takes two arguments: the request object and the response object. Inside of that anonymous function, we use the writeHead() method of the response object, to set the server’s response of “200 ok” to the client’s browser, and set the header of “Content-type” to “text/plain”. Next, we call the end() method of the response object. The end() method closes the response to the client. It can also send output to the client. We pass in a string as an argument in this example, and that string is sent to the client’s browser.

For Step # 3, we call the listen() method on the return value of the createServer() method. We pass in “3000”, which tells Node.js to listen on port # 3000.

If you run this code in Node.js, and then in your browser, “type localhost:3000”, you will see the following in your browser: “Your node.js server is running on localhost:3000.”

Whew! The explanation for Example # 1A took much longer to write than the actual code!

As you can see, it’s pretty easy to create an HTTP server with Node.js. In my opinion, the only part that might seem a bit confusing to some is the callback that is passed into the createServer() method. This callback is executed each time the server receives an HTTP request. It might make things easier to understand if we move the guts of that callback to its own function, and then pass that function declaration as the callback to the createServer() method.

Example # 1 B

In Example # 1B, we create a function declaration named requestHandler. Then we pass that function as the sole argument to the createServer() method. I believe that if you are new to Node.js, you’ll find it is easier to see what is going on, because the createServer() method is all on one line.

Example # 1 C

In Example # 1C, we’ve refactored our code to make things even simpler. First, our helper function processes the HTTP request, then Step 1, Step 2 and Step 3. Bing, Bang, Boom. Simple stuff.

Example # 2 A


In Example # 2A, we’ve upgraded our message to the client’s browser to include some HTML. After all, HTML is what we will really want to serve, right? The only problem is that Node is not parsing the HTML. When you run this example in your browser, you see the HTML tags in the response. That is not what we want. What is happening?

The problem is in the header that we are setting with the res.writeHead() method call. The value of the “Content-Type” header is “text/plain”. So, Node just passes all the text along as… well, plain old text.

Example # 2 B

In Example # 2B, we have changed the value of the “Content-Type” header to “text/html”. If you run this example in your browser, you will see that Node sends the string as HTML, so our H1 and UL elements are rendering as they should in the browser.

Example # 3

In Example # 3, we take things a bit further. Up until now, we have been using the res.end() method to do two things: send some text or HTML to the client’s browser, and then close the response. In this example, we use the res.write() method to send our HTML to the client’s browser, and the end() method is used only to close the request.

We’ve also introduced some logic into our code. While what this example accomplishes is very little, and has virtually no real-world value, it demonstrates that while we have created an HTTP server, we have done so with JavaScript, and we already know the JavaScript language. So, we can do something like create a for/loop block, and use that loop to provide some dynamic HTML output. Again, this “dynamic” aspect of our code is not very impressive, but I think you get the point: it’s just JavaScript, so the sky’s the limit.

Summary

In this article, we learned how to create a simple HTTP server using Node.JS. We covered the three most basic steps needed, which include requiring the HTTP module, calling the createServer() method, and then telling the server to listen for an HTTP request. Finally, we learned how the server executes a callback function for each HTTP request it receives, and the most basic things that need to happen inside of that callback.

Helpful Links for creating a simple Node.js HTTP Server

http://nodejs.org/

http://docs.nodejitsu.com/articles/HTTP/servers/how-to-create-a-HTTP-server

http://www.youtube.com/watch?v=jo_B4LTHi3I

http://stackoverflow.com/questions/6084360/node-js-as-a-simple-web-server

http://www.nodebeginner.org/

Replicating a “mailto:” href When You Need to Return false From an Anchor Tag Click

JavaScript

JavaScript LogoYou have an anchor tag, the href is a “mailto”, but what if you can’t have the hyper link follow?

Problem:

You need to have a “mailto:” click event, but you have to (for whatever reason) return false or otherwise prevent the actual click event’s default behavior.

Short Answer: On that element’s click event: window.location = “mailto:?subject=XXX…”;

Long Answer (with long story prepended) :

I recently added some social networking buttons to a client’s mobile site, one of which was an old-school “mailto:” anchor tag. No big deal, right?

Well… sort of.

I was testing the deployment in their DEV environment and everything was peachy. And then all of a sudden, nothing worked. Needless to say, I was banging my head against my cubicle for about 20 minutes. I hadn’t made any changes, but suddenly nothing worked. When I calmed down and inspected the live DOM, I could see that my nice long “mailto:?subject=BLAH BLAH BLAH…” href value was very much in-tact on page load, but when I clicked the anchor tag, everything after the “mailto:” disappeared. The result was a new window with simply “mailto:” in the address bar. I tried this over and over (and over). Same thing. HREF valule is fine on page load, but on click, the query string is stripped out.

WTF?

Another 20 minutes of cubicle head-banging, and then I realized that someone had “upgraded” the Omniture library that the page was pulling in. I won’t bore you with the details, but in short, any anchor tag in the page was checked on a click event, and if it had a query string, the query string was removed.

Ugggghhhhh….

I wasted a good half hour trying to get around this, but no matter what I did, that query string got stripped off. Then I wasted another 20 minutes with a plan to create a new anchor element on every click, give it the same “mailto:?subject=BLAH BLAH BLAH…” href value, never append it to the DOM, and just trigger its click event when the original element was clicked.

Dumb Idea.

After a little poking around, I found this little gem:

For that problem elements click event, just do the following:

Nice.

Omniture Calls Firing Twice When Returning False from Click Event

JavaScript

JavaScript LogoSometimes “return false” is not enough; you need to prevent the event from bubbling up the DOM

Problem:

While implementing new Omniture calls on a client’s mobile site today, I noticed that two Omniture calls were being fired each time the new social media buttons I had added where clicked. These buttons only fired the Omniture call once, but each time one was clicked, two Ominiture calls were firing. I know this could not be the right behavior. The previous developer had implemented zepto.js, so I wanted to be sure it was not an anomaly of zepto that was causing the problem.

Short Answer:

Instead of ending each click handler with “return false”, I had to do end it with:

Long Answer:

I noticed that when two Omniture calls were fired, they were not the same. One was the one I intended to call, and it was working perfectly. The other was more generic, and did not seem to understand what exatly was clicked. This led me to believe that there was a more generic event handler up the DOM somewhere, that was binding to any click, and firing off some general parameterss.

Yuck!

It turns out that someone had updated the Omniture library that was used, and they had bound a generic Omniture call to the anchor tag click event. Even though my click event returned false, the event bubbled up to wherever that generic event binding was. I found this StackOverflow post, and the answer provided was dead-on:

http://stackoverflow.com/questions/6207956/zepto-js-doesnt-return-false

So my click handler went from this:

…to this:

Summary:

I just needed to kill the event bubbling, and prevent the default behaviour, and everything worked just fine.

Getting Started with JavaScript Unit Testing and jQuery QUnit

JavaScript

JavaScript LogoDecent programmers tests their code before deploying it. In JavaScript development, this usually means viewing the web page that your code interacts with, and clicking one or more elements in the page to ensure that the desired result is achieved

When your code base starts to grow and become more complex, testing can become tedious. Even worse, manual testing can become unreliable, because you not only have to test your new code, you have to regression test as well, so that you can be sure your new code did not break any old code.

Yuck!

If we’ve learned nothing else at this point in technology, we have at least discovered, first hand, that humans are really bad at tedious, repetitive tasks. Fortunately, computers love this kind of work.

Enter Unit Testing

The key to writing testable code is to produce small modules of functionality that always return a predictable result.

Unit testing provides a methodical way to ensure that your code always performs as expected, and provides red flags for the nanosecond that this condition changes. The key to writing testable code is to produce small modules of functionality that always return a predictable result.

jQuery QUnit

jQuery QUnit is a test framework created by the same impressive folks who bring you jQuery. It is lightweight, easy to understand, and easy to use. It has a number of simple methods that allow you to test your code. What is really impressive about jQuery QUnit is that it is designed to run in a (very) simple web page so that your test results are not only visual, but easy to understand.

Before we dive into the code, it might help to take a look at the full working example:

http://examples.kevinchisholm.com/javascript/unit-testing/qunit/part-i/

Let’s review the files involved in the full working example.

qunit.js

This is the QUnit JavaScript library.

qunit.css

This is the CSS that our test page will need.

tests.js

This is the JavaScript file that contains our unit tests.

index.html

This is the web page that you see in the full working example. It allows us to view the test results.

Here is the full source code for index.html:

Example # 1 A

In Example # 1A, we test a function named “badFunction”. I gave it that name because when we test for a positive result, it fails. The syntax is simple:

  • We execute the test() method
  • The first argument to the test() method is simply a label for the test that makes it easier to identify in the test results page (index.html).
  • The second argument to the test() method is an anonymous function. We craft our test(s) inside of this function.
  • Inside of the anonymous function, we execute the ok() method, a boolean assertion. This test passes if the first argument is “truthy”.
  • The first argument to the ok() method is the execution of badFunction(). Since badFunction returns false, the test fails.
  • The second argument to the ok() method is the test result message.

Example # 1 B

In Example # 1B, The approach taken is identical to Example # 1A, with one exception: we test goodFunction(), which passes the ok() test because its goodFunction() returns true.

Example # 2 A

In example # 2A, we test the function makeArray1(). That function returns an empty array literal. Our unit test consists of two calls to the ok() method. The first call simply checks to see that makeArray() returns a true array. It does, so that test passes. The second call to ok() checks to make sure there is at least one element in the array. The array is empty, so that test fails.

Example # 2 B

In Example # 2B, we test makeArray2(). Since that function returns an array with three elements, both calls to the ok() method pass.

Example # 3 A

In Example # 3A, we test a function named lessThanFive(). It is actually a closure that returns a function. The closure allows us to have a private scope which will keep track of how many times the function has been executed. Since this function was designed only to be executed less than five times, on the fifth execution, and for every execution that follows, the function returns false. The first four times, it will return true. You’ll see in the full working example that our unit test passes four times and then fails twice. This is because the first four times that lessThanFive() runs, it returns true. The fifth and sixth times that it is run, it returns false.

Example # 3 B

In Example # 3B, we have a slightly more elegant approach. Instead of writing out six calls to the ok() method, we have a FOR/LOOP, which executes six times. On each iteration, it calls the ok() method, which, in turn, executes the lessThanFive() function. The only drawback to this approach is that we do not have a nice customized test message for each iteration of the test.

Once again, here is the full working example:

http://examples.kevinchisholm.com/javascript/unit-testing/qunit/part-i/

Summary

In this article, we took a brief look at how to write JavaScript unit tests using jQuery QUnit. We learned about the files needed, the test() method, and the ok() method. We learned how to check for more than one possible outcome of a test, and that there is more than one way to write the same test.

In the next article, we’ll take a closer look at the other features of QUnit.

Helpful Links for jQuery QUnit

http://qunitjs.com/

https://github.com/jquery/qunit

http://en.wikipedia.org/wiki/QUnit

http://net.tutsplus.com/tutorials/javascript-ajax/how-to-test-your-javascript-code-with-qunit/

http://msdn.microsoft.com/en-us/magazine/gg749824.aspx

Getting Started with Require.js – Part III

Asynchronous Module Definition

Require.js LogoLearn How to Build a Social Media Plugin, Using Require.js and the Asynchronous Module Definition (AMD) Pattern

In Getting Started with Require.js – Part II, we took a closer look at the way the Require.js JavaScript library works. We created modules that depended on other modules, and learned how the return value of a module can be used to expose functionality to the outside world.

In Part III of this series, we will use Require.JS to build a social media plugin. We’ll leverage the concepts and techniques used in Part II to create reusable front-end code that has real-world usefulness. You’ll be able to take the code from the completed working example, copy it, tweak it, and use it for your own web page.

Since we have discussed a great deal of Require.js implementation details, I’ll keep the discussion on a high level here. You can drill down into the code for a completed working example and review all of the nitty-gritty details if you like. The focus of this article is to provide an example that demonstrates how Require.js can be put to use in a real-world context.

Before we dive into the code, it might help to see the full working example for this article:

http://examples.kevinchisholm.com/javascript/requirejs/part-iii/

NOTE: For most of the examples, I will provide a link to the actual module file. I don’t think there is much point in repeating that same code here in the article. You can simply view it in your browser.

Example # 1

In Example # 1, we have the markup for our web page. You’ll notice that I have removed the CSS in the head and most of the content in the body. This is only to keep the code example short. Otherwise, it is identical to the working example.

In this example, after including require.js, we use the require() function. The first argument is social-menu.js. This is the only dependency for the JavaScript code in the page. In the anonymous function that is the second argument to the require() function, we reference social-menu.js as “menu”. We then call the init() method of the variable “menu”, which is an object. We know this because as we will see shortly, the return value of the module social-menu.js is an object with a method named init(). We pass an array to meunu.init(). This array contains strings that identify the social media icons we want to include in our plugin. Next, we will take a closer look at the module: social-menu.js.

social-menu.js

http://examples.kevinchisholm.com/javascript/requirejs/part-iii/social-menu.js

This module has one dependency: social-markup.js. Inside of our module, social-markup.js is referred to as “socialMarkup”. Inside of the init() method, we instantiate the socialMarkup() constructor. We then use the getLinks() method of the socialMarkup() object. When past the appropriate array, the getLinks() method will return a DOM object that only needs be appended to the DOM, which we do on the very next line.

The beauty of this Asynchronous Module Definition (AMD) pattern is that as we step through the code, the implementation details of each dependency is abstracted away by the module that we depend on. We simply “need” that module, Require.js loads it asynchronously for us, and then we use it. This makes it easier to follow and understand code that you did not write. As you follow the dependency chain, digging deeper into the code, you can see more implementation details (if you choose to do so).

social-markup.js

http://examples.kevinchisholm.com/javascript/requirejs/part-iii/social-markup.js

If you look towards the bottom of this module, you’ll see that it returns a function. That function is meant to be used as a constructor. The line “this.getLinks = function(arr){…” indicates that when instantiated, the resulting object will have a method named “getLinks()”. The private variables “makeAnchor”, “addTitle”, “addClickHandler” and “makeImage” are all helper functions that handle the implementation work needed to create the DOM object that this module returns. Lastly, notice that this module’s sole dependency is “social-icons.js”, which contains the data we need to construct the actual social media icons and event handlers.

social-icons.js

http://examples.kevinchisholm.com/javascript/requirejs/part-iii/social-icons.js

This module has no dependencies. It returns an object whose properties are all objects containing data for each social media type. Each of those individually named objects has the following properties:

  • Image: A data URI that provides an image, so that we don’t need to reference external resources.
  • Title: What users see when they hover over the icon.
  • Handler: A function that will be the click-event handler for that social media icon.

Now that we have taken a high-level view of the code, re-visit the full working example for this article:

http://examples.kevinchisholm.com/javascript/requirejs/part-iii/

In the full working example, you’ll notice that each social media icon allows you to share the page (e.g., “tweet” “pin”, “facebook post”, etc…). These actions are determined by the click event handler that we specified for each icon in the module: social-icons.js. The images for icons themselves are provided by the data URL for each social media type (once again in “social-icons.js”), as well as the title that you see when you hover the mouse over that icon.

Summary

In this article, we put to use, in a real-world context, the concepts and techniques that we learned in Part I and Part II. We created a social media plugin that actually works. I hope you have enjoyed this series. Require.js is a powerful and helpful JavaScript library that helps you to create loosely-coupled, modular, reusable code.

Helpful Links for Require.js and Asynchronous Module Definition (AMD)

Require.js

http://requirejs.org/

http://www.webdesignerdepot.com/2013/02/optimize-your-javascript-with-requirejs/

Asynchronous Module Definition (AMD)

http://stackoverflow.com/questions/12455537/asynchronous-module-definition-difference-between-beta-verb-and-requirebeta

http://www.sitepen.com/blog/2012/06/25/amd-the-definitive-source/

http://blog.davidpadbury.com/2011/08/21/javascript-modules/

Using the jQuery Promise Interface to Avoid the AJAX Pyramid of Doom

jQuery

jQuery LogoNested success callbacks are messy business. The jQuery Promise interface provides a simple and elegant solution.

So, you have to make an AJAX call, and then do something with the return data. No problem, right? Right. What if you have to make two AJAX calls, and then do something with the return data for each one? No problem, right? Right. What if the second AJAX call depends on the success of the first AJAX call?

“…um, well…. then, well… wait a minute… ok, I’ve got it:

I’ll make the first AJAX call…and then inside the success callback function, cache the data somewhere… um… in a global variable for now I guess… yeah, no one will notice. OK, and then inside of that success callback, we’ll nest another AJAX call, and then inside of the second AJAX calls’ success callback, we’ll get our first chunk of data from the global variable, and then, and then… um…and then…”

…yikes!

Obviously, the preceding diatribe was a little over the top, but c’mon…. haven’t you at least once stood at the edge of that cliff and looked over? Fortunately, jQuery features a way out of this mess that is safe, reliable and packed with vitamins.

The jqXHR object

Since version 1.5.1, jqXHR objects returned by $.ajax() implement a “Promise” interface. In short, this means that a number of methods that are exposed provide powerful abstraction for handling multiple asynchronous tasks.

I think it is important to note that the subject of the jQuery Deferred and Promise Objects is deep. It is not an easy topic to jump into and a detailed discussion of this is outside of the scope of this article. What I hope to accomplish here is to provide a simple and fast introduction to the topic, by using a real-world problem / solution.

There are certainly multiple scenarios in which the jQuery Deferred and Promise objects can be useful. I have chosen to use AJAX calls for this, since it is an example of asynchronous behavior that I think most folks can relate to. In order to dramatize the effect of an asynchronous AJAX call, I am using a PHP file that can return a delayed response. Here is the code for the server page:

OK, now some AJAX.

(Note: I highly recommend that you open up the “network”  panel in Firebug or WebKit developer tools so that you can see these AJAX calls in action when viewing the working examples… especially AJAX call # 1, which will take 5 seconds to complete)

Example # 1

In Example # 1 we have a fairly straightforward setup: Two buttons, each resulting in an AJAX call. Notice that the 1st AJAX call takes 5 seconds to complete. Instead of providing an inline anonymous function for the success callback of each AJAX call, we have a generic handler named “success”.

Here is a link to the working code for Example # 1: http://examples.kevinchisholm.com/jquery/promise/promise-and-ajax-beginner/example-1.html

But what if we want AJAX call # 2 to depend on AJAX call # 1? That is, we don’t want AJAX call # 2 to even be possible until AJAX call # 1 has completed successfully.

Example # 2

In Example # 2, we have a pattern that is known as the “Pyramid of Doom”. This might work for the short term, but it is impractical, not at all flexible, and just plain messy. What if there was a third button, and a fourth button… I think you see what I’m getting at here.

Example # 3

Ahhh… that’s much better!

In Example # 3, we have taken advantage of the Promise interface that is exposed as part of the jqXHR object. If you are wondering what the jqXHR object is, it is the return value of any $.ajax() call. So, while you can simply do this: $.ajax(URL,CALLBACK), the call itself returns a value. That return value is the jqXHR object, which is a superset of the XMLHTTPRequest object.

The return value of $.ajax() is the jqXHR object, which is a superset of the XMLHTTPRequest object, and packed with some powerful features.

We don’t have to dive too deeply into the good ol’ XMLHTTPRequest object (although it is important to know what it is and the critical role that it plays in AJAX). But the key point here is that the jqXHR object wraps the XMLHTTPRequest object, providing some useful features. One of those features is the “Promise” interface.

“….ok, ok Kevin, you’re givin’ me a migraine… where are you going with all this?”

Hang in there; we are at the 99 yard line here. What this all means is that instead of just making an AJAX call, you can assign that AJAX call to a variable. Since the $.ajax() method returns the jqXHR object, your variable is now a Swiss Army knife of AJAXian goodness. You can then implement methods of your object (i.e. your variable). Two of those methods are: .when() and .done();

So, in Example # 3, when we fired the first AJAX call, we assigned its return value to the variable “aj1”. Notice that we did NOT make a success handler call. We simply make the AJAX call, and that call’s return value is held by the variable “aj1”. Then when the user clicks the second button. we set the return value of the second AJAX call to the variable: “aj2”. Now we have two variables and each is a jqXHR object. These are powerful little objects!

The line where the fun really starts is: $.when(aj1,aj2).done()

Notice how the .done() function takes a callback. The callback is fired when the two arguments passed to the .when() method are resolved. And guess what those two arguments are… our two little jqXHR objects!

So, the .done() method knows how to get ahold of the data returned by each of those calls. Now we simply call our generic success handler, passing in the return data of each AJAX call (i.e. each jqXHR object). You may be wondering why I pass in the values “a[0]” and “b[0]”. This is because “a” and “b” are jqXHR objects. It just so happens that the first property of these objects (i.e. the property with the index of 0) happens to be the “responseText” property of that object (i.e. the text sent back from the server).

Phew!

I know that was a lot. But there is much to shout about when it comes to the jQuery Promise interface. As I mentioned, it is a big topic and not easily summarized. But my hope is that these examples will have put a little context around the subject, and will help you to dive in and get started.

Below is the source code for this article’s full working example:

Example # 4:

Here is a link to this article’s full working example: http://examples.kevinchisholm.com/jquery/promise/promise-and-ajax-beginner/example-2.html

Summary

In this article we learned about the jQuery Promise interface. We discovered that since version 1.5.1, calls to $.ajax() return a jqXHR object, which implements the Promise interface. We utilized the .when() and .done() methods of this interface to execute callback functions for two asynchronous tasks. This eliminates the need for nested success callback functions.

Helpful Links for the jQuery Deferred, jQuery Promise and jqXHR Objects

jQuery Deferred

http://api.jquery.com/category/deferred-object/

http://api.jquery.com/jQuery.Deferred/

jQuery Promise

http://api.jquery.com/promise/

http://api.jquery.com/deferred.promise/

http://joseoncode.com/2011/09/26/a-walkthrough-jquery-deferred-and-promise/

jQuery jqXHR

http://api.jquery.com/Types/#jqXHR

http://api.jquery.com/jQuery.ajax/#jqXHR

Getting Started with Require.js – Part II

Asynchronous Module Definition

Require.js LogoStep beyond the basics, and learn how Require.js modules can return various kind of values, depend on other modules, and keep those dependencies transparent to the outside world

In Getting Started with Require.js Part I, we got to know the Require.js JavaScript library. We learned about the basics of the define() and require() methods, and how they load dependencies asynchronously and then provide access to the return value of each one.

In Part II of this series, we will use Require.JS to build a little application that displays the daily specials for a restaurant. It’s a silly little example, but perfect for taking our discussion of Require.js to the next step.

The focus of this article is to demonstrate how one module can depend on one or more modules, and each of them can have similar dependencies. The beauty of this approach is that when one module depends on another, it has no knowledge of, nor does it care about how many dependencies the module it needs may have. So for example:

index.html -> needs module-A
Module-A -> needs Module-B
Module-B -> needs Module-C and Module-D
Module-D – > needs Module-E

The beauty of this approach is that our web page index.html only cares about module-A. It has no idea that Module-A in turn needs Module-B. And so on. This approach encourages you to write code modules that are reusable, and less tightly coupled.

Before we dive into the code, it might help to see the full working example for this article:

http://examples.kevinchisholm.com/javascript/requirejs/part-ii/

NOTE: for most of the examples, I will provide a link to the actual module file. I don’t think there is much point in repeating that same code here in the article. You can simply view it in your browser.

Example # 1

menuData.js

http://examples.kevinchisholm.com/javascript/requirejs/part-ii/menuData.js

In Example # 1, we see the data that is used for this example. What is nice about the module pattern used here is that whenever this data needs to change, we only have to make that change in this one small file. The rest of the files that depend on this module have no knowledge of that, nor do they care. As long as the data is structured the way they expect, they don’t need to know about any changes to this module.

Example # 2

In Example # 2, we have the full source code for our web page. If you look at the require() statement, you’ll see that we have two modules as dependencies: css.js and menuMaker.js. Let’s follow the dependency tree, see what each module does, and then circle back to review the JavaScript in this page that responds to the button clicks. css.js http://examples.kevinchisholm.com/javascript/requirejs/part-ii/css.js This module simply injects a STYLE tag into the DOM. This is the CSS that makes the page look the way it does. Pretty simple stuff. menuMaker.js

http://examples.kevinchisholm.com/javascript/requirejs/part-ii/menuMaker.js

This module returns an object literal. That object has three properties. Each property is a DOM element: an unordered list (UL). None of these DOM elements exist in the page (yet) when they are returned, but they are valid unordered lists, waiting to be injected into the page. This module has two dependencies: weekParser.js and makeList.js. Inside of the anonymous function that wraps our module, they are referred to as: “weekTool” and “makeList.” We could have just as well called them “Sally” and “Sue”. It doesn’t matter. “weekTool” and “makeList.” are the variable names we chose. If you look at the object literal that is returned by menuMaker.js, you’ll see that we use “weekTool” and “makeList.” to create the object’s property values. weekParser.js

http://examples.kevinchisholm.com/javascript/requirejs/part-ii/weekParser.js

This module has the dependencies: ‘menuData’,’getDayType’. menuData is the array that contains our actual menu data. getDayType.js returns a sub-set of the ‘menuData’ array, depending on whether “weekday”, “weekend” is passed-in. getDayType.js

http://examples.kevinchisholm.com/javascript/requirejs/part-ii/getDayType.js

This module takes two arguments: the type of day (i.e. weekday or weekend), and the data array that contains the entire menu. Based on the type that was passed-in, it returns a sub-set of the array that contains only the days of type specified. makeList.js

http://examples.kevinchisholm.com/javascript/requirejs/part-ii/makeList.js

This module is unique amongst the modules we have reviewed so far in that it has no dependencies. It returns a function that takes one argument: an array. That array should contain the day objects that we want to turn into an unordered list. For each element in that array, it creates an LI element, puts the “Day” and “Menu” values into that LI, and then returns an unordered list (UL). Example # 3

In Example # 3, we circle back to our web page. This code does a quick check to make sure that the addEventListener() method is supported, and then gets to work setting up click event handlers for each of the three buttons at top.

Notice that in each case, menu.getFullWeek is the only reference to functionality provided by one of our modules. A simple call to a property of that module’s return value kicks off the dependency chain that we discussed above, but this web page neither knows nor cares about all that. It only knows that it required a file named “menuMaker.js”, it refers to its return value as “menu” and it wants the value of menu.getFullWeek (or menu.weekendMenu, etc…). The menuMaker.js module provides that functionality, and any other modules that it depends on in order to provide that functionality, are only of concern to menuMaker.js.

Summary

In this article, we created a web page that allows the user to view the weekday, weekend or full week specials for a restaurant. We demonstrated how modules can have dependencies on other modules, and that dependency chain can grow and become complex. The key takeaway here is that while this scenario may seem to be a one-way ticket to spaghetti code, it is quite the opposite; by following the Asynchronous Module Definition pattern, each one of our modules provides clear and distinct functionality. A module may depend on other modules, but it neither knows nor cares about the dependency chain that may exist with the modules that it depends on.

There is plenty more to discover with Require.js. But I hope this article has provided a helpful introduction to the library and the benefits of Asynchronous Module Definition patterns, beyond the basics.

Once again, here is the full working example for this article:

http://examples.kevinchisholm.com/javascript/requirejs/part-ii/

Helpful Links for Require.js and Asynchronous Module Definition

Require.js

http://requirejs.org/

http://www.adobe.com/devnet/html5/articles/javascript-architecture-requirejs-dependency-management.html

http://javascriptplayground.com/blog/2012/07/requirejs-amd-tutorial-introduction

Asynchronous Module Definition

http://requirejs.org/docs/whyamd.html

http://wiki.commonjs.org/wiki/Modules/AsynchronousDefinition

https://github.com/amdjs/amdjs-api/wiki/AMD

http://www.2ality.com/2011/10/amd.html

What’s the Difference Between jQuery().each() and jQuery.each() ?

jQuery

jQuery LogojQuery’s two .each() methods are similar in nature, but differ in level of functionality

Some may find it difficult to understand the difference between jQuery.each() and jQuery().each(). Perhaps the easiest way to understand the difference is to start with jQuery().each(). This method can only be used against a jQuery collection. So when you do this: jQuery(‘#someDiv p’).each(), what you are saying is: “for EACH paragraph that is inside of the element with the ID of “someDiv”, I want to do something. That’s it.

The jQuery.each() method is a static method of the jQuery object. This means that it is just a method that’s out there for you to use, and you need to give it a little more info. But there is a bigger payoff with this method: it can be used to iterate over different kinds of things, not just a jQuery collection.

The syntax for the jQuery.each() method is also simple:

So, OBJECT can be an object, an array, an array-like object or even a jQuery collection. How cool is that? The CALLBACK is a function that will be run against each element in the first argument. The super-star feature here is that the first argument can be a jQuery DOM collection. This means that jQuery.each() can do ANYTHING that jQuery().each() can do. Let’s jump into some code:

jQuery().each()

Example # 1.A

In Example # 1.A, we have an unordered list, with the days of the week as list items. The last two have the “weekend” class applied. We use the $().each() method twice. In the first run, it will iterate over every one of the list items. In the second run, the jQuery collection contains only the last two list items because they have the “weekend” class.

In both cases though, we can see how the $().each() method does one thing and does it well: it iterates over a jQuery collection. Inside of that collection, we use $(this) to get a reference to the current element being iterated over.

Here is the JSFiddle Link for Example # 1.A: http://jsfiddle.net/wcRmd/


Example # 1.B

In Example # 1.B, we take advantage of two additional features that the jQuery().each method has to offer. The callback takes two optional arguments: the index of the current element being iterated over, and the element itself. In our example, we add the index of each element to its text, and we do so by referencing ‘element’ instead of ‘this’. Keep in mind that ‘element’ is just what we decided to name that argument variable. We could just have easily named it ‘foo’ or ‘glove’. It doesn’t matter what you name these variables, just as long as you are aware of what they are.

We also used the .hasClass() method to see if each element had the “skip” class. This was just a way to illustrate the fact that while you CAN do things to each element inside of the callback function, you can also choose not to. There are numerous ways that you can organize this kind of logic. Using the ‘skip’ class was merely a ‘quick and dirty’ approach.

Here is the JSFiddle Link for Example # 1.B: http://jsfiddle.net/9C8He/

jQuery.each()

Example # 2.A

In Example # 2A, we pass-in two arguments to the static jQuery.each() method: an array and an anonymous callback function. The array has three elements, and the callback merely outputs the value of each array element to the console. Pretty simple stuff.

Here is the JSFiddle Link for Example # 2.A: http://jsbin.com/epanov/1/edit


Example # 2.B

In Example # 2.B, we provide an object as the first argument to the jQuery.each() method. When iterating over an object, the jQuery.each() method will return the property name for ‘index’. This is a brilliant approach, as it provides a very flexible alternative to the native JavaScript “for/in” loop.

Here is the JSFiddle Link for Example # 2.B: http://jsbin.com/examuz/1/edit


Example # 2.C

In Example # 2.C, we provide a jQuery DOM collection as the first argument to the jQuery.each() method. Essentially, this is just like using the jQuery().each() method. Inside of the callback function, ‘index’ can be used to get a numerical reference to the current element being iterated over, and ‘value’ will be the element itself. Brilliant.

NOTE: You may wonder why the last two elements have indexes of 0 and 1 respectively. This is because we specified that list items with the ‘weekend’ class should be returned in the collection. So, our jQuery collection object contains only two elements (‘saturday’ and ‘sunday’).

Here is the JSFiddle Link for Example # 2.C: http://jsfiddle.net/XjxvZ/


Summary

In this article we learned the difference between the jQuery.each() and jQuery().each() methods. We also discovered that while they do differ, the jQuery.each() is flexible enough to provide the same functionality as jQuery().each() if needed.

Helpful Links for jQuery().each() and jQuery.each()

jQuery().each()

http://api.jquery.com/each/

jQuery.each()

http://api.jquery.com/jQuery.each/

Getting Started with Require.js – Part I

Asynchronous Module Definition

Require.js LogoLearn how to decouple your code and organize it into reusable modules

Require.js is a JavaScript library that allows you to organize your code into separate modules. It follows the Asynchronous Module Definition API. Each module is an individual JavaScript file. You may, at first, bristle at this pattern because it forces you to rethink the way you organize your JavaScript. But while it may be a bit of an acquired taste, this approach encourages you to write code that is less coupled and easier to reuse.

The two methods that you will likely use the most are require() and define(). In both cases, you specify zero or more modules that your module “depends” on. When you do so, those modules will be loaded asynchronously. These dependencies are specified by a string which is a path to that JavaScript file. These strings must be in an array even if there is only one.

Following the array is an anonymous function. That function takes each dependency as an argument. What you do inside of that function is up to you. Just keep in mind that this function’s return value is what the outside world will “see” when they require your module.

Example # 1 A

Example # 1 B

Example # 1 A shows the code for our first module. It is a single JavaScript file named module-1.js. In that file, we execute the define() function. The define function takes a single argument, which is an anonymous function. In that function, we simply output some text to the console. Our module doesn’t do too much, but we’re keeping it simple for demonstration purposes.

In Example # 1B, we have the code for our web page. At the bottom of the page, we first pull in require.js. Then we execute the require() function. The first argument that it receives is an array. In this case, that array has only one element: “module-1”. That tells require: “hey, there is a file named ‘module-1.js’; load it asynchronously, and when that script has completed loading, run the following anonymous function.” In this example, the anonymous function has no code, so it does nothing.

Example # 2

In example # 2, we output some text to the console in the anonymous function. That console.log() call will only fire after module-1.js has loaded. This is where we start to see the brilliance of Require.js: you can have another module as a dependency, and your code will only execute once that dependency has loaded successfully.

Example # 3 A

Example # 3 B

In Examples # 3A and 3B, we see that we now have two modules. In each case, we output some text to the console, just to show that the module executes, and then each module returns a string.

Example # 3 C

In example # 3C, we pass an array with two elements as the first argument to the require() function: “module-1” and ,”module-2”. The anonymous function that is the second argument receives the return value of each member of that array. We can name these whatever we want. I used “mod1” and “mod2”, but I could just as well have named them “sally” and “sam”. It doesn’t matter; they are simply identifiers for the return value of each dependency. We demonstrate all of this by outputting the return value of each module to the console.

The working example for this article can be found here: http://examples.kevinchisholm.com/javascript/requirejs/part-i/

Summary

In this article, we were introduced to Require.js. We learned about how this JavaScript library allows you to organize your code into individual JavaScript files called “modules”. We learned about the define() and require() functions, their signatures, and how they are used in order to asynchronously load dependencies and create references to their return values.

Helpful Links for Require.js

http://requirejs.org/

http://blog.teamtreehouse.com/organize-your-code-with-requirejs

http://net.tutsplus.com/tag/requirejs/

http://requirejs.org/docs/whyamd.html

Super Flexible JavaScript Object and Array Iteration with jQuery.each()

jQuery

jQuery LogoThe jQuery.each() method makes it trivial to iterate over or inspect any kind of collection: arrays, objects, array-like objects, even jQuery DOM Objects.

Working with JavaScript means working with Objects. There is almost no way around this. So even in the simplest of scenarios, at some point you are likely to encounter an object and you need to inspect it.

Keep in mind that in JavaScript, there are different kinds of objects. For example, an array is an object. And, a DOM element is an object. It’s no secret that I am a huge fan of the JavaScript “For/In” loop. If you are not able to use jQuery then that is your go-to tool for object inspection. If you are using jQuery, then the static .each() method is a real winner.

It is important to make sure you understand that this is not the same thing as the $().each() method. When you pass a CSS selector to jQuery and then call the .each() method on the collection that is returned, you are calling a different method in jQuery. It is very similar, but that syntax is meant especially for DOM collections.

The jQuery.each() method is a static method of the jQuery object. It is a more generalized method that can be used to iterate over any object, array or array-like object. So the syntax is quite simple:

The OBJECT argument is any object, array or array-like object. The CALLBACK argument can be an inline anonymous function, a named function expression or a variable that points to an anonymous function.

Example # 1


In Example # 1, we have provided a simple array: three strings, each representing a corresponding day of the work week. The callback function executes for each one of the array elements, and inside of that function the variable “value” represents the value of that array element. We could have called that variable “baseball”; it doesn’t matter what you call it. The most important thing to remember is that the second argument to the callback will return the value of the current array element that is being iterated over. So, simple stuff.

Here is a JSBin link for Example # 1: http://jsbin.com/epanov/1/edit


Example # 2

In Example # 2, we take advantage of the “index” argument. In the console, we output the value of that variable. Again, this variable can be named anything. As with “value”, it’s most important to be aware that the first argument of the callback will return the index of the array element that is currently being iterated over.

Here is a JSBin link for Example # 2: http://jsbin.com/epezuc/1/edit


Example # 3

In Example # 3, we take things a step further to illustrate the fact that we can not only access the value of the current array element, but we can do things with it. Here, we simply remove ‘day’ from the string. But there is certainly a whole lot more that one might do. For example, if these array elements were objects instead of primitive strings, we could make changes to the objects and the next person or function who reached for that object would find it changed.

Here is a JSBin link for Example # 3: http://jsbin.com/okoxej/1/edit


Example # 4

In Example # 4, we move the object out of the jQuery.each() call and then simply reference it as the variable “data”. This time we have provided an array of objects. So on each iteration of the callback, instead of simply outputting a string, we are inspecting an object.

Here is a JSBin link for Example # 4: http://jsbin.com/usewoj/1/edit


Example # 5

In Example # 5, things get even more interesting. Here, we can see the brilliance of the jQuery.each() method. In this case we provide an object literal as the first argument to the .each() method. When an object is passed in, then the value of the “index” variable will be the name of the key or property of the object. So this saves you the time it would take to roll your own “For/In” loop.

Here is a JSBin link for Example # 5: http://jsbin.com/examuz/1/edit


Example # 6

In Example # 6, the object that is provided is a jQuery collection object. So now, on each execution of the callback, we can use $(this) to reference the jQuery DOM element object that is being iterated over, and of course do all the usual kinds of fun things to the element with jQuery.

Here is a JSFiddle link for Example # 6: http://jsfiddle.net/n7PRD/


Example # 7

And here, in Example # 7, we have abstracted the callback. Instead of providing an inline anonymous function, we provide a reference to a variable that is a function: “inspect”. So, that function will be called for every element provided in the data. The data we have provided in an array, and each element of that array is an object with some user account data. Phew! So, on each iteration of the callback (which is really the variable “inspect”, which is a function), we output the contents of that object to the console. We certainly could have done much more here, but the point of the example is that you can abstract any aspect of this that you like. So, as you can see, there is a ton of flexibility here and you are only limited by your imagination.

Here is a JSBin link for Example # 7: http://jsbin.com/iriwer/1/edit


Summary

In this article we learned a bit about the jQuery.each() method. We discussed the simple syntax, as well as the two arguments that are used in the callback. We also explored multiple scenarios such as inspecting an array of strings, inspecting an array of objects, inspecting objects and inspecting jQuery DOM objects.

Helpful Links for the jQuery.each() Method.

http://api.jquery.com/jQuery.each/

http://www.jquery4u.com/jquery-functions/jquery-each-examples/

http://stackoverflow.com/questions/722815/jquery-each-practical-uses

jQuery Plugin Authoring – The Absolute Basics – Part II

jQuery

jQuery LogoOnce you have jQuery plugin basics down, it’s time to implement some best practices

In the previous post “jQuery Plugin Authoring – The Absolute Basics – Part I”, we to a detailed look at the architecture of a jQuery plugin. Now that you understand the building blocks, let’s discuss a few best practices. These techniques are considered standard for quality jQuery plugin authoring, and will dress you for success.

Protecting the Dollar Sign

Most jQuery consumers associate the dollar sign with jQuery. But that dollar sign is simply a shortcut to the jQuery object, which is a property of the window object. You could write all of your jQuery code without ever using the dollar sign, and simply “jQuery” instead. But most people prefer the dollar sign because it is of course quite a bit easier and faster to type.

But jQuery offers a “no conflict” mode that allows another library to take over the dollar sign. It is considered best practice to anticipate this scenario and pass the global jQuery object into the immediate function that wraps your plugin. This way, inside of the nice and safe sandbox of your plugin, you can use the dollar sign all you like, without the slightest concern for how it is being used in the global context.

Example # 1

In Example # 1, we pass the global jQuery object into the immediate function. The immediate function takes that jQuery object as “$”, so from there on we are free to use the dollar sign safely, even if jQuery is in no-conflict mode.

Chainability

Method chaining is a popular technique in JavaScript. Many web developers use this technique when they leverage jQuery without even knowing it. How many time have you seen something like this:

$(SOME PARENT).find(SOME CHILD).CSS(“prop”,”val”).click();

What signifies the chaining activity is the fact that we have only one reference to the jQuery collection returned by $(SOME PARENT). Since each method used returns the jQuery object, we can use that return value to invoke another jQuery method, and so on. This is called “Chaining” method calls together.

It is considered best practice to allow method chaining when authoring your own jQuery plugin. Doing so is quite simple; you just need to return the jQuery object from each method.

Example # 2

In Example # 2, we return “this” from our plugin function. It’s important to note where the return statement is. Because the return statement occurs as the last line of code in our plugin’s function, the jQuery collection object is returned to the next method that wants to “chain”, without the need to re-state a jQuery collection.

Example # 3

In Example # 3, we have an example of method chaining in jQuery. Note that $(‘a’) only occurs once. That call to jQuery returns a jQuery collection object, which is returned from our jQuery plugin. As a result, the .attr() method can “chain” onto that return value and function properly.

Example # 4

In Example # 4, we have an even more complex example of method chaining. First we invoke “myPlugin”, and the the jQuery methods: .attr(), .css() and .click()

Here is a fully working JSFiddle.net link that demonstrates the best practices we have covered in this article. Be sure to click a few of the links to demonstrate the method chaining from example # 4:

http://jsfiddle.net/fTA95/

Summary

In this article we discussed a few jQuery plugin authoring best practices. We covered how to safely use the dollar sign in your plugin code, even when jQuery is in no-conflict mode. We also covered how to implement method chaining.

Helpful Links for jQuery plugin authoring

http://docs.jquery.com/Plugins/Authoring
http://stackoverflow.com/questions/12632382/jquery-plugin-authoring-and-namespacing

jQuery Plugin Authoring – The Absolute Basics – Part I

jQuery

jQuery Logo

You know a little jQuery, you have used a few jQuery plugins, and now you want to write your own jQuery plugin. Don’t worry, it’s no big deal. In fact it’s fun.

If you have been putting off authoring your first jQuery plugin, it’s time to wrap a bandana around your head, fire up “The Eye of the Tiger” by “Survivor” and figure out how to defeat Apollo Creed. Sorry, for the cheesy 80s reference, I couldn’t resist.

But seriously, it really is no big deal. The most important thing is to get a firm grip on the fundamentals. That part is serious. If you don’t understand what you are doing from a jQuery-architecture standpoint, then you will quickly find yourself in a quagmire of muck and filth, and you don’t want that.

In this article we will discuss the absolute basics of how to author a jQuery plugin:

  • Wrapping your plugin in a self-executing anonymous function
  • Extending the jQuery prototype,
  • Iterating over each element in the jQuery collection returned by your plugin.

This is the big stuff. Once you get your noggin around these concepts, the fun can begin.

A note about Self-executing anonymous functions

These are otherwise known as “immediate functions”. An immediate function is simply a function that is wrapped in parentheses, and followed by a pair of parentheses:

You can learn more about immediate functions in my blog post:Immediate Functions in JavaScript – The Basicsas well as my blog post:Using an Immediate Function to Create a Global JavaScript Variable That Has Private Scope

The main point here is to make sure you are comfortable with the concept of an immediate function in JavaScript. It’s important to do before reading further.

Where does my jQuery plugin code go?

Good question. The answer is: In its own file. By convention, you’ll want to create a JavaSript file named jquery.myPlugin.js. Then you’ll need to reference it just as you would any other JavaScript file:

Just make sure you reference jQuery before you reference your plugin.

For simplicity sake, we will reference our jQuery plugin via a set of SCRIPT tags, right in the page (that is perfectly valid, but definitely not practical).

Example # 1

In example # 1 we have the absolute bare-bones code needed for a jQuery plugin. Here are the important points to consider for example # 1:

Wrap your jQuery plugin in an immediate Function

This is considered a best-practice and for good reason. Taking this approach allows you to create as many variables as you need in your plugin, without polluting the global namespace. Don’t overlook this, it allows you complete freedom with regards to the number of variables you need to create, and sandboxes all of these variables very nicely.

Again, an immediate function is simply a function that is wrapped in parentheses, and followed by a pair of parentheses. It fires right away when the JavaScript is evaluated, you don’t need to (and cannot) call the function. It just fires right away and whatever code you implement in that function executes. It’s a great way to provide private variable scope to some code without a whole lotta fuss.

If you are still having a tough time with the concept of immediate functions, stop, do a google search for JavaScript Immediate Function, learn it, live it, ask it out on a date, marry it, and then come back here to keep on reading.

https://www.google.com/search?q=javascript+immediate+function

(I’m serious about this immediate function thingy)

Your jQuery plugin becomes a property of the jQuery prototype object

jQuery is a function. Actually, the code in jQuery follows the factory pattern and returns a function that in-turn returns different kinds of things, depending on what you pass into that function. Most of the time, it returns an HTML collection wrapped with jQuery (hence a jQuery collection object), but again, the actual return value depends on what you are passing in.

Every JavaScript object has a prototype property, this includes functions. jQuery exposes its prototype property as “fn”. So, you simply assign your plugin to be a property of that “fn” object. Once you have done that, jQuery now has a new method that is YOUR plugin.

Now you can do this:

Inside of your plugin, the JavaScript keyword “this” is already a jQuery object

Most people know that inside of a jQuery callback, “this” usually refers to the current native DOM element that is being iterated over. When you wrap “this” in jQuery, it becomes a jQuery object. So, we often refer to “this” as “$(this)”.

Inside of your plugin, there is no need to do that because the JavaScript keyword “this” is already a jQuery object. If you refer to “this” as “$(this)”, it’s not going to kill anyone, but it is not necessary and just uses more memory than is needed.

Your jQuery plugin returns a jQuery collection

What your jQuery plugin returns depends on the CSS selector that was passed-in. For example, if you do this: $(body).myPlugin(), your jquery plugin will return a jQuery collection that has exactly one element: the BODY tag of your document (unless of course you have more than one BODY element in your page, which would be a bit of a head-scratcher). So, if you have an unordered list that has for example three items, and you invoke your plugin like this: $(ul li).myPlugin(), then your plugin will return a jQuery collection that contains three elements.

Use this.each() to iterate over all of the elements that are returned by your jQuery plugin

jQuery’s .each() method is a lovely little tool that allows you to iterate over a jQuery collection and “do something” to each element. Keep in mind that a jQuery collection can always contain exactly one element, and when it does, then the .each() method will run once. But when a jQuery collection contains multiple elements, then the .each() method will run once for EACH element in that collection.

When you use the .each() method, you pass in an anonymous function, and inside that function you have access to the current element that is being iterated over. It is here that you will need to wrap “this” with jQuery if you want it to be a jQuery object: Use $(this) for the jQuery object that represents the current element, or simply “this” for the native DOM element implementation. This anonymous function takes as its first argument the index of the current element. This is surprisingly handy: what if you want to know if this the the first element in the collection? or the last? That index number will help you with that task.

Now you are ready to write some awesome jQuery plugin code

Thanks for hanging in there. The preceding details were important. I know you are anxious to write some code, but understanding the outer architecture of a jQuery plugin is critical. If you do not understand what was just covered, then you will quickly be awash in spaghetti code that is not working right and will be difficult to debug. I promise you.

Example # 2

In example # 2, we invoke our jQuery plugin. We wrap it in a $(document).ready() call so that it only fires once the document is ready.

Invoking our plugin is as simple as $(CSS SELECTOR).myPlugin().

This is because our plugin is a property of the jQuery prototype object, which makes it a completely valid jQuery method. Nice.

Example # 3

In example # 3, we see how our plugin can behave differently depending on what we pass into it. In each case, the jQuery collection object returned by our plugin will differ, depending again on what CSS selector we passed-in.

Example # 4

In example # 4, we have included some implementation code so that our jQuery plugin actually does something. I this case, for each element returned in the jQuery collection, we change the CSS so that the element’s color is green, the background color is yellow, and the font is “Comic Sans”. Not too pretty, but just enough so that when we run the code, we can see that our plugin is working perfectly. More importantly, if you vary the CSS selector that is passed-in, you will see that our plugin behaves differently in each case (i.e. the HTML elements that become green with yellow backgrounds and Comic Sans font will vary).

Full Working Code for this Article
http://jsfiddle.net/wdUtL/

Full Working Code for this ArticleWith Comments
http://jsfiddle.net/ewTez/

Summary

In this article we discussed the absolute basics of how to author a jQuery plugin. We covered how to wrap your plugin in a self-executing anonymous function, how to extend the jQuery prototype, and how to iterate over each element in the jQuery collection returned by your plugin.

This example provided in this article was very simple. The main purpose of the article was to provide the overview needed so that you understand how a jQuery plugin is constructed, how it works at the most basic level, and importantly how the value of the JavaScript keyword “this” will vary a bit, depending on where you are in the code.

With a firm understanding of how a jQuery plugin is constructed, we can move on to best practices and more intermediate jQuery plugin authoring techniques.

Helpful Links for jQuery plugin authoring basics

http://docs.jquery.com/Plugins/Authoring

http://coding.smashingmagazine.com/2011/10/11/essential-jquery-plugin-patterns/

http://blog.kevinchisholm.com/jquery/jquery-each-method/


What is the Difference Between Scope and Context in JavaScript?

JavaScript

scope and contextIn JavaScript, scope and context are not the same thing, and it’s important to understand the difference between them. Fortunately, the answer is short and simple.

Why Should We Care About Scope and Context ?

When interviewing front-end developers, I usually try to include a question about scope and context in JavaScript. I always ask what the difference is, and I am often surprised by the answers I get. It seems that even those with some experience have difficulty answering this question.

The answer is short and simple: Scope pertains to the visibility of variables, and context refers to the object to which a function belongs.

Scope in JavaScript

Scope has to do with the the visibility of variables. In JavaScript, scope is achieved through the use of functions. When you use the keyword “var” inside of a function, the variable that you are initializing is private to the function, and cannot be seen outside of that function. But if there are functions inside of this function, then those “inner” functions can “see” that variable, and that variable is said to be “in-scope”. Functions can “see” variables that are declared inside of them. They can also “see” any that are declared outside of them, but never those declared inside of functions that are nested in that function. This is scope in JavaScript.

Context in JavaScript

Context is related to objects. It refers to the object to which a function belongs. When you use the JavaScript “this” keyword, it refers to the object to which function belongs.

Scope refers to the visibility of variables, and content refers to the object to which a function belongs.

For example, inside of a function, when you say: “this.accoutNumber”, you are referring to the property “accoutNumber”, that belongs to the object to which that function belongs. If the object “foo” has a method called “bar”, when the JavaScript keyword “this” is used inside of “bar”, it refers to “foo”. If the function “bar” were executed in the global scope, then “this” refers to the window object (except in strict mode). It is important to keep in mind that by using the JavaScript call() or apply() methods, you can alter the context within which a function is executed. This, in-turn, changes the meaning of “this” inside of that function when it is executed.

Summary

As a front-end developer, you can surely appreciate what an important topic this is, and how critical it is to understand the difference between scope and context in JavaScript. These two subjects become very important as soon as you have to write or edit even intermediate-level JavaScript, and your ability to comfortably and confidently write / edit JavaScript will only improve once you have a good working knowledge of the difference between scope and context. The good news is, it’s not that difficult to understand and once you get it, you’ve got it.

What’s the Difference Between Scope and Context in JavaScript ? | Skillshare

Understanding Scope in JavaScript – Function Level Scope | Kevin Chisholm – Blog

Understanding Context in JavaScript – Object Literals | Kevin Chisholm – Blog

Two Ways to Dynamically Append an Element to a JavaScript Array

JavaScript

JavaScript Logo - dynamically appendThere are two ways to dynamically add an element to the end of a JavaScript array. You can use the Array.prototype.push() method, or you can leverage the array’s “length” property to dynamically get the index of what would be the new element’s position.

I have provided candidate pre-screening services for recruiters in the past, and one of the classic JavaScript interview questions is: “Name two ways to dynamically append an element to a JavaScript array.” Some folks nail that question, but some are left scratching their heads. So I thought I’d quickly re-visit the logic behind this concept.

At first glance, some might say: “Well, you are the programmer. So you know how long the array is and can dynamically append an element by doing the following: foo[x] = newElement. Right?” Well, yes, but that is not what we are really trying to do.

Why Dynamically Append an Element to a JavaScript Array ?

I think that most programmers will agree that what you want in this situation is to be able to add an element to the array, regardless of the length. What you want to assume is that you will not know the length. And from a pseudo-code perspective, you want to say: “Hey, I have an array named ‘foo’ and however long it is, add this new element named ‘newElement’ to the end of it.” I think that when you can accomplish that, you have significantly more power.

Array.prototype.push() – Example # 1

In Example # 1, we used JavaScript’s Array.prototype.push() method. This wonderful little utility adds whatever you pass it to the end of the array.

The syntax is: yourArray.push(WhatYouWantToAdd)

It’s literally that simple.

Using the array’s “length” property – Example # 2

In Example #2, we leverage the “length” property of the array. The reason this works so well is that the value of an array’s “length” property will always be exactly one higher than the index of the last element in the array. Why? Because while array indexes are zero-based (i.e. the first element in the array is element 0, and the second element in the array is element # 1, and the third element is element # 2, etc…), the array’s “length’”property is a one-based value (i.e., if there are three elements in the array, the length is: 3).

So, if the array “foo” has three elements, foo[2] is the last element in the array, and the value of foo’s “length” property is “3”. Therefore, foo[3] does not exist yet (remember foo[2] is the last element).

Since we may not always know the length of the array when we need to dynamically append an element by simply adding a new element to the end, we can reference foo[.foo.length]. This way, no matter how many elements are in foo, we can simply assign the new element to foo[.foo.length].

Helpful Links for JavaScript Arrays

JavaScript for Beginners | Arrays: Adding and Removing Elements

JavaScript Array Management with Push(), Pop(), Shift() and Unshift()

Why is a JavaScript Array’s Length Property Always One Higher Than the Value of the Last Element’s Index?

Summary

There are two ways to dynamically append an element to the end of a JavaScript array. You can use the Array.prototype.push() method, or assign the new variable to the index that is equal to the array’s “length” method.