
![]()
Setting the right value for the “Content-Type” header is a critical task for any web server
In Part III of this series, we built out our Node.js server to serve up any file that is requested, or gracefully return a 404 / “Not Found” header, as well as a custom HTML page informing the user that the requested file was not found. But the only problem is that we are not setting headers for each request. So, it’s important that HTML, CSS, JavaScript and image file, have the appropriate “Content-Type” header set.
In order to demonstrate all of this, we will include a CSS file and a JavaScript file in our web page. I won’t bother including the CSS file in an example; it’s just some silly CSS… nothing too interesting. But I will include the source of our JavaScript file in Example # 1, just so we can see that the second blue box in the web page is created via JavaScript.
TO SAVE TIME, THE FULL WORKING VERSION OF THE CODE EXAMPLES CAN BE CLONED HERE: HTTPS://GITHUB.COM/KEVINCHISHOLM/SIMPLE-HTTP-SERVER-WITH-NODE-PART-IV
Example # 1
|
1 2 3 4 5 6 |
var div = document.createElement('div'), text = document.createTextNode('This box was added by my JavaScript file'); div.className="colorBox blueBack"; div.appendChild(text); document.getElementsByTagName('body')[0].appendChild(div); |
Example # 1 simply shows the contents of the JavaScript file: “script.js” that we will request in our pages.
Example # 2
|
1 2 3 4 5 6 7 8 9 10 11 12 13 14 15 |
<!DOCTYPE html> <html> <head> <meta charset="utf-8"> <title>My First Node.js Page</title> <link href="style.css" rel="stylesheet" type="text/css" /> </head> <body> <img src="node-js-logo.png"/> <div class="colorBox redBack"> My awesome content goes here.... </div> <script src="script.js"></script> </body> </html> |
Example # 2 is the source code for index.html.
Example # 3
|
1 2 3 4 5 6 7 8 9 10 11 12 13 14 |
<!DOCTYPE html> <html> <head> <meta charset="utf-8"> <title>About</title> <link href="style.css" rel="stylesheet" type="text/css" /> </head> <body> <div class="colorBox redBack"> About our company.... </div> <script src="script.js"></script> </body> </html> |
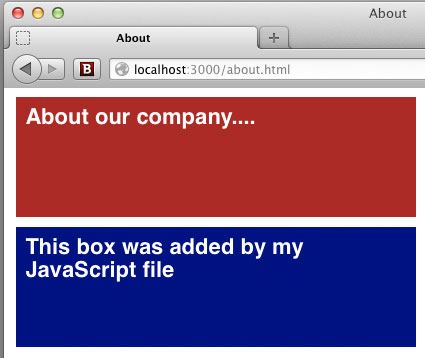
Example # 3 is the source code for about.html, a second web page that we can request from our Node.js web server.
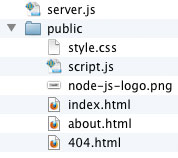
Before we go any further, let’s take a moment to discuss the folder structure. Just as in Part III of this series, the folder that our server.js file sits in has a sub-folder named “public”. This is where our assets will go. It is this “public” folder that the world will have access to and all requested files will be in there. See Figure # 1.
Example # 4
|
1 2 3 4 5 6 7 8 |
extensions = { ".html" : "text/html", ".css" : "text/css", ".js" : "application/javascript", ".png" : "image/png", ".gif" : "image/gif", ".jpg" : "image/jpeg" }; |
In Example # 4, we have a JavaScript object that contains a list of mime-types that we will support. Each of the object’s properties represents a file extension that we plan to support, and the corresponding value is the mime-type string that will be used for the “Content-Type” header.
Example # 5
|
1 2 3 4 5 |
var fileName = path.basename(req.url) || 'index.html', ext = path.extname(fileName), localFolder = __dirname + '/public/', page404 = localFolder + '404.html'; |
In Example # 5, we have added a new line to the variable declarations for the requestHandler() function. The variable “ext” contains a string copy of the requested file’s extension (e.g. “.html” for a web page, “.js” for a JavaScript file, and so on). So we will use that string to check all properties of the “extensions” object from Example # 4. Don’t worry if you feel like you are getting lost; we’ll piece everything together nicely at the end. For now, just know that we have so far provided a hard-coded list of file extensions that we will allow, and the mime-type string values for each one, and we have the variable: “ext” that tells us what the file type is.
Example # 6
|
1 2 3 4 5 6 |
//do we support the requested file type? if(!extensions[ext]){ //for now just send a 404 and a short message res.writeHead(404, {'Content-Type': 'text/html'}); res.end("<html><head></head><body>The requested file type is not supported</body></html>"); }; |
In Example # 6, we see if the extensions object has a property that matches the value of the “ext” variable. If not, we write a 404 header, and return a simple HTML page, informing the user that the requested file type is not supported.
Example # 7
|
1 |
getFile((localFolder + fileName),res,page404,extensions[ext]); |
In Example # 7, we add a new argument to the getFile() function call. We pass-in the value of the property in the extensions object that matches the file extension of the user’s request. In a nutshell, we are telling the getFile() function what type of mime-type to set in the response header.
Example # 8
|
1 2 3 4 5 6 7 8 9 10 |
function getFile(filePath,res,page404,mimeType) In Example # 8, you can see that the getFile() function takes a new fourth argument, which is the <strong>mime-type</strong> for the requested file. <strong>Example # 9 </strong>res.writeHead(200,{ "Content-type" : mimeType, "Content-Length" : contents.length }); |
In Example # 8, we have expanded the res.writeHead() function call. Where previously we only set the 200 / “OK” response code, we now set the “Content-Type” and “Content-Length” headers. The “Content-Type” property is mapped to the value of the mimeType variable, which was passed-in as an argument to the function. So the fruits of our labor in this article all become apparent in this example. The value of the mimeType variable will be set accordingly, for the file type.
Example # 9
|
1 2 3 4 5 6 7 8 9 10 11 12 13 14 15 16 17 18 19 20 21 22 23 24 25 26 27 28 29 30 31 32 33 34 35 36 37 38 39 40 41 42 43 44 45 46 47 48 49 50 51 52 53 54 55 56 57 58 59 60 61 62 63 64 65 66 67 68 69 70 71 72 73 74 75 76 77 78 79 80 81 82 |
//step 1) require the modules we need var http = require('http'), path = require('path'), fs = require('fs'), //these are the only file types we will support for now extensions = { ".html" : "text/html", ".css" : "text/css", ".js" : "application/javascript", ".png" : "image/png", ".gif" : "image/gif", ".jpg" : "image/jpeg" }; //helper function handles file verification function getFile(filePath,res,page404,mimeType){ //does the requested file exist? fs.exists(filePath,function(exists){ //if it does... if(exists){ //read the fiule, run the anonymous function fs.readFile(filePath,function(err,contents){ if(!err){ //if there was no error //send the contents with the default 200/ok header res.writeHead(200,{ "Content-type" : mimeType, "Content-Length" : contents.length }); res.end(contents); } else { //for our own troubleshooting console.dir(err); }; }); } else { //if the requested file was not found //serve-up our custom 404 page fs.readFile(page404,function(err,contents){ //if there was no error if(!err){ //send the contents with a 404/not found header res.writeHead(404, {'Content-Type': 'text/html'}); res.end(contents); } else { //for our own troubleshooting console.dir(err); }; }); }; }); }; //a helper function to handle HTTP requests function requestHandler(req, res) { var fileName = path.basename(req.url) || 'index.html', ext = path.extname(fileName), localFolder = __dirname + '/public/', page404 = localFolder + '404.html'; //do we support the requested file type? if(!extensions[ext]){ //for now just send a 404 and a short message res.writeHead(404, {'Content-Type': 'text/html'}); res.end("<html><head></head><body>The requested file type is not supported</body></html>"); }; //call our helper function //pass in the path to the file we want, //the response object, and the 404 page path //in case the requestd file is not found getFile((localFolder + fileName),res,page404,extensions[ext]); }; //step 2) create the server http.createServer(requestHandler) //step 3) listen for an HTTP request on port 3000 .listen(3000); |
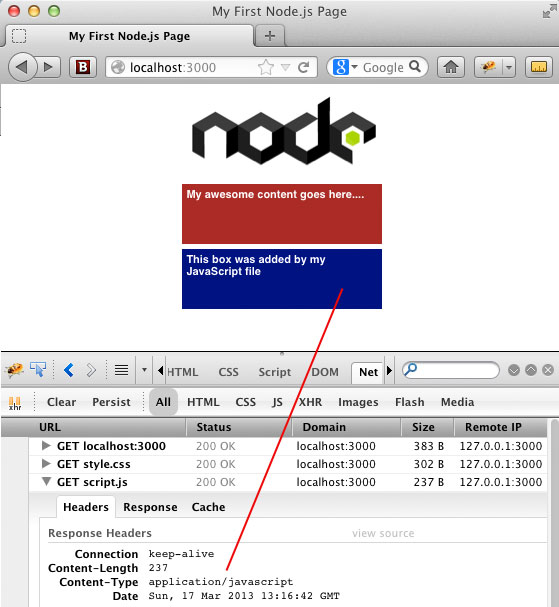
Example # 9 is a complete code-listing for this article. In Figure # 2, we see the results of http://localhost:3000/index.html. So, as you can see, we are serving not only HTML, but also an image file, a CSS file and a JavaScript file. The JavaScript file dynamically creates the blue box you see on page load (simply to demonstrate that our JavaScript file is served correctly from our Node.js web server, and works).

In Figure # 3, we see that our “about.html” page works, and also pulls in the CSS and JavaScript files with no problems.
In Figure # 4, we inspect the JavaScript file call in the “net” tab of FireBug and can see that the “Content-Type” header is set accordingly.
Summary
In this article we learned how to set the appropriate “Content-Type” header for each request, based on the file extension of the requested file. We demonstrated how to use the extname() method of the path module, to return the extension of the requested file. We also applied some logic, to handle scenarios in which the requested file-type is not supported.
Helpful Links for the Node.js path module
http://nodejs.org/api/path.html
http://docs.nodejitsu.com/articles/file-system/how-to-use-the-path-module
Helpful Links for HTTP header fields
http://en.wikipedia.org/wiki/List_of_HTTP_header_fields
http://www.w3.org/Protocols/rfc2616/rfc2616-sec14.html