JavaScript Rest Parameter – Basics

JavaScript

JavaScript LogoThe Rest Parameter allows you to do two things: (1) break out the first X arguments passed-into the function, and (2) put “the rest” of the arguments into an array.

Passing arguments to a JavaScript function is quite common. If a function expects one or more arguments, then it follows that inside of that function you’ll want to examine the incoming arguments. But things can get problematic when you’re not entirely sure exactly what the incoming arguments will be at design time. Now it’s true that inside of any function you have a local variable named “arguments” that is an array-like object, but there are two problems with this array-like “arguments” object.

First of all, it’s not an array, and while you can leverage the Array.prototype object in order to treat the “arguments” object as if it is a true array, that approach feels like a hack. Secondly, if you want to act upon the incoming arguments differently, based on their position, things can get messy. Now this is where the JavaScript Rest Parameter comes in – it’s a powerful tool that can help solve these problems.

Why Should I Care About the JavaScript Rest Parameter?

In this article, I will cover the basics of the JavaScript rest parameter. I’ll walk through the ways in which it can be used to collect the incoming arguments of a function and convert them into a true JavaScript array. I’ll also demonstrate how you can use the JavaScript rest parameter to break out the incoming arguments so that one or more of the initial arguments can be left as is, and then “the rest” of them can be put into an array.

Using the Rest Parameter – Example # 1 A

inspectArgs Output – Example # 1 B

Above we’ve created a function named “inspectArgs”, which we’ll use in the rest of the code examples for this article. In Example # 1 A, we use the JavaScript rest parameter to collect all of the arguments that are passed into the function, we and put them into an array. So, on line # 2, since theArgs translates to an array, we can use the forEach method of the “theArgs” variable to iterate that array. Inside of the anonymous callback function that we pass to the forEach method, we have access to each array element, as well as the index of that element. Now using this information, we output the value of each argument, and the index of that argument.

So, the key point here is that by placing “…theArgs” where the incoming arguments would normally go, we are saying: “take all of the arguments that are passed-into this function, put them into an array, and create a local variable for this function named theArgs”. And in Example # 1 B, you can see the output of Example # 1 A, which is exactly what we expect: the value of each argument that was passed to the inspectArgs function.

When you actually want “the rest” of the arguments – Example # 2 A

We See the First Argument, and “the rest” of them- Example # 2 B

Now, in Example # 2A, we made one small change, in order to really demonstrate the power of the JavaScript rest parameter. We changed “…theArgs” to “x, …theArgs” where the incoming arguments would normally go. So, what we are saying to the JavaScript engine here is: “let the first argument be what it is, but then take the rest of the incoming arguments and put them into an array”. So, before we use the “theArgs.forEach” method to iterate the “theArgs” variable, we take a look at the very first argument: “X” and output it.

Now if we take a look at Example # 2 B, we see the output of Example # 2 A. As expected, we see “x -> a” first, because we examined the first argument. Then we see the “rest” of the arguments, because we used the rest parameter to iterate the “rest of” the arguments that were passed into the function.

Skipping Arguments – Example # 3 A

The Second Argument Has Been Skipped – Example # 3 B


In Example # 3 A, we take an approach that’s very similar to that of Example # 2 A, by examining the first argument and outputting it to the console. But when you look at Example # 3 B, the output of this call to inspectArgs skips the second argument: “b”. This is because we specify: “x, y, …theArgs” where the incoming arguments would normally go. So now what we are saying to the JavaScript engine here is: “let the first and second arguments be what they are, but then take the rest of the incoming arguments and put them into an array”. As a result, we wind up with three local variables in this function: “a” “b” and “theArgs”. We output the value of “a” and “theArgs”, but we ignored “b”. The main point here is that we have changed the value of “theArgs” simply by specifying a “b” argument. So, as you can see, Example # 3 A truly demonstrates the power of the JavaScript Rest Parameter.

Handling HTTP POST Requests with Express.js

Express JS

Node.js LogoLearn how to access the body of an HTTP POST request using the Express.js framework and body-parser module.
Forms are a common component in web applications. When a user submits a form, that data is sent to the back-end for processing. To process that data, the web server must understand how to access it. Popular web server languages include Java, .NET, PHP, Python and Node.js. In this article, we’ll learn how to access the POST data sent to a Node.js web server using the Express.js framework. To get started, you can go ahead and clone the following github repository: Handling POST requests with Express and Node.js.

And you’ll find instructions on how to run the code in the Github page.

package.json

The package.json for this project is pretty straightforward, and we’ll only need the body-parser and express Node.js modules. We also create a scripts property so that running the example code requires a simple command: npm start.

Requiring the modules we need – Example # 1:

In Example # 1, we’ve imported the Node.js modules that we need. The Express module takes care of the heavy lifting with regard to fulfilling web requests. NOTE: If you’re not familiar with the Express Node.js module, please see my earlier blog post on this subject:  Set up a Node / Express Static Web Server in Five Minutes.

We also import the body-parser Node.js module, which has the critical role of parsing the body of an HTTP request. When it comes to processing a POST request, this is important. And the path Node.js module helps express to construct a file path.

bodyParser.json and bodyParser.urlencoded – Example # 2:

Now, here in Example # 2, we tell express to use the bodyParser.json middleware, which provides support for parsing of application/json type post data. We also tell express to use the bodyParser.urlencoded middleware, which provides support for the parsing of application/x-www-form-urlencoded type post data.

Creating the node.js web server – Example # 3:

In Example # 3, we use express.static to set up the static assets folder, the main purpose of which is to help the working example function in a browser, with minimal effort. For more information on express.static, please see my earlier blog post in Express mentioned above. In this example, we use the app.post method, which tells the Express module to wait for an HTTP request at the /form route that leverages the POST HTTP verb. So, when the user sends a POST request to the /form route, Node.js executes the provided callback, which is the second argument passed to the app.post method.

The app.post callback takes two arguments, the first of which is the request object (i.e. “req”). The second is the result argument (i.e. “res”). We use the res.setHeader method to set the Content-Type header to application/json, which tells the user’s browser how to properly handle the returned data from the request.

NOTE: We wrap the rest of the callback code in a setTimeout, the purpose of which is to mimic a slow internet connection. Otherwise, the working example will move too fast for most to comfortably follow.

Inside the setTimeout, we use the res.send method to send the result body back to the user, and here we’re sending a serialized JSON object. To construct this object, we access the body property of the req object (i.e. the request object), which is why we have implemented the bodyParser.json middleware. And this is what allows us to parse the properties of the request body. In this example, we are expecting firstName and lastName POST parameters, which will allow us to access the req.body.firstName and req.body.lastName properties, to build the JSON for our result object.

To see this code in action, just follow these steps :

  1. Clone the git hub repository: https://github.com/kevinchisholm/video-code-examples/tree/master/node-express/handling-POST-requests-with-express
  2. Follow the instructions in the readme to set up the code
  3. Point your browser to: http://localhost:3000
  4. In the web page, enter some text into the two input boxes, and then click the “Submit” button
  5. Notice the logging statement in your node.js terminal
  6. Notice that the text you entered displayed in a browser message

You might also want to take a look at the Network tab in your Web Developer Tools, which allows you to see the actual network request that goes to the web server. You’ll be able to inspect the POST data sent, and the JSON data returned.

Viewing the working code example

Here’s what happens when you submit the data in the browser:

  1. The JavaScript in www/js/form-handler.js makes an AJAX POST call to the route: /form.
  2. The object sent in the POST request is: {firstName: XXX. lastName: XXX}. (NOTE: “XXX” is whatever value entered into the form’s text inputs.)
  3. Our Node.js web server intercepts the HTTP request to /form.
  4. Our Node.js web server parses the body of the HTTP request and constructs a JSON object.
  5. The XMLHttpRequest for the AJAX call is this JSON object.
  6. The browser displays the data from this JSON object in the browser.

Nothing too fancy here, just illustrating the “round trip” of our HTTP POST request.

Summary

In this article, we learned how to handle POST requests with the Express node.js module, and we talked about the need for bodyParser.json and bodyParser.urlencoded. We also learned how to listen for a POST request to a specific route, and how to access the POST parameters in the HTTP request body. Now, while the working example is simple, it does allow you to inspect every step of the process. If you look at your browser’s network tab, you can see the HTTP POST request go out, and then return. What happens during the server-side processing of that request is what you see in our Node.js code: server.js.

So, a lot to digest at first, but I’m hoping that this it will get you started with your next form-based Node.js application!

Introduction to Express.js, the Node.js web application framework

Express JS

Node.js Logo - expressExpress.js provides the kind of abstraction that lets you stay out of the weeds and focus on your application code.

While the low-level nature of Node can be an asset, it can also be somewhat of a curse because when you’re serving static assets, it can be tedious to detect routes and serve the correct static assets for an entire web page. Some examples of static assets are CSS files, images or JavaScript files. Now, the good news is, Express is a Node module that provides abstraction for these kinds of challenges. It’s popular, it’s used by large companies, and there’s strong community support for it, all of which make this a solid choice.

Why Express?

The main goal of Express is to provide an application framework, and getting started is simple. Take a look at the code samples, which you can clone at the following Github repository: Introduction to Express.js, the Node.js web application framework. You’ll find instructions on how to run the code in the Github

package.json

The package.json for this project is simple: the single dependency is express.

The get() Method – Example # 1

In Example # 1, we call the get() method of the app variable, and we pass the string “/” to the get method. This tells Express.js how we want to handle any GET request to the root of the application. (NOTE: GET is an HTTP verb, other examples are POST and PUT.) In Example # 1, we are sending back a simple HTML page, and we have created the HTML by constructing a string that represents that HTML code. This happens in the “HTML” variable. We then call the send() method of the result object, sending our HTML back to the user. Now run Example # 1 in your terminal with the command node example-1.js, then navigate to http://localhost:3000/ in your browser. There you will then see “This is Example # 1”.

The use() method – Example # 2

Example # 2 is much shorter than Example # 1 because we have not hard-coded our HTML. Instead, we have used the use method of the app object, which tells Express which folder we want to use for serving static assets. As a result, our JavaScript code is cleaner, and easier to read. Also, we’ve separated concerns. In other words, instead of hard-coding our HTML in our JavaScript file, we’ve put HTML where it belongs: in an HTML file.

Now notice how the web page in Example # 2 has an image. I included that to point out how Express handles this for us, even though we never had to write any JavaScript code that specifically waits for an image request. There is also a CSS file being served. In both cases, Express understands that WWW is our public web folder and it serves up static assets as needed, which certainly saves us a lot of time. Now run Example # 2 in your terminal with the command node example-2.js, then navigate to http://localhost:3000/ in your browser. There you will see “This is www/index.html”, which is a major improvement, as the HTML that the user sees is actually served from a static HTML file.

Adding Handlers for a Second Route – Example # 3

In Example # 3, we use the GET method to add a handler for when the user requests “/about“. In this case, we serve-up “/www/about.html“, which is just one example, but we could have added any specific route handlers needed. Now run Example # 3 in your terminal with the command node example-3.js, and navigate to http://localhost:3000/ in your browser. There you will see “This is www/index.html”. Now, click “About” in the upper-right-hand corner, to display the “About Us” page. You can then click “Home” and “About” over and over, to switch routes, because our JavaScript code in Example-1.js handles the alternation of these two routes.

Summary

In this article, we learned the absolute basics of Express, but in doing so, we also got to see how simple it is to use. In our discussion we saw examples of the get() method, as well as the use() method. I’m hoping that this was enough to illustrate the power behind this Node.js web application framework, and that it will get you well on your way to enjoying its usefulness.

Create a Node Websocket Server in Five Minutes

Node.js

Node.js Logo - node websocket serverLeveraging Express.js and the ws NPM module, it is possible to create a Node Websocket Server in less than ten lines of code.

The Websocket protocol provides full-duplex communication channels over a single TCP connection. In the past, web clients had to employ long-polling or the repeated pinging of a server in order to achieve this kind of “push” functionality. Now, Websocket technology eliminates the need for such outdated techniques. So, when a Websocket client connects to the server, a persistent connection is created, and the Websocket server can then push notifications to all connected clients. It is possible for the clients to send messages to the Websocket server as well, but I’ll cover that in a later article.

In this article, I’ll explain the bare-minimum code needed to create a Node Websocket server that can broadcast all incoming messages to connected clients. This should take us about five minutes, and less than ten lines of code. The beauty of Express.js is that it takes care of the heavy lifting with regard to the actual web server. The ws NPM module also plays a starring role in that it handles the Websocket communication layer, allowing us to expose an endpoint that accepts connections and messages from clients. Plus, we can broadcast messages to connected clients.

package.json

Above is the contents of package.json. There are only two dependencies: the Express.js framework and the ws module.

The Node Websocket Server – Example # 1

So, here in Example # 1 we have the entire working application. On line #s 3 through 9 we create our dependencies. I’ve grouped things in a way that I hope makes sense, but I’ll just point out that on a high level there are two things happening here. We require the modules that we need as constants: http, express, and WebSocket. Also, we create the constants app, server and websocketServer. These constants are the results of expressions. Now if you’ve ever worked with Express.js before, the app constant should be familiar to you; it’s simply an instance of the Express framework. The server constant is the result of calling http.createServer(), passing it our express.js instance (ie. “app”). And finally, the constant websocketServer represents our Websocket server.

Now let’s jump ahead for a moment to line # 30, where we start our web server. It’s not that there’s much going on here; it’s just that I wanted to point out that the server is started by calling the server.listen method, passing it the port to listen on (i.e. 3000). The second argument (the anonymous function) is optional.

Now let’s go back up to the top of the file. As you can see, the rest of the code is surprisingly simple. We create two event handlers, the first of which takes care of each Websocket client connection, and the second one processes each message that it receives from that client. On line # 12, we have the first event handler. We use the “on” method of the websocketServer instance to handler an incoming connection. This is somewhat similar to creating a handler for a GET or POST request in Express.js.

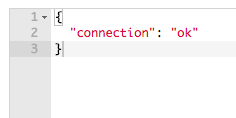
We pass the event as the first argument (i.e. “connection”), and then a function as the 2nd argument. The anonymous function that we provide contains the code that we want executed for each new Websocket client connection. This function also receives a Websocket client as its first argument. We have named this variable: “webSocketClient”. On line # 14 we provide some feedback to the Websocket client by sending it the first Websocket message: { “connection” : “ok”}. This is for demonstration purposes only, just so that we can see right away that the connection has been established.

Now inside of the anonymous callback, we set up the second event handler, which will process each message that this client receives. And similar to the connection event handler, we use the “on” method of the webSocketClient variable to handler an incoming message. We pass the event as the first argument (i.e. “message”), and then a function as the 2nd argument. The anonymous function that we provide contains the code that we want executed for each message received by this Websocket client.

Broadcasting the Message to All Websocket Clients

On line # 20, we start the process of broadcasting the incoming message to all Websocket clients. Using the forEach method of the Websocket.clients list, we iterate the list of websocket clients. And for each iteration, we provide a callback function. This callback function receives the currently iterated Websocket client as its first argument. So, we then use the send method of that client object, and send the incoming message (i.e. by sending one message to many recipients, we are “broadcasting” that message).

Testing the Websocket Server

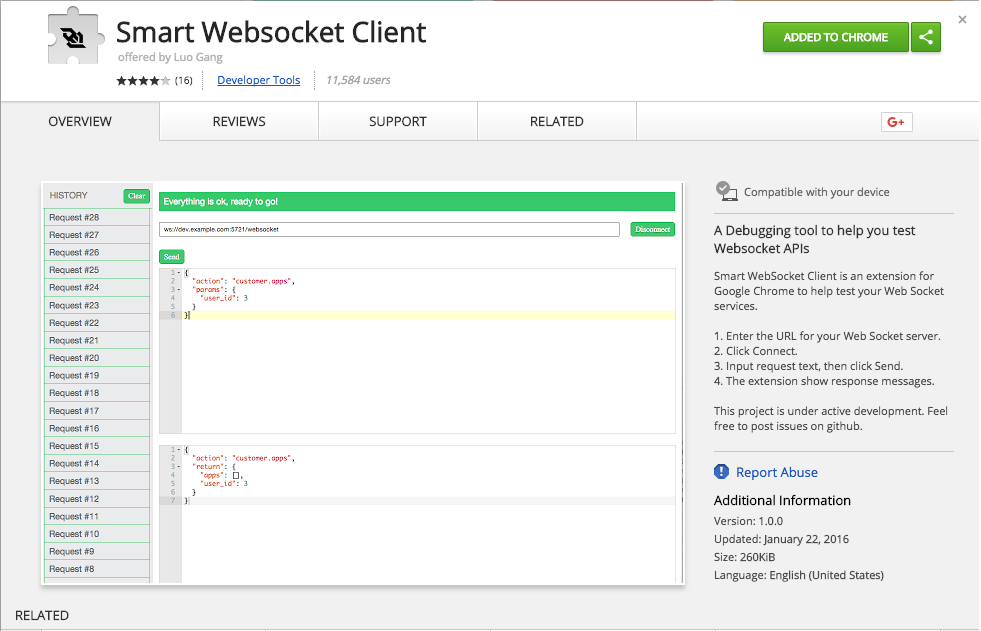
Now if you copy all of the code from Example # 1 into a file and then execute it, you’ll have a running Websocket server on port # 3000. But that isn’t enough. Now we want to test our websocket server, and an easy way to do this is to use the Smart Websocket Client plugin for Google Chrome.

So go ahead and click this link to install the plugin, and once you’ve installed it, start the plugin by clicking the icon in the upper-right-hand corner of your Chrome browser.

smart-websocket-client-icon
smart-websocket-client-1
Smart Websocket Client

Once the Smart Websocket Client is running, enter http://localhost:3000 in the address bar and then click the “Connect” button. You should see { “connection” : “ok”} in the lower window, indicating that a Websocket connection was successfully established (see example # 2).

smart-websocket-client-2
Connecting
smart-websocket-client-3
Connecting Success Message

Example # 2

In the top window, enter any text, click the “Send” button, then you’ll see your message appear in the lower window. Now open a few more instances of the Smart Websocket Client and follow the same steps. If you place your Chrome browser tabs side by side, you’ll see that every message you’ve sent has been broadcast to every Websocket client. Congratulations!  You’ve just built a working Node Websocket server.

Example # 3

Now earlier in this article, I promised that we could create our Websocket server in less than ten lines of code. Example # 1 clocks in at 32 lines of code, but this is because I used whitespace and comments to make the code as readable as possible. So, in Example # 3, I’ve provided the condensed version of our Node Websocket server. This code is not very pretty, but as promised, it is a fully functional Node Websocket server that’s set up in less than ten lines

Angular Child to Parent Communication with @output()

Angular

Angular Logo - @output()When passing data up to a parent component with the Angular @Output() decorator, you’ll need to set up an event handler in the parent, and then emit events from the child component whenever your data changes.

In the article: “Angular Child to Parent Communication with @ViewChild()”, I detailed two ways in which data can be passed from a child component to a parent component. In this article, I will cover the other approach, which leverages the @output() decorator.

When we walked through the steps for the @ViewChild() decorator, we saw that the majority of the setup work happens in the parent component. Here, with the @output() decorator, things are a bit different. For the most part, the required steps are spread out across the parent component, the parent template and the child components. I was actually a little surprised to see how intimate the relationship between the child and parent components / templates are. On a high level, the data communication starts with event handlers in the parent component. Then, in the parent component’s template, we specify event handlers for each property that we want to pass-up to the parent component. And finally, in the child component, there is a two-step process.

First, we use the @Output() decorator to create an instance of EventEmitter. Next, we set up methods in the child component that match the naming convention used in the parent component template (see Examples # 2 and # 3 below). It’s a surprisingly close relationship between the various pieces of the puzzle, given Angular’s declarative-focused syntax. Let’s take a look at some code examples.

Full Working Example Code

You can clone the full working example code here: https://github.com/kevinchisholm/video-code-examples

  1. Go to this folder in your terminal: angular/components/@output
  2. Follow the directions in the readme

The Parent Component – Example # 1

In Example # 1 we have the parent component. Here, the userName and userPhone properties will be utilized in Example # 2, to set up the binding for the data that we will receive from the child components. And on line #s 11 and 15, we create methods that become event handlers. Note here that although I name each method’s lone argument “$event”, this is completely arbitrary; I could have named it anything. The key thing here is that in each of these event handlers, we update the userName and userPhone properties with the data that we receive from the child components (i.e. $event).

The Parent Component Template – Example # 2

So now, in Example # 2 we have the parent component template. As expected, we see bindings for the userName and userPhone properties. But the interesting parts happen on line #s 5, 6, 9 and 10. We’ve set up handlers for the nameEvent and phoneEvent events, and the values that we assign to these handlers match up with the methods that were defined in the parent component: nameEventHander and phoneEventHander. So, this is where the connection is made between the child and parent components. In fact, the syntax used probably looks familiar to you: (click)=”someEventHandlerName($event)”. In our code, the difference is: instead of click, we are connecting a method to a custom event (i.e. nameEvent or phoneEvent).

The Child Components – Example # 3

In Example # 3 we have the child components, and on line #s 8 and 9 we have used the @Output() decorator to create two custom events. These events are instances of Angular EventEmitter, so the nameEvent and phoneEvent properties become event emitters. Then on line #s 14 and 18, we have the onNameChange and onPhoneChange methods. In these methods, we use the emit() method of the nameEvent and phoneEvent properties, which are instances of EventEmitter. So this, of course, is where the data is getting passed up to the parent component.

The Child Component Templates – Example # 4

In Example # 4 you’ll see the code for both of the child component templates. Notice how we have set up an event handler for each text input keyup event. This is where we are assigning the onNameChange and onPhoneChange methods to those events. So what happens is: the user enters some text in either of the inputs, which triggers the onNameChange and onPhoneChange methods, which in-turn emit the custom events. That triggers the handlers in the parent component’s template, passing up the data from the child.

Summary

So, in leveraging the @output() decorator, keep in mind that while the differences between it and the @ViewChild() decorator are not minor, they’re also not particularly complicated, once you understand how the data communication channels are set up. This means that when you use the Angular @output() decorator, you will be adding an event handler to your parent component. That event handler will then receive data, which will allow you to update the parent component’s template with that updated data. You will also be configuring the event handler on the child component HTML element in the parent component’s template, which is where the data connection happens. And then finally, in the child component, you’ll leverage the @output() decorator to emit an event with updated data, thus allowing the data to flow up to the parent component.

Angular Child to Parent Communication with @ViewChild()

Angular

Angular Logo - ViewChild()Angular child-to-parent communication with the @ViewChild() decorator mostly involves configuring the parent component to pay attention to one or more child component properties.

In the article: “Angular Parent to Child Communication with @Input()”, I covered the process of passing data from a parent component to a child component. I this article, I will cover one of two possible approaches to Angular child-to-parent communication. This particular approach takes advantage of the ViewChild decorator, and the syntax is fairly straightforward and easy to understand.

When I first looked into Angular child-to-parent communication, I assumed that it might be as simple as reversing the steps taken with the @ViewChild() decorator, but this was not quite the case. Leveraging the @ViewChild() decorator differs from the @Input() approach because not only are we accomplishing the opposite task, but the overall steps and methods of communication lack resemblance to the @Input() approach. Also, the communication mechanism requires a bit of event handling.

First, we import the child component from the parent component. The @ViewChild decorator is then used to set up a new property on the parent component, which provides the data connection from the child component. Next, we tap into the ngAfterViewInit component lifecycle hook, thereby making the live connection between one or more parent component properties and the respective child component properties. The steps required in the child component do not require much special attention, so it’s safe to say that Angular child-to-parent communication with the @ViewChild() decorator mostly involves configuring the parent component to pay attention to one or more child component properties.

Full Working Example Code

You can clone the full working example code here: github.com/kevinchisholm/video-code-examples/tree/master/angular/components/ViewChild

  1. Go to this folder in your terminal: angular/components/ViewChild
  2. Follow the directions in the readme

The Parent Component & @ViewChild() – Example # 1

Example # 1 contains all of the code for the parent component. On line #s 2 and 3, we import the children components: Child1Component and Child2Component. Now this is a bit of a departure in that we normally import services in an Angular component, but in this case, we need access to the instances of the children components.

Next, on line #s 10 and 11, we use the @ViewChild decorator to create properties that represent instances of each child component class. The syntax is a bit odd, but just note that while we reference the child component class twice (e.g. Child1Component), what we wind up with is a new property (e.g. child1).

On line #s 13 and 18 we create the properties userInfo1 and userInfo2, and we do this to set up objects that can be used to take in data from the child components. Finally, on line # 23, we tap into the ngAfterViewInit component lifecycle hook, and what we are saying here is: “after the PARENT component has completely initialized, please get the child1.userInfo and child2.userInfo values and assign them to this.userInfo1 and this.userInfo2.

So, as I mentioned above, most of the action is now over. The real “wiring-up” steps take place in the parent component. The methodology here is that we are listening for changes to some data points on the child components.

The Parent Component’s Template – Example # 2

In Example # 2 we have the parent component’s template, and on line #s 3, 4, 7 and 8 we have bindings for the child component properties that we wired-up on the parent component. These are the places in the UI that the child component data will render (and automatically update whenever that data changes in the child). And then, on line #s 10 and 11, we have the child1 and child2 elements. Nothing too special there, since most of the setup work was done in the parent component.

The Child 1 & Child 2 Components – Example # 3

Example # 3 has the code for both the Child 1 and Child 2 components. The code is virtually identical, so I won’t spend any time comparing the two, but what I wanted to point out here is that there is not too much to point out : – ). The code you see in the Child 1 and Child 2 components pretty much looks like what you would expect from any Angular component. Just note, though, that in each child component, we create a userInfo object which is used to set up the data bindings.

The Child 1 & Child 2 Component Templates – Example # 4

And pretty much the same situation here; the Child 1 and Child 2 component templates are virtually identical. We have HTML text inputs that allow the user to enter some text, and whenever the user adds or edits that text, the respective properties of the userInfo object are updated and that data flows up to the parent component.

Summary

If you have the time, I recommend cloning the github repo at the top of this page and running the example code locally, because while (I hope) the code examples are straightforward, it might be helpful to actually see the code in action. When you do, you’ll see that as you type in each child component text input, that data is reflected in the parent component. This makes it a bit easier to understand how the data flows up from the child components to the parent component.

Angular Parent to Child Communication with @Input()

Angular

Angular LogoThe Angular @Input() decorator provides a channel by which a parent component can communicate with its child.

I think most Angular developers would agree that more of those smaller components that do one thing and do it well make for more manageable code, and a critical part of this design pattern is the parent-child communication. This is because, with more of the smaller chunks of code, nesting components becomes unavoidable. So, in this article, I’ll demonstrate how you can leverage Angular’s @Input() decorator to allow your parent components to smoothly pass information down to a child.

On a high-level, the communication channel is composed of mainly two parts: First, you provide custom attributes in the template code for your child components and pass references to values that you want to pass down. Then, you use the @Input() decorator to accept that data in the child component. Now there are two ways to leverage the @Input() decorator in your child component, and I’ll cover each one. For now, let’s just look at some code examples to see how these two pieces of the puzzle fit together.

Full Working Example Code

You can clone the full working example code here: https://github.com/kevinchisholm/video-code-examples

The Parent Component – Example # 1

In Example # 1 you’ll see the code for the parent component. Okay, now let’s take a look at lines # 8 and 9, where we expose two properties: userName and userPhone. Now we’ll consume those two properties in Example # 2, but for now, just be aware that in order to pass data down to the child component, we need to expose that data as properties on the parent component class.

The Parent Component’s Template – Example # 2

So here in Example # 2 we have the parent component’s template, and on line #s 1 and 6 there are two HTML text inputs. What we want now, is for the user to enter some text into these inputs, and then that data will be passed down to the child component. Notice how the ngModel directives for the texts input are assigned to the userName and userPhone properties. Then on line #s 11 and 15, we have the two child components. In each case, we have added a custom attribute to the child component’s HTML element. Now notice that the userName and userPhone properties are provided as values for the child1 component. And for the child2, component we use “theUserName” and “thePhone“. Okay, let’s put that aside for now, and we’ll discuss it in Example # 5.

But why are the custom attributes named “userNameFromParent” and “userPhoneFromParent” ? Well, these names are arbitrary; we could have just as easily named them “foo” and “bar”. The important thing to keep in mind is: the “userNameFromParent” and “userPhoneFromParent” custom attributes set up the communication channel. In other words: the “userNameFromParent” and “userPhoneFromParent” custom attributes are the connection to the child component class, and the userName and userPhone properties are the bindings for that data. And because of the “{{ }}” bindings, any time the userName and userPhone properties change, the updated values will be passed to the child component via the “userNameFromParent” and “userPhoneFromParent” custom attributes.

The Child 1 Component – Example # 3

Example # 3 contains the code for the child component, so let’s jump right to line #s 7 & 8. The @Input() decorator is used to declare that userNameFromParent and userPhoneFromParent properties are not just any old properties; they are inputs from the parent component (in this case, we have initialized them as an empty string). This is an important relationship, since the “userNameFromParent” and “userPhoneFromParent” custom attributes of the child template are connected to these class properties that are decorated with @Input(). This is that “communication channel” we covered earlier.

Child 1 Component’s Template – Example # 4

In Example # 4 we have the child component’s template, where there are only two lines of code, so things are pretty simple. But notice the userNameFromParent and userPhoneFromParent bindings. Importantly, this is where the template is bound to the two properties that we created with the two @Input() decorators. So if you go ahead and clone the GitHub repo listed above and run the code locally, you’ll see that when you enter some text into the two inputs of the parent component, that data is passed down to the child component and rendered in the UI.

The Child 2 Component – Example # 5

In Example # 5 we have the child 2 component, which I wanted to revisit, so I could demonstrate the 2nd option for how to leverage the @Input() decorator. In this case, we can “alias” the data that is passed down from the parent component. In other words, we defined the two data points as “userNameFromParent” and “userPhoneFromParent” in the parent component, and in Example # 4 and # 5, we used those property names verbatim in our child component template bindings. But in this case we “alias” the data by passing a string to the @Input() decorator. So, instead of @Input() PROPERTY_NAME = “”, we use the following syntax: @Input(PROPERTY_NAME) alt_property_name = “”.

So here we are saying to Angular: “I want to consume theUserName and thePhone, but I want to call it something different in my child component”. So now we have two properties: name and phone. But remember back in Example # 2, where we mentioned that we would discuss theUserName and thePhone? Well, this is where I want to revisit that part of the parent template. In this child 2 component, we are consuming theUserName and thePhone, which were passed down from the parent template, but we are declaring two new properties: name and phone.

Child 2 Component’s Template – Example # 6

In Example # 6 we have the child 2 component’s template, and as you have probably guessed by now, this is where we are consuming the name and phone properties. When you run the working code in your browser, you’ll see that just as with the child 1 component, whatever you type in the text inputs will be rendered in this child 2 template. The difference is that we took a slightly different approach with the @Input() decorator, creating two new properties.

Summary

In this article, we learned how to use the Angular @Input() decorator to pass data from a parent component to a child component. We also learned how to set the custom attributes in the parent components’ template and bind values from the parent in order to set up the data flow. Then, we covered the @Input() decorator’s syntax, learning how to receive the data in the child component. And finally, we discussed the two ways of using the @Input() decorator so that you can have the option of aliasing the child component’s properties.

How to Create a Node.js Web Server as an Amazon AWS EC2 Linux Instance

Amazon Web Services (AWS)

aws ec2 linux instance LogoCreating an Amazon AWS EC2 Linux instance is easier than you may think. There are few decisions to make and you can accept most default values. Once your instance is launched, it’s easy to SSH in, install Node.js and create your web server.

Creating an Amazon AWS EC2 Linux instance can be intimidating. Because AWS provides such low-level functionality, it can often feel as if you have to think-through a lot of details just to get your “Hello World!” application up-and-running. After walking through the process of spinning-up a server instance on AWS EC2, I found that the steps are not overly difficult. For the most part, there are only a few decisions to make, and in many cases you can accept the default values. Some of the concepts or terms might be difficult to understand at first, but for the most part they encompass pretty basic full-stack web development topics that you should have run across by now.

In this article, I will walk you through the steps needed to create and launch an Ubuntu Linux instance on AWS EC2. To be specific, we will create an Amazon AWS EC2 Linux Instance and then install Node.js and create an HTTP web server. Once our instance is launched, we will install Node.js and create a (very) bare-bones web server. A very important step to think about is towards the end: downloading your .pem file. This file contains the AWS credentials needed to SSH into your Linux instance. If anyone were to get their hands on this file, they could SSH into your Linux instance, which is bad. If you lost this file, then you will not be able to SSH into your Linux instance, which is bad too. So, keep that file in a safe place. For this article, I assume you already have an AWS account. If you do not have one, please take care of that first. It’s easy and there is no cost to sign up. You will need to provide a credit card, but that is for future billing purposes. Ok, let’s get started.

IMPORTANT NOTE: I kept all of the example images small for the sake of readability. Click on any thumbnail to open the full-sized image in a new window.


Creating an EC2 Instance

Go to the EC3 dashboard

You can go directly to the AWS EC2 Console: console.aws.amazon.com/ec2

Or, at the AWS Console, click “Services” in the upper-left-hand corner of the page, then click “compute”, and then “EC2”.

Click the “Launch Instance” button.

Launch Instance button


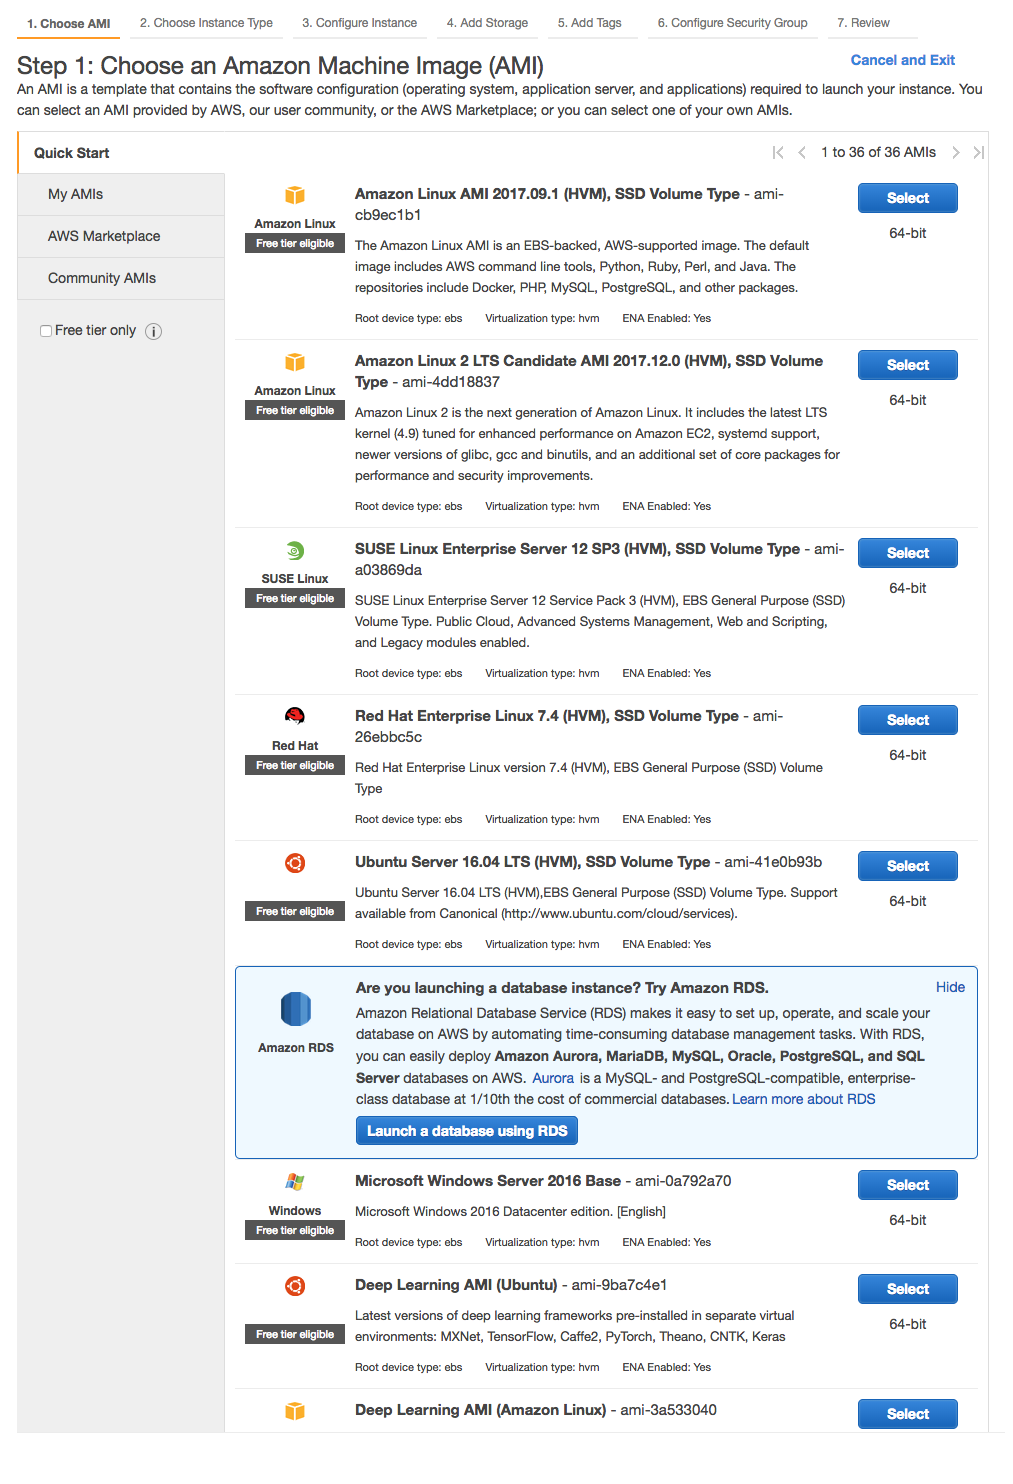
Choose an Amazon Machine Image (AMI) – Step 1

Step 1: Choose an Amazon Machine Image (AMI)

Choose Ubuntu Server 16.04 LTS (click the “Select” button)


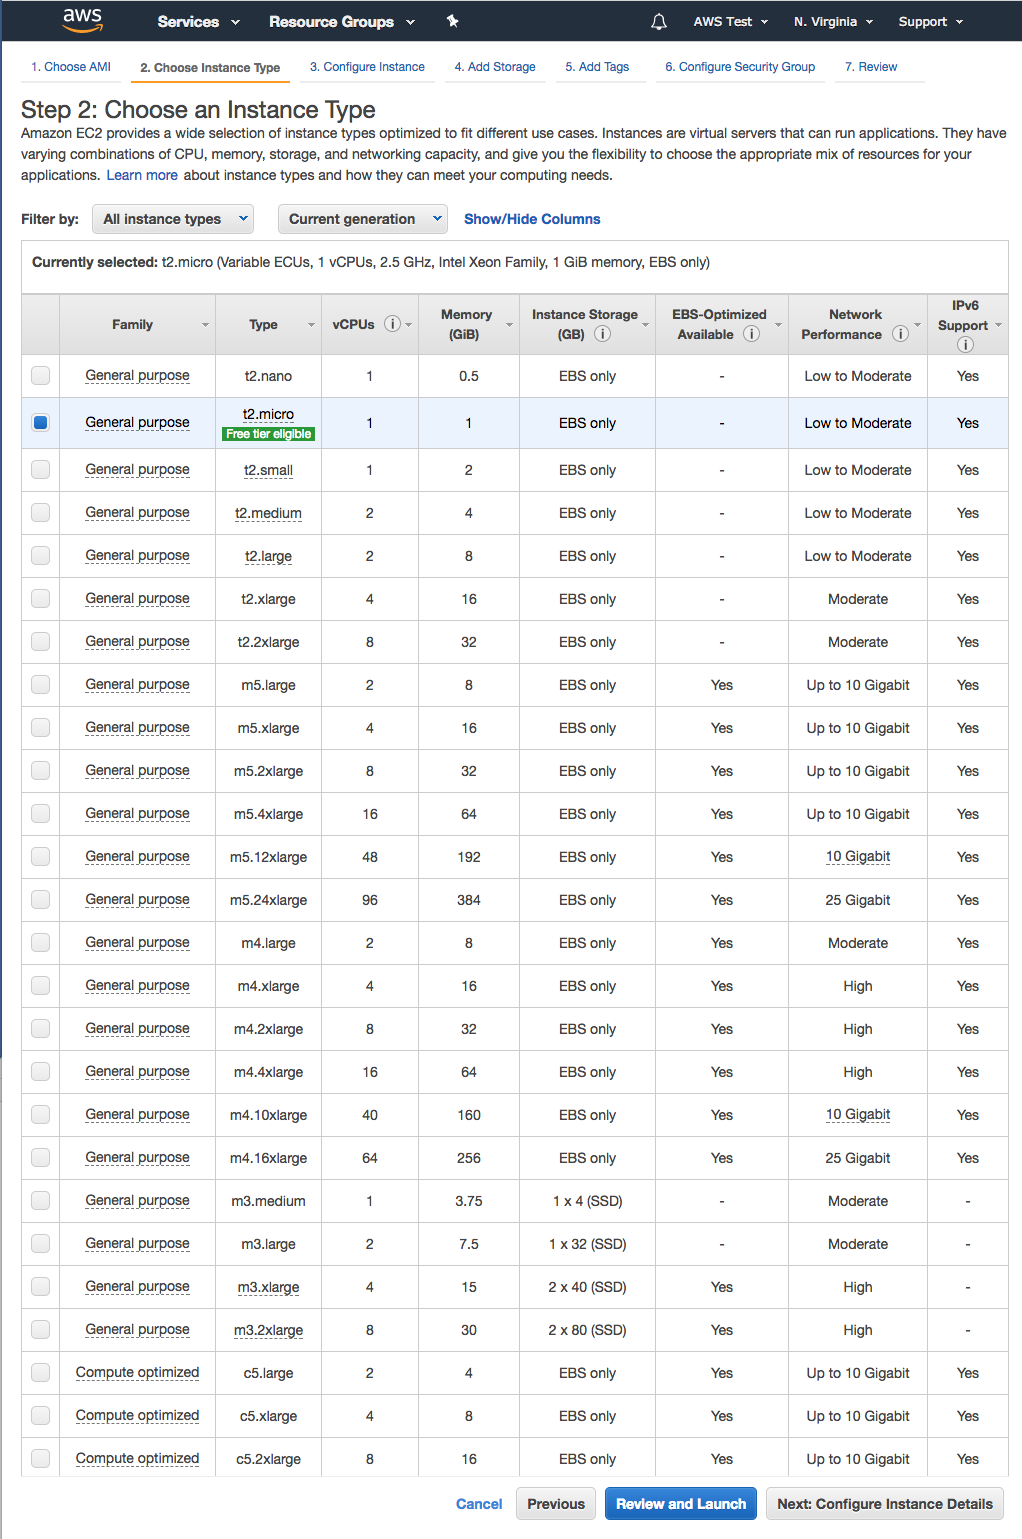
Choose an Instance Type – Step 2

Step 2: Choose an Instance Type

Choose “t2.micro”
Click “Next: Configure Instance Details”


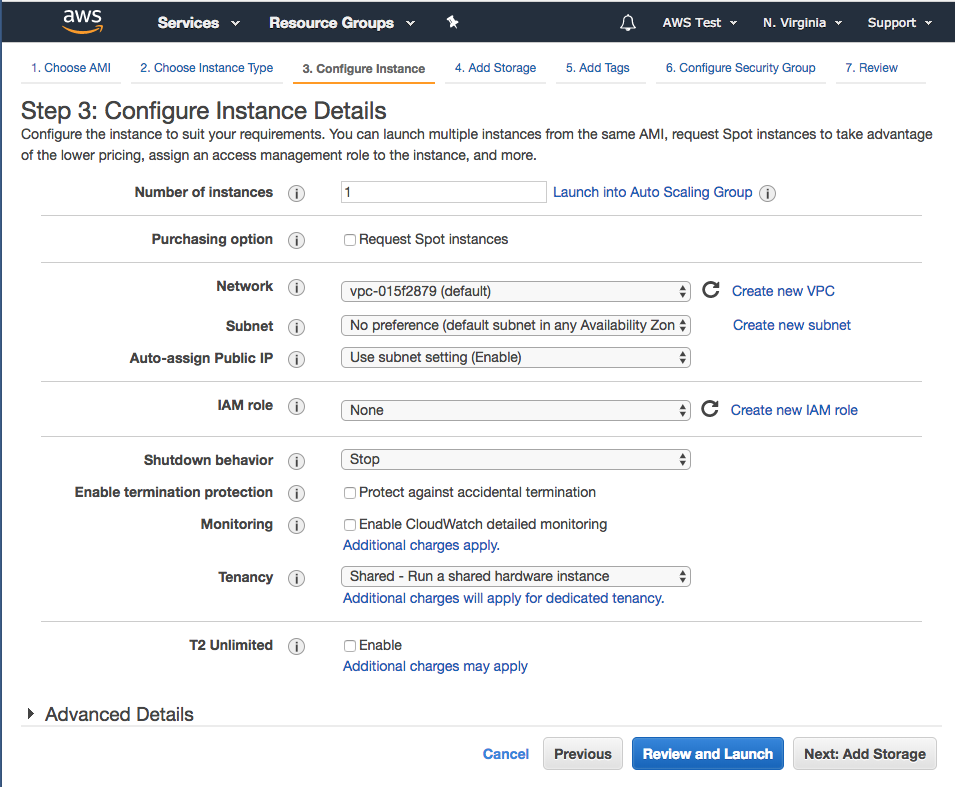
Configure Instance Details – Step 3

Step 3: Configure Instance Details

You can accept all default values on this page
Click “Next: Add Storage”


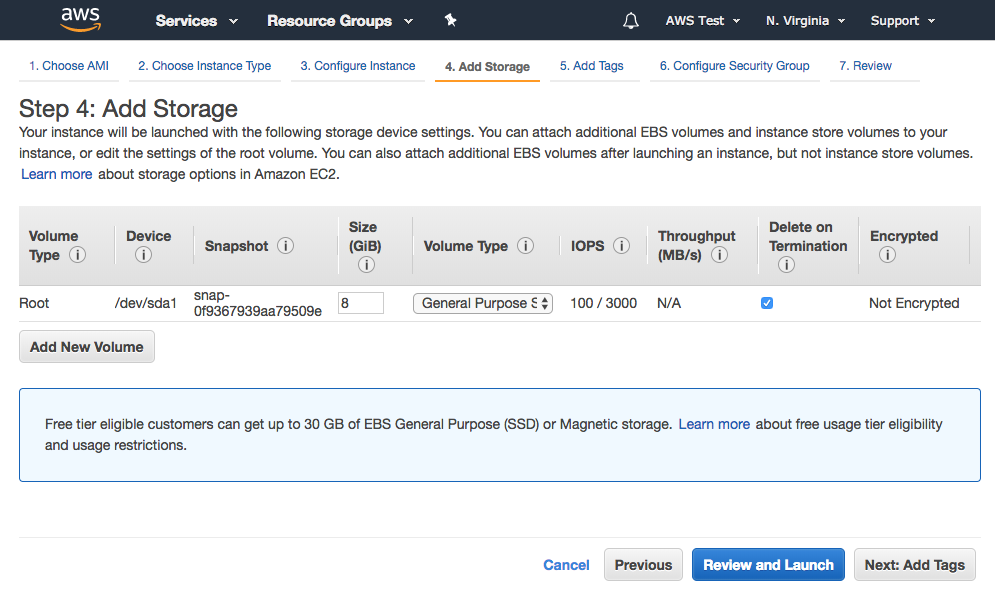
Step 4 – Add Storage

Step 4: Add Storage

Accept the default SSD side of 8GB.
Click “Next: Add Tags”


You can configure a tag here, but that is optional.
Click “Next: Configure Security Group”


Configure Security Group – Step 6

Step 6: Configure Security Group

By default, AWS configures SSH using TCP on port # 22. You will see a warning about the source value of 0.0.0.0/0. This is because right now we can SSH to our EC2 instance from any IP address in the world. Best practice is to restrict SSH access to just one or two IP address in order to maximize security, but for this article we can leave the default value. We also need to provide public HTTP access to our Node.js server via port 80.

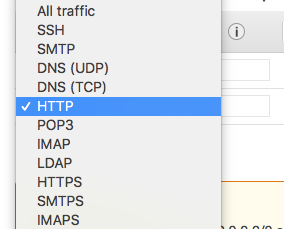
Click “Add Rule” and select the type as “HTTP”, the default settings for this will use TCP as the protocol and expose port 80 to all IPs.

Choose HTTP

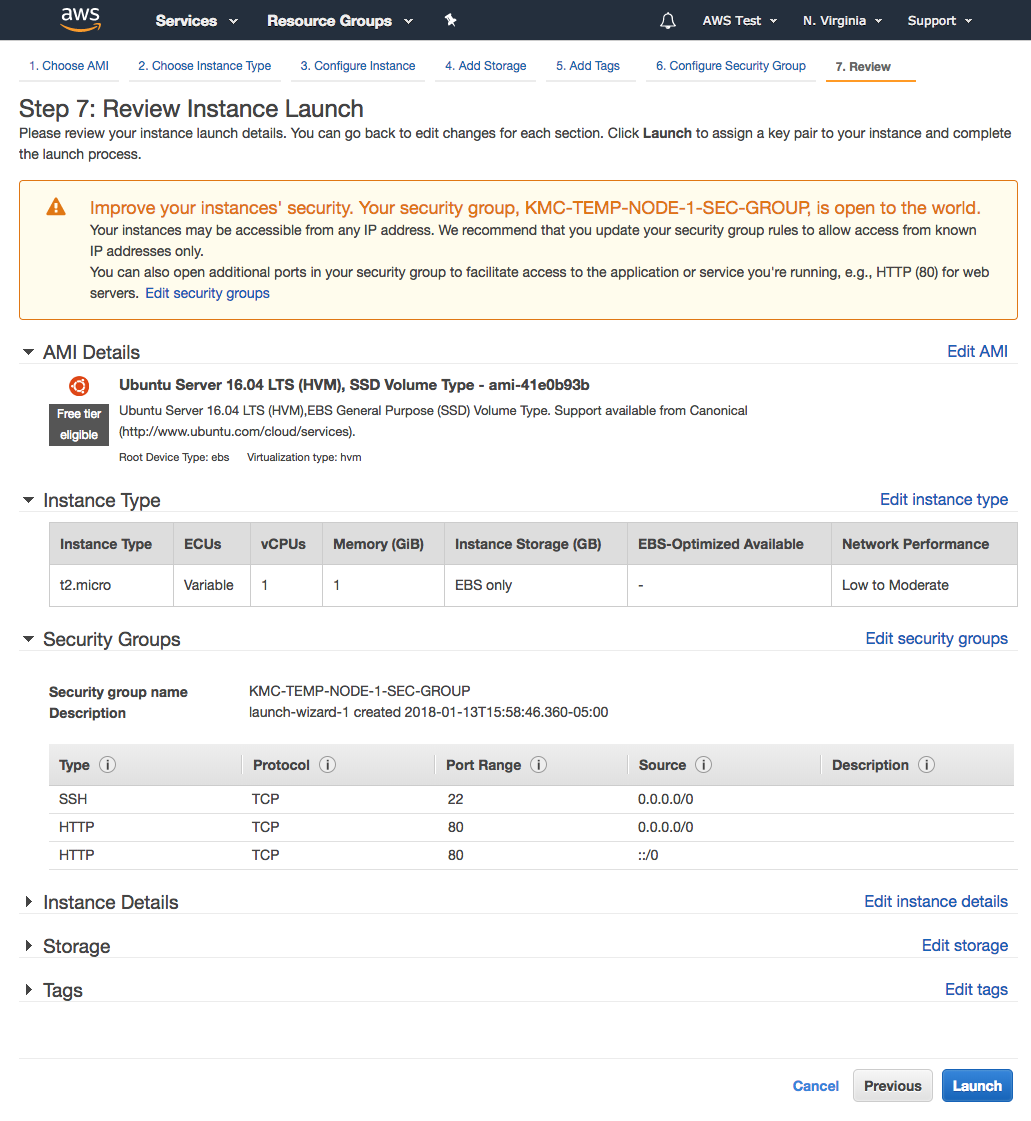
To launch your EC2 instance, click “Review and Launch”, then click “Launch”.


Review Instance Launch – Step 7

Step 7: Review Instance Launch

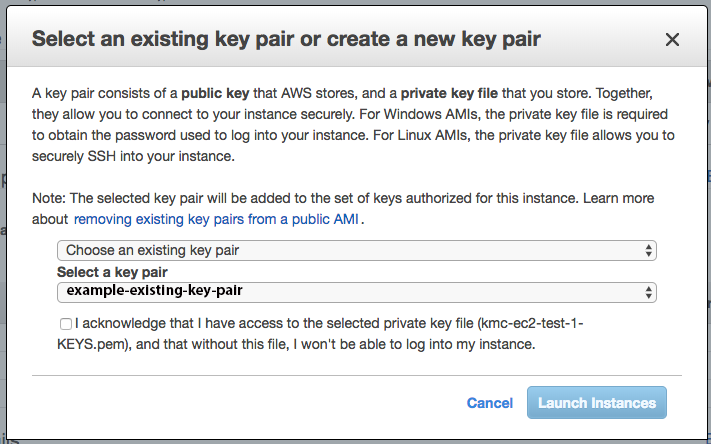
You’ll see the modal: “Select an existing key pair or create a new key pair”

You will be prompted to set up an SSH key which will give you access to your EC2 instance.

Select an existing key pair or create a new key pair modal

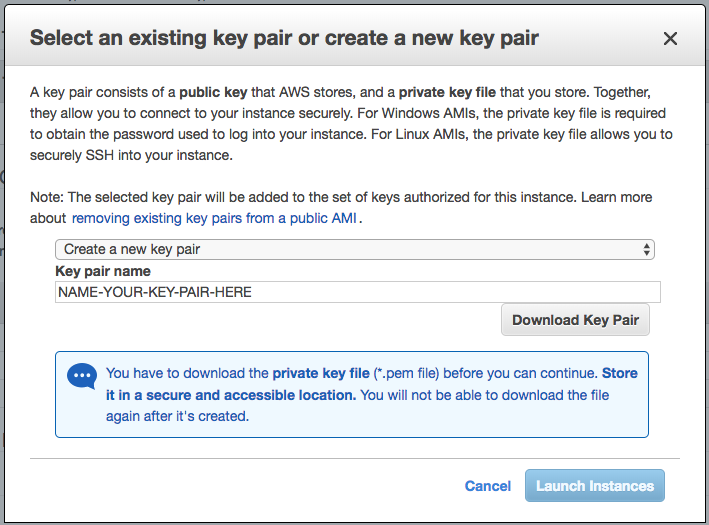
Choose “Create a new key pair”, and give the key a meaningful name.
After you enter a name for the key pair, click “Download Key Pair”

Download Key Pair

After you click “Download Key Pair”, a .pem file should start to download. You will need the contents of this file to create an SSH connection to your EC2 instance. It’s really important to keep this file in a safe place because anyone can SSH into your EC2 instance if they get their hands on it. Keep in mind: if you lose this file you will need to generate a new one.

After you have downloaded the .pem file, put that file in the following folder: ~/.ssh

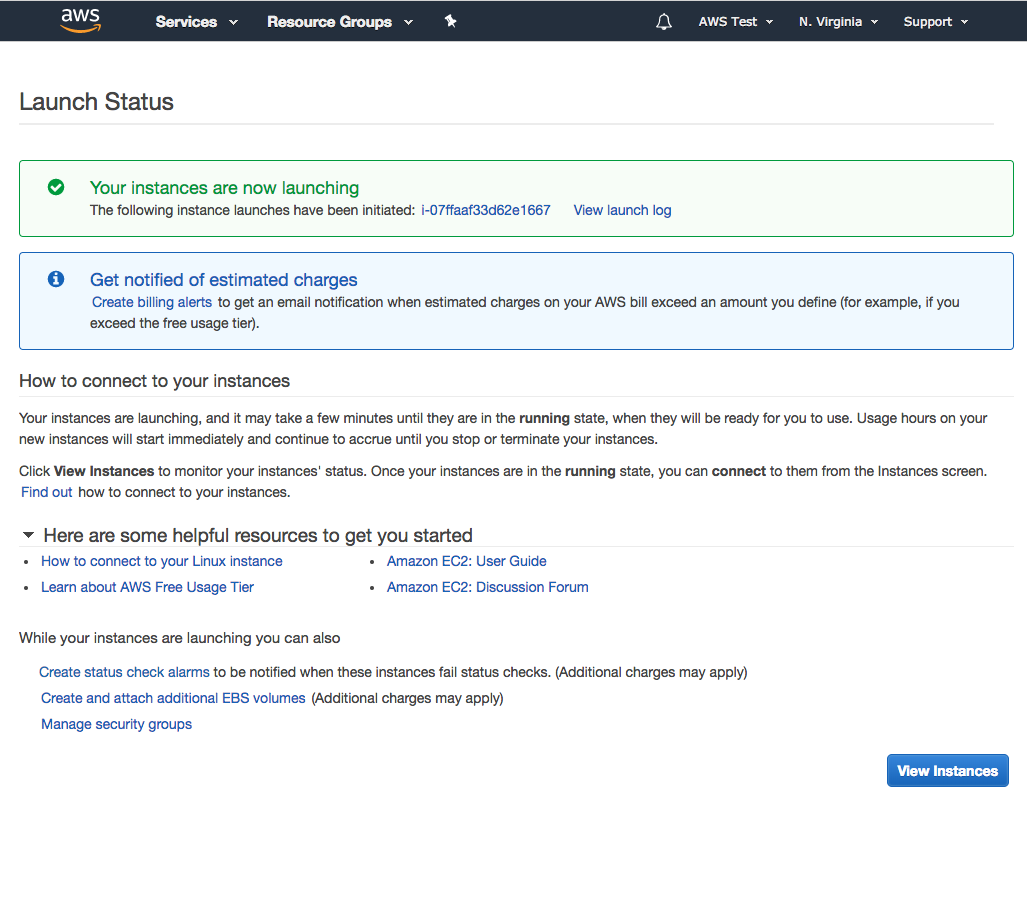
Click “Launch Instance”


Launch Status

Launch Status

Click “View Instances”

Running Instances


SSH into your server

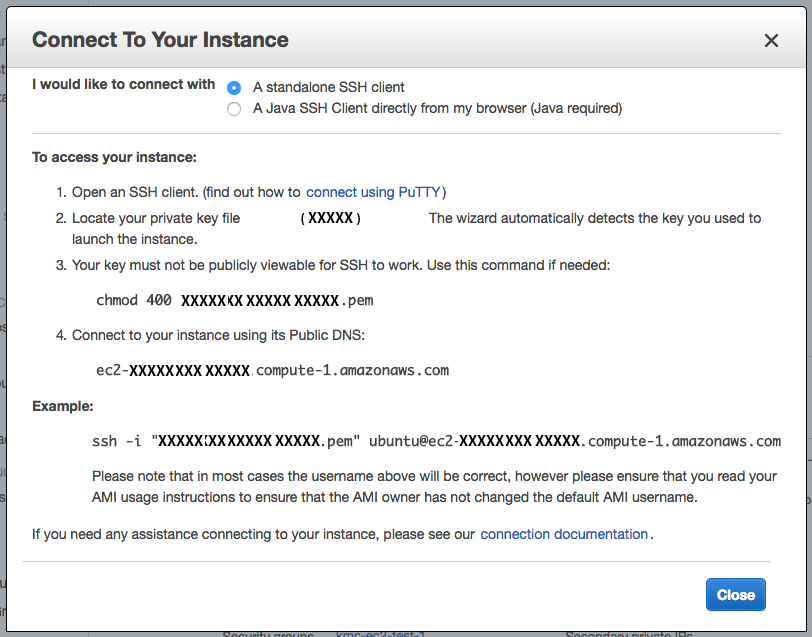
You’ll need to locate the public address of your EC2 instance. Right-click your instance and then click “Connect”. You’ll see the “Connect to Your Instance” modal

Connect to Your Instance modal

In the “Connect to Your Instance” modal, where it says: “Connect to your instance using its Public DNS”, copy the address you see.
This address should be in the following format: “ec2-1-2-3-4.compute-X.amazonaws.com”.


Open up your terminal application and execute the following command:

You will be connected to your EC2 Linux

Installing node and system dependencies

Install Node Version Manager

First we want to install NVM (Node Version Manager). Execute the following command:

Install Node

Before you install Node, you’ll need to log out and then reconnect with SSH. Log out by with the following command:

…and then re-establish your SSH connection.


Next, go to https://nodejs.org/en/ and check the latest version number of Node (for example, as of the date of this post, the latest version is: 8.9.4).
Install Node using the following command:

When the installation completes, verify the install using the following command:

Create a public HTTP endpoint

Create a new directory and move into it. For example:

Next initialize NPM with the following command:

…and accept all default values.

Now install Express.js using the following command:

Next we need to create the code for our web server. Execute this command:

This opens up the VIM editor. Press “a”, and then paste the following code into your terminal:

Now press the “esc” key, then “ : “, “w” and then “q”.

Finally, start the server:

Open Up Port 3000


Back in the AWS EC2 Console, on the left side where it says: “NETWORK & SECURITY”, click “Security Groups”
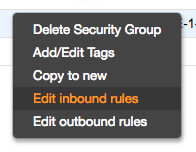
Right click the security group you set up and click “Edit inbound rules”.

Edit inbound rules

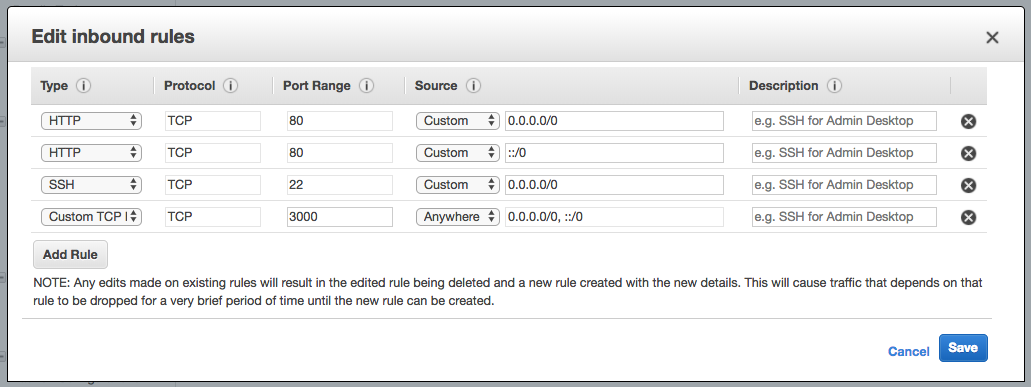
Click Add Rule.
Use a custom TCP rule on port 3000, set the “Source” to “Anywhere” and then click the “Save” button.

Edit inbound rules modal


Now you can view your EC2 instance in the browser using its Public DNS: ec2-1-2-3-4.compute-X.amazonaws.com

You should see the following message in your browser: “Your AWS EC2 Node.js Web Server is Working!”


Summary

This article covered only what you need to know in order to get your Node.js web server up-and-running. I only walked through the absolute minimum needed in order to spin-up an Ubuntu Linux instance on AWS EC2. One issue you’ll quickly run into is: uploading actual application files to your Linux instance. I’ll cover that in a new blog post. For now, I hope this article provided the information you needed to get your Amazon AWS EC2 instance launched and your new Node.js web server running.

How to Show Points on a Mapbox Map With React Native

React Native

JavaScript LogoThe key to rendering MapBox markers in your React Native application is implementing the MapboxGL.PointAnnotation component.

In the article: “Getting Started with the Mapbox Maps SDK for React Native,” I covered the absolute basics needed to get a MapBox map to render in your React Native application. The level of effort was low, and the scope of the article was minimal, but that was the whole idea. We wanted to stick to the basics and we did, by rendering a map and setting the center coordinates to Columbus Circle in New York City. In this article, however, our goal is to set a number of markers on a map.

So, markers, what are they? Well, they’re the common features of map applications that allow us to provide a visual cue that refers to a location on earth. And depending on your business requirement, your markers can often extend the richness of your application. For example, you can attach click or press event handlers and provide geo-specific information to the user. Or, you could customize the image that is used for the marker to further enhance the user experience. Now the key to rendering markers with MapBox is implementing the MapboxGL.PointAnnotation. According to the mapbox GitHub page, this component represents “…a one-dimensional shape located at a single geographical coordinate.”  While that definition may be a bit dry, it just means that it is the component that will become the marker on your map.

package.json

Above we have the contents of package.json. We have dependencies on react, react-native and @mapbox/react-native-mapbox-gl. Let’s take a look at an example:

Example # 1

Now there is a lot going on in Example # 1, but let’s break it down. As I mentioned in the previous article, we need to use the MapboxGL.setAccessToken method to let MapBox know what our access token is. So, just skip down to line # 64: the render() method. Here, we render the MapBox map via the MapboxGL.MapView component, which takes care of all the heavy lifting when it comes to rendering the map. The sole child element of MapboxGL.MapView is the return value of our renderAnnotations() method. So let’s go ahead and take a look at that method.

Look at the renderAnnotations method on line # 54. Here, we create a for-loop, which iterates over the state.coordinates array. And for each iteration, we call the renderAnnotation() method, passing the value of the “i” variable, which is just a counter. In this method, we are simply pushing elements into the items array, which is a private variable, and we return that array. So, now, back at line #74, it is this array of MapboxGL.PointAnnotation components. Let’s just go ahead and take a look at the renderAnnotation() method.

Take a close look at the renderAnnotation() method on line # 30. You’ll see that it takes counter as an argument, which we’ll need in order to understand the coordinates of the marker we create. This method returns a MapboxGL.PointAnnotation, which is constructed in this method. The constants id, coordinate and title are used to help make this MapboxGL.PointAnnotation unique. The sole child element is a react-native Image component instance. This image you use is arbitrary, so go ahead and use any image you want. We make reference to “../common/images/marker.png”, which is a relative path in our application. The most important part of this method is the coordinate constant. We use the counter variable to get a reference to one of the state.coordinates array elements, and it’s here that we are able to give this MapboxGL.PointAnnotation component a geographic presence on our map. Nice.

Summary

Overall, in this example we did three things. First, we rendered a MapboxGL.MapView. Second, we executed a method whose return value became the sole child element of the MapboxGL.MapView component. That method looped through all of the coordinates that we stored in state.coordinates. And third, we used a for-loop to iterate the state.coordinates array and render a MapboxGL.PointAnnotation for each coordinate in that array. So, on the whole, this approach requires relatively little code. If you’re new to React Native, however, it might take a little getting used to. But I think that you’ll find that outside of the React Native learning curve, rendering markers on the map is fairly simple, and once you do master it, you’ll find it to be a great addition to your tool belt.

Getting Started with the Mapbox Maps SDK for React Native

React Native

JavaScript LogoMapbox’s react-native-mapbox-gl module simplifies the process of generating a map in your React Native application.

At first, I was a bit hesitant to embrace Mapbox because I have always been so impressed with Google Maps. Until recently, I’d had virtually no motivation to look elsewhere. After all, Google had made rendering and manipulating maps so effortless. But, now that I’ve spent some time with it, I must admit that Mapbox is a formidable competitor to Google Maps. Now, I would like to see a more robust API, especially when it comes to map event handlers. But, the more time I spend with Mapbox, the more knocked-out I am with it. So, something for you to think about: if you’re building a React Native application that leverages maps, the react-native-mapbox-gl module is quite a life saver.

For one thing, when it takes less than a few minutes to get a module working in an app, I pay attention. And that was exactly what happened with react-native-mapbox-gl. After an initial npm install –save, I was up-and-running. I will note, however, that the documentation is a bit of a disappointment, as it is minimal, fairly dry and lacking in working example code. That said, though, it was at least up to date and, for the most part, the various properties and methods worked as advertised. In fact, once you get the map to render in your React Native application for the first time, it kind of feels like magic. The map renders so smoothly and it’s almost embarrassing how little code you need to write, in order to spin-up a pretty slick-looking map-based application.

package.json

Above, we have our package.json file. Nothing too special going on here; we just need react, react-native and @mapbox/react-native-mapbox-gl. You should be able to copy and paste this into your application, then fire up your emulator.

Example # 1 – MapboxGL.MapView

In Example # 1 we start out by importing our dependencies. After that, we need to set the access token for the application. That’s done by calling the setAccessToken method of the MapboxGL module. Then, in our class, we render a MapboxGL.MapView, nested inside of a React Native View. There is a slight problem, though; we don’t see too much after the map is rendered. So let’s fix this by setting the zoomLevel property.

Example # 2 – Setting the zoomLevel property

In Example # 2, we add zoomLevel as a property of the MapboxGL.MapView, and set it to “1”. Now we see a map in our emulator. Unfortunately, though, we are in the middle of the Atlantic Ocean, which is probably not where we want to be. Okay, so let’s take care of that by setting the centerCoordinate property.

Example # 3 – Setting the centerCoordinate property

In Example # 3, we set the centerCoordinate of the MapboxGL.MapView, to the const “columbusCircleCoordinates“. This is an array that contains the latitude and longitude of Columbus Circle in New York City. So this has forced the map to render a specific location on earth, ensuring that everyone sees the same thing when they start the application.

Summary

So, MapBox clearly wants you to use to their product, as evidenced by how easy they make it to spin-up a map in your application. Their react-native-mapbox-gl module extends this facility to React Native applications. Now the key to rendering a map is the MapboxGL.MapView. So just be sure to set the centerCoordinate property to valid coordinates in an array (i.e. a set of latitude and longitude values for some place on earth).

Now, as you can well imagine, this article merely scratches the surface of what’s possible. My goal here was to simply provide a very high-level explanation of how to render a MapBox map in your React Native application. I recommend this SDK. There is a fairly robust set of properties and methods here that really makes your maps come alive.

What is the difference between LET and CONST in JavaScript?

JavaScript

JavaScript LogoThe JavaScript let and const keywords provide block-level scope, but there is a slight difference in how they behave. With const, you can not re-assign a value to the variable. With let,
you can.

Over time, JavaScript applications have grown in complexity. As a result of the increased code complexity programmers have been faced with a challenging dilemma: build applications that satisfy ever-evolving business requirements, yet continue to work with the same tools. It only makes sense that JavaScript would be in need of improvements, since for much of its history, functions were the only tools available to achieve scope. But, for several years, block-level scope was a feature that was sorely lacking. Then along came the ECMAScript-2015 specification that finally met that need with the let and const keywords.

The JavaScript let and const keywords are quite similar, in that they create block-level scope. However, they do differ a bit in the way that they behave. For example, the JavaScript let keyword is similar to the var keyword in that assignments can be changed. On the other hand, the JavaScript const keyword differs in that assignments can not be changed. So, once you declare a variable using the const keyword, you cannot re-assign a value to that variable. This does not mean that the variable is immutable. If you assign an object to a variable using the const keyword, you can mutate that object. You just can’t re-assign that variable with a new value. Let’s take a look at some examples.

Example # 1 A

Example # 1 B

In Example # 1 A, we have two different versions of the “i” variable. I say “two different versions” because the same variable name exists in two difference scopes, the global scope and a block scope. The block scope exists between the two curly braces: “{ }”. Then inside of the two curly braces, I used the JavaScript let keyword to declare a second “i” variable. Because we used the let keyword, that particular “i” variable is scoped to the block in which it was declared. And because of this, the console.log() statement on line # 6 outputs  50. I’ll just note here that it may seem a little odd at first to declare a variable anywhere other than at the top of the function, but this actually is the correct syntax; if we want a block-level scope variable, we use the let keyword inside of a set of curly braces.

Take a look at Example # 1 B. Notice how, in the second console.log() statement, the output is 100. This is because that second console.log() statement is in the global scope, and in that scope the “i” variable is equal to 100. So, there we have it: two different scopes without even having used a function.

Example # 2 A

Example # 2 B

Now, in Example # 2 A, there are two “j” variables.
The first “j” variable is a global, equal to 100, and the second is defined inside of the for loop. And because it’s defined inside of a block, it has block-level scope. Now look at example # 2 B. Because “i” is global, the “i” variable increments, just as we would expect. But notice that the “j” variable is always 50 in each console.log() statement, even though there is a global “j” variable. This is because on each iteration of the for loop, a block-level “j” variable is declared using the let keyword, and it is incremented (just to demonstrate that with let, we can re-assign a variable value). So in this case, with each iteration of the for loop we have a block-scoped “j” variable and it is always 51. Note that the global “j” variable is ignored on line # 12.

Example # 3 A

Example # 3 B

In Examples # 3 A and # 3 B you’ll see a similarity to Examples # 1 A and # 1 B, the only difference being the use of the use of the const keyword instead of let when declaring our block-level version of the “i” variable.

Example # 4 A

Example # 4 B

Now here in Example # 4 A, we’ve run into a problem. We tried to take the same approach as Example # 2 A, that is, we tried to increment the “j” variable declared on line # 6. The problem, though, is that when you use the JavaScript const keyword, you cannot re-assign a new value to a variable. So when you look at Example # 4 B, you’ll see that we never see the full output of the for loop that we expected, because line # 9 of Example # 4A throws a TypeError. This is because when we try to change the value of “j”, we find that this is not possible because it was created using the const keyword. In other words: it’s a constant.

Example # 5 A

Example # 5 B

Now Example # 5 A is virtually identical to Example # 4 A, except that we have not tried to increment the “j” variable. And when you look at Example # 5 B, you’ll see that we no longer have an error. In the console, the value of “j” is 50 every time.

Summary

So to recap, we now know that the JavaScript let and const keywords allow you to create block-level scope for variables, which, in turn, negates the need to always use functions to create scope. With block-level scope, all you need are the curly braces “{ }”, and within that block, any variable created using let or const is private (or local) to that block. This is particularly helpful with for-loops. And a very important thing to keep in mind: with const, you cannot re-assign values to a variable. In other words, any variable created with the const keyword is a constant and the assignment cannot be changed.

A lot to take in here, but I think it’s worth keeping on your radar, given this very functional block-level scope now increasingly available in browsers.

How do I detect a text-input change event with Angular?

Angular

Angular logo -routing
If you want to act upon the change event of a text input or text area, assign a method to the change attribute.

Okay, let’s start with the basics. Let’s say an HTML text input is simply sitting there, waiting for the user to click the form’s submit button, after which your JavaScript code would take that text input’s value and send it as part of the HTTP POST request. But what if you don’t want to wait; what if you want to know if the user has made a change to the text input. Let’s use form-validation as a typical case; let’s say you want to know if the user has entered a valid value. For example, you might want to enter an email address, a telephone number, or a social security number. Well, by assigning an event handler to the element’s (change) attribute, you’ll be able to act upon any change in the text input.

Let’s take a look at a couple of examples:

Example # 1

In Example #1 we have our component. We will consume the changeCount property in our template.

Example # 2

In Example # 2, we have our template. In the H3 tag, we use the {{changeCount}} placeholder to show the value of the changeCount property. The text input has a change attribute. For the value, we assign an expression: “changeCount = changeCount + 1”. This means that each time the change event fires on that text input, the changeCount property is incremented by one. Thus, each time the user makes a change to that text input, the UI message “You have made {{changeCount}} changes so far.” is updated and the {{changeCount}} placeholder  shows the current value of the changeCount property.

So, for the sake of simplicity, we have incremented the value of the changeCount property inline. That is, instead of assigning a method to the text input’s (change) attribute, we assign an expression. Now even though this approach is not a recommended pattern, it does have the advantage of being valid and easy to read. So the best approach is the normal one, which is to assign a method to the (change) attribute. And that method would be a property of our HomeComponent.

Video Example Code

If you want to download the example code, visit this Github page, and then follow the instructions: bit.ly/kcv-angular-change-attribute

How do I use the Angular ngFor Directive ?

Angular

Angular logo -routing

When you have an array of data to show in the page, ngFor does all the work. You simply define your UI element once, and ngFor takes care of the rest.

Creating a for loop is one of the first things every programmer learns. You set up your loop, and then define what should happen in each iteration of the loop. But while this may sound simple, it can create a lot of boilerplate code. Each time you need to set up an iteration, you need to create your counter variable (for example “var i = 0”). The thing is, this kind of repetitive code can quickly become tedious and difficult to manage. And since Angular takes care of DOM rendering for you, you actually don’t want to manually iterate data with the intention of rendering multiple DOM elements. So the better approach would be to let Angular do the heavy lifting when it comes to iterating data and rendering DOM elements based on that data.

When leveraging the Angular ngFor directive, the approach is very much the same. The number of iterations is determined by the length of your array, so Angular handles that for you. The only thing left to do is define your data and a variable that will represent the model on each iteration of the loop.

You’ll find that the approach here is somewhat similar to using a library such as underscore.js or lodash.js; you simply let the library take care of the tedious loop setup code. And Angular offers even more value here because it takes care of not only the data iteration, but the DOM rendering as well. In addition to this, Angular takes care of all the deep DOM management tasks such as hiding & showing, data binding and event handler binding. So let’s face it, that makes for a much more streamlined process and saves you a great deal of work!

Example # 1

In Example # 1, we have our component. Take note of the days property. It contains the seven days of the week. This is the data which we will use in our template.

Example # 2

In Example # 2, we have our template, containing an unordered list. Our goal is to have a list item for each day of the week. Instead of manually creating seven list items, we have only one. This single list item has an ngFor attribute. The value assigned to this attribute is: “let day of days”. What this means is: “let’s loop over our days array, and on each iteration of the loop, the item being iterated over will be referred to as: day.

On each iteration of the loop, Angular will create a list item with a paragraph inside of it. Inside the paragraph, we have a placeholder for the day variable in our loop. So {{day}} will be replaced with “Monday“, “Tuesday“, “Wednesday“, etc.

Video Example Code

If you want to download the example code, visit this Github page, and then follow the instructions: bit.ly/kc-angular-ngFor

Summary

I think most would agree that the Angular ngFor directive provides a powerful way to iterate over your data and render DOM elements. You’ll find that as is often the case with Angular, this directive saves you time and effort as it takes care of the most tedious aspects of this kind of challenge. Just add this to your bag of resources and you can rely on Angular to minimize human error and provide a more reliable solution for data iteration and DOM rendering.

How do I use the Angular ngClass attribute?

Angular

Angular logo - ngClass

The Angular ngClass attribute allows you to programmatically determine if a CSS class will be applied to an HTML element.

We know that adding and removing CSS classes is a common JavaScript task. Quite often, it is the most efficient way to make style changes to one or more DOM elements. In fact, there is a great deal of power in this approach, with its ability to add or remove one CSS class that can cascade, causing dozens, hundreds or even thousands of child elements to change in appearance. But when leveraging Angular, there is no need to manually add or remove CSS classes to or from DOM elements; Angular just takes care of this, based on the state of your data. So, as you’ll see in the examples below, the most efficient way to go is to use the Angular ngClass attribute, which allows you to determine if a CSS class should be added to a DOM element, based on the result of a JavaScript expression.

Sometimes you may want to apply some CSS to an element, based on the value of some data. And sometimes you may want to apply other CSS when that data changes, or if it has a very specific value. With the ngClass attribute, Angular makes this kind of CSS logic arbitrary.

Example # 1

In Example # 1, we have our component. This code example is short, as there is only one thing to point out: the contentHighlighted property. This property is a boolean, so it will always be either true or false. We will pay attention to this value in our template.

Example # 2

In Example # 2, we have our Angular template. First, let’s take a look at the buttons. The first button sets the contentHighlighted property to true. It also has an ngIf attribute set so that when contentHighlighted is true, the button is destroyed. The second button functions in the exact opposite way: it sets the contentHighlighted property to false, and is destroyed if contentHighlighted is false. When you run the example code, you’ll notice that button’s toggle. That is to say: when you click one, it disappears (i.e. is destroyed) and then the other button appears (is created), and vice verse.

Next, look at the style element. There, we’ve defined a highlighted class. So, any element that has the highlighted class gets an outline and pastel yellow background.

Finally, we have the div with the ngClass attribute. Based on the syntax, we have declared that if the contentHighlighted property is true, then the highlighted class will be applied to this element. Conversely, if the contentHighlighted property is false, then the highlighted class will not be applied to this element. When you run the example code, you’ll see that as you toggle the buttons, the highlighted class is toggled on that element, and when it is applied, then that element gets the outline and pastel yellow background.

Video Example Code

If you want to download the example code, visit this Github page, and then follow the instructions: bit.ly/kcv-angular-ngClass

Sumary

The Angular Ngclass attribute allows you to programmatically apply one or more CSS classes to a DOM element. The CSS class is applied or removed, based on the result of a JavaScript expression, and any valid JavaScript expression can be used. This is much more efficient than manually applying or removing CSS classes. It just provides so much power when you’re trying to make small or large style changes to your component and its children.

How do I disable an HTML element with Angular ?

Angular

Angular logo - disable an html element

Set the disabled attribute to the result of an expression and Angular will disable / enable the element for you as needed.

Disable an HTML Element – Example # 1

In example # 1, we have our component. There are two properties we are interested in: count and buttonDisabled. We will leverage these in our template.

Disable an HTML Element – Example # 2

In example # 2, we have our template. There are three buttons. The first two buttons toggle each other. That is to say, when the first button is clicked it is destroyed, and the second button is created. Conversely, when the second button is clicked, it is destroyed and the first button is created. All of this happens because each button has an ngIf attribute. That attribute is watching for the value of the buttonDisabled property. Also, each button has a click attribute. In each case, clicking the button updates the value of the buttonDisabled property.

Important note: these two buttons are for demonstration purposes only. The focus of this article is the Angular [disabled] attribute.

Next, take a look at the third button. It has a disabled attribute. That attribute is set to toggle based on the buttonDisabled property. So when the buttonDisabled property is true, that third button is disabled. And when the buttonDisabled property is false, the third button is not disabled.

Video Example Code

If you want to download the example code, visit this Github page, and then follow the instructions: bit.ly/kcv-angular-disabled-attribute

How do I get the value of the selected dropdown menu item with Angular?

Angular

Angular logo -routing

Learn how to determine which dropdown menu the user selected in your Angular template, and get its value.

Dropdown elements provide a way to give your visitors choices. Technically, a dropdown element is actually a select element and each menu item in the dropdown is an option element. In a pure HTML-based form, there is virtually no work to do; the browser takes care of all the heavy-lifting. But with Angular, you need to do a little bit of the work. The key is to examine the event object. It contains information about the user’s action.

The reason that we care about the event object is that the select element contains one or more children, and we are going to attach a handler to the (change) event of the select element. But, hold on… even though a change event fired on the select element, we’re concerned with more than just the fact that there was a change; we want to know which one of the option elements was selected. So to do this, we need to take a look at the event object that is passed to the handler assigned to the change event of the select element. And when we look at that event object, we want to pay particular attention to the event target, and get its value. For instance: “event.target.value”, in Example #1.

Example # 1

In Example # 3 we have the contents or our component. There is a selectedDay property, which will be used to display the value of the selected dropdown menu item. There is also a selectChangeHandler method. This method takes an event object as its sole argument. When executed, this.selectedDay is set to the value of the event.target.value property.

So here, you’ll see our event handler because it’s generally considered best practice to define methods in your component, and then assign those methods to the event attributes of the HTML elements in your template. In Example # 2, however, you’ll see that we assign the selectChangeHandler method to the (click) attribute of our select element in the template.

Example # 2

In Example # 2, we have our Angular template. There is a select element, which has five option elements inside of it. Each of these option elements translates to a dropdown menu choice.

The select element has a change attribute. We assign that change attribute to the radioChangeHandler method, passing it the $event object. In ourselectChangeHandler method (see Example # 1), we take a look at the event object. That is, we want to know about its event.target.value property. We set the value of that property to the selectedDay property of our component (in the radioChangeHandler method, we refer to it as this.selectedDay). By setting the selectedDay property of our component, the UI is updated with whatever value is assigned to that property.

Video Example Code

If you want to download the example code, visit this Github page, and then follow the instructions: bit.ly/kcv-angular-option-get-value

Summary

So now we have the full picture: getting the value of the selected dropdown menu item with Angular requires that an event handler be set for the (change) attribute of a select element. But because select elements have one or more children (i.e. the option elements), we need to inspect the event object that is passed to the change event handler. And by referencing the value property of the event target, we can determine the selection that was made by the user. So this workflow requires a bit more effort than is usually the case with Angular, and part of the reason for that is: we are not using any other JavaScript library such as jQuery, so we need to use vanilla JavaScript in order to determine which drop down menu choice was selected. A little more work here, but to get to what you’re after, it’s worth it.

How do I get the value of the selected radio button with Angular?

Angular

Angular logo -routing

Learn how to determine which radio button the user selected in your Angular template, and get its value.

Radio buttons provide a way to give your visitors mutually exclusive choices. In a pure HTML-based form, there is virtually no work to do; the browser takes care of all the heavy-lifting. But with Angular, you need to do a little bit of the work. The key is to examine the event object. It contains information about the user’s action.

Now the reason that we care about the event object is that the select element contains one or more children. So we’re going to attach a handler to the (change) event of the select element. But, even though a change event fired on the select element, we’re concerned with more than just the fact that there was a change; we want to know which one of the option elements was selected. So to do this, we need to take a look at the event object that is passed to the handler which is assigned to the change event of the select element. And when we do look at that event object, we want to examine the event target, and get its value. Take, for instance: “event.target.value”, in Example #1.

Example # 1

In Example # 1, we have the contents of our component. There is a selectedDay property, which will be used to display the value of the selected radio button. There is also a days property. The days property is an array, which contains the five days of the work week. This array will be used in our template so that we don’t have have to actually create five radio buttons. We will use the ngFor directive to loop over the elements of this array. For each element in the array (i.e. for each “day of days”), we create a radio button.

We’ve leveraged the ngFor directive to create the radio buttons programmatically. And in Example # 2, you’ll see that we assign the radioChangeHandler method to the (click) attribute of each of the radio button elements in the template.

Example # 2

In Example # 2, we have our Angular template. Instead of manually writing out five radio buttons, we leverage theAngular ngFor directive. In this directive, we loop over the days array that was defined in our component (see Example # 1). In our ngFor directive, we provide the value: “let day of days“. This means that for each iteration of the loop, the element being referenced will be known as day. Each, time, we use that reference to create the radio button.

Each radio button has a change attribute. We assign that change attribute to the radioChangeHandler method, passing it the $event object. In our radioChangeHandler method (see Example # 1), we take a look at the event object. That is, we want to know about its event.target.value property. We set the value of that property to the selectedDay property of our component (in the radioChangeHandler method, we refer to it as this.selectedDay). But setting the selectedDay property of our component, the UI is updated with whatever value as assign to that property.

Video Example Code

If you want to download the example code, visit this Github page, and then follow the instructions: bit.ly/kcv-angular-radio-get-value

Summary

So here, we’ve found that getting the value of the selected Radio Button with Angular requires that an event handler be set for the (change) attribute of each element. We then see that we have to inspect the event object that is passed to the change event handler. Then, by referencing the value property of the event target, we can determine which radio button was clicked by the user. Now even though this workflow requires the use of vanilla JavaScript, which is a bit more effort than is usually the case with Angular, it’s worth it so we can make that determination about which Radio Button was clicked.

Angular Routing Basics

Angular

Angular logo -routing

Basic Angular routing is easy to set up. You’ll need to define your routes and the components that should handle each one, in routes.ts .

With any single page application, routing is important. The main reason for this is: users will spend most of their time on the same page. Angular provides routing for your application so that you can divide it into logical parts. These parts make sense not only from a UI perspective, but also programmatically. That is, you want each logical part of your application to live in a relatively small, organized collection of files.

So, let’s begin with what every Angular application needs, which is a routes.ts file. And even if you have only one route, it is best to set up your routing with routes.ts. The main reason for this is: you may want to expand your routing in the future, so why not include this in your application’s architecture now. It’s great planning. Also, you may want to define a component that should handle any routing errors (that is, which component should be instantiated if the user tries to navigate to a non-existing route). As you’ll see in the following examples, any components that will handle routes should be defined in app.module.ts, and then you can use them in your routes.ts file. So let’s take a look at those examples:

Example # 1

In Example # 1, we have our app.module.ts file. The important thing to note here is that you need to declare your components in this file. Our application has three routes: home, products and about. So we need to declare those components here in app.module.ts.

Example # 2

In Example # 2, we have routes.ts. This is where we set up our routes. There is a Routes constant, and it is an array. Each element in this array is an object. Each object has a path property and a component property. The path property defines the string that represents the route that appears in the address bar. For example: “/#/home”. The component property determines which component will handle this route. In each case, the component that matches the specified path property is defined.

You may have noticed that although we have three routes, there are four elements in this array. This is because we have defined a default route. The first element in the array has a path property of: “” (an empty string). It does not have a component property. However, it does have a redirectTo property. What this means is: when a route is not specified, redirect to the home route. So, when the user navigates to the root of the application (i.e. “/”), they are taken to the home route. This value can be any one of our existing routes, so we could have also configured products as the default route.

Example # 3

In Example # 3, we have the HTML for our navigation component. For each navigation item, there is a [routerLink] attribute. This connects the appropriate route to the click event of that HTML element. In each case, the appropriate route has been defined.

So now, whenever a navigation item is clicked, its [routerLink] attribute connects that action to the appropriate component. This will happen because we set a one-to-one mapping between routes and components in the routes.ts file. So, for example, we can have something like: [routerLink]=”[ ‘/home’]”.

Video Example Code

If you want to download the example code, visit this Github page, and then follow the instructions: bit.ly/kcv-angular-routing-basics

Summary

Routing allows you to organize your code into logical units that mirror the navigation choices available to the user, and that’s a good thing. In fact, defining your routing in a routes.ts file is considered a best practice. The routes.ts file provides a one-to-one mapping between routes and the components that should handle each route respectively. And your routes.ts file also allows you to define which component should handle cases in which a non-existent route is attempted. But don’t forget that essential detail: each component that you leverage in routes.ts must first be defined in your app.module.ts file. Routing in Angular is not difficult, but it does require some effort when you start putting together your application. These basics are an important part of any single page application.

Angular HTTP get basics

Angular

Angular logo - httpMaking an HTTP get request with Angular is fairly simple. What may seem a bit different is the way that you handle the request. Instead of nested callbacks, you set up a subscription that can handle a stream of data.

It’s difficult to imagine an Angular application that does not make HTTP GET requests, because making network requests is at the very heart of any Angular application. It’s one of the basics. And for any front-end web developer, an HTTP GET request should be nothing new; it’s a simple one-way transaction. You simply request a remote resource such as a HTML file, CSS file or JavaScript file, and that resource is returned to you. Most front-end web developers will leverage a JavaScript library such as jQuery to make HTTP GET requests, rather than piecing together vanilla JavaScript which has to instantiate the XMLHttpRequest object. But while there is nothing wrong with this approach, it can result in boilerplate code and much of that code will become difficult to manage as it scales. So, most would agree that this should really be avoided.

Angular’s HTTP module provides a get method, and on a very high level, it provides similar functionality to the jQuery.get() method. The biggest difference between the jQuery.get() method and the Angular HTTP.get method, is in what each returns. While the jQuery.get() method returns a promise, the Angular HTTP.get method returns an observable. Important to note that this observable is markedly more sophisticated than a JavaScript promise. You subscribe to this observable, rather than passing a callback to it (as is the case with a promise). Significantly, as a subscriber of this observable, you are notified any time the data stream changes. For a closer look, take check out the examples that follow.

Example # 1

In Example # 1, we have our home component. We have imported RXJS components because we will need those in order to handle the HTTP get request. In this case, the real action happens in the ngOnInit method. This method is executed when the component is initialized, so we know that our code will be executed each time the user navigates to this route. Inside the ngOnInit method, we get ahold of the http service (i.e. this.http), and execute the get method, passing it the URL of the HTTP request we need to make. We then chain the map method to the result of this get request, returning JSON.

Next, we chain the subscribe method. Here we are setting up a subscription to this data. What this means is: whenever there is new data, we want to “know about it”. We pass an anonymous function to the subscribe method, and inside of that function, we can handle the new data. In this case, what we do is set this.destinations to the new data.  The reference: this.destinations  is the destinations property of our component. We use the “this” keyword because we are inside of a method, and the “this” keyword gives us access to the component. Setting this.destinations  to the streamed data will update the UI, which we will look at next.

Example # 2

In Example # 2, we have our Angular template. This is an unordered list. There are numerous destinations in our streamed JSON data, but we only create one list item. The reason for this is: we use the ngFor attribute to create a list item for every destination in the destinations array. In each iteration of this array, we reference the destination variable, and display the various properties of that object such as countryCode, nameduration and price. These values appear in the UI.

Video Example Code

If you want to download the example code, visit this Github page, and then follow the instructions: bit.ly/kcv-angular-http-get

Summary

Unlike the jQuery.get() method, Angular’s HTTP.get() method returns an observable (rather than a promise), and observables are more sophisticated than promises. We also know that when you subscribe to an observable, you are notified each time the data stream is updated. Another strength of the observable design pattern is that it allows for more than one party to subscribe to it, and these subscriptions can be cancelled at any time. Now while the syntax needed to set up an HTTP GET request in Angular is fairly simple, consuming observables might take a little getting used to. But it’s every bit worth the effort: observables are powerful.

How do I set up an Angular click-event handler?

Angular

Angular logo - click

Setting up a click event handler in Angular requires the click attribute and an expression or method assignment.

It’s hard to imagine any modern web page that does not have at least one click-event handler. And while anchor tags provide a scripting-free way of taking the user to a new web address, JavaScript event handlers are a common trait among web pages today. But setting up up a click-event handler that would require you to make some kind of connection between the HTML and a JavaScript method that lives somewhere in your code. In vanilla JavaScript, this means a tight-coupling between your HTML and JS code. Just keep in mind, though, that even with a library such as jQuery, managing click-event handlers can become tedious.

Angular makes event handlers simple: you add a click attribute to the element. The value you assign to this attribute depends on the approach you want to take. You can provide an expression that Angular will evaluate. For example: count = count + 1. This means that when the element is clicked you want Angular to increase the value of the count property by one. You can also assign a method. This means that you want Angular to execute a method when the element is clicked. You can also pass parameters to this method.

Let’s look at a couple of examples, to see how this works:

Example # 1

In Example # 1, we have our component. Note the content property, which is a string and the count property, which is a number. We will display these properties in the UI. There is also a setMessage1 method. This method assigns a value to the content property. We refer to the content property as this.content inside of that method because the this keyword provides access to the object to which this method belongs.

Example # 2

In Example # 2, we have our template. There are three buttons. Each has a click event handler set up via the click attribute. The first button has a method assigned to the click attribute. We reviewed the setMessage1 method in the first example. This method sets the content property to  “This is message # 1”. This allows us to see in the UI that the first button was clicked. This approach is mostly likely one you’ll take when setting up a click event handler with Angular. The advantage here is that inside of the setMessage1 method, you can execute more than one task (i.e. you could do more than simply set the value of the the content property).

The second button takes a different approach: it sets the value of the content property directly. This is because an expression is provided as a value to the click attribute: “This is message # 2”. This approach is perfectly fine, but somewhat limited; you can only accomplish one thing.

The third button takes the same approach, but instead of setting the content property, it increases the count property. Also, the button’s text is updated by the {{count}} binding.

Video Example Code

If you want to download the example code, visit this Github page, and then follow the instructions: bit.ly/kcv-angular-click-attribute

Summary

The key to setting a click event handler in an Angular template is the (click) attribute, and you now know that you can take one of two approaches: 1) you can assign a valid JavaScript expression to the (click) attribute, for example: “count = count + 1” or, 2) you can assign a method to the (click) attribute, as long as that method is a property of the component to which the template belongs.
Just keep in mind that the first approach is limited in that you can only accomplish one task when the element is clicked. The second approach, on the other hand, is more powerful; in the method that you assign to the (click) attribute, you can execute arbitrary code, which means that a limitless number of tasks can be accomplished. So the thing for you to do, at the outset, is to decide which approach is best for what you’re planning to do.