Getting Started with the Google Maps JavaScript API – Part I

JavaScript

Google Maps
Getting a Google Map to show in a web page requires an astonishingly small amount of JavaScript. In this article, we’ll show the user where they are on earth in 12 lines of code.

Since 2005, the Google Maps API has driven one of the most popular web-based applications ever: Google Maps. What I find so appealing about the Google Maps JavaScript API is the relatively small amount of code needed to display a map in a web page. And of course when you do, it’s pretty magical: you are prompted by the browser to allow the page to use your location, and “poof” there you are!

The Google Maps API is a topic worthy of a deep discussion. In this article, we’ll just cover the absolute basics needed to get a map on the page. I chose to limit Part I to this scope because quite often, if you can just “get it to work,” a topic will seem more approachable, and easier to digest.

Ok, let’s show a Google Map on a web page!

Example # 1

In Example # 1, we test to see if the user’s browser supports Geolocation. Specifically, we check to see if the navigator object has a property called “geolocation.” If this property does exist, then we call its .getCurrentPosition() method, passing it a callback. In this case, the callback is a function named “successHandler,” which we will discuss next.

Example # 2

In Example # 2, we have the successHandler function. This is the callback that we have provided to the getCurrentPosition() method. This callback will receive a “position” object as its first argument. That position object holds the data that we will need to provide to the Google Maps API.

Using the latitude and longitude properties of the position object’s “coords” object, we can now instantiate the Map() constructor, which is a property of the google.maps object. When instantiating the Map() constructor, we provide two arguments: a reference to the DOM element in which the map will be displayed, and an object literal, containing display settings:

zoom: Tells the map how much to zoom in when first displaying
center: the “place on earth” on which the map should be centered. Here we instantiate the LatLang() constructor, passing it the latitude and longitude values that were obtained by the geolocation.getCurrentPosition() method
mapTypeId: The type of map to show. The four possible values are: ROADMAP, SATELLITE, HYBRID, and TERRAIN

Example # 3

In Example # 3, we have the full code for this article’s working demo. Here, the exact same code that we discussed in Examples 1 & 2 are used in the context of a full web page.

Here is the JsFiddle.net link for this article’s working demo: http://jsfiddle.net/uQ35v/

Summary

In this article we learned about the absolute basics of the Google Maps JavaScript API. We discussed the need to implement the geolocation.getCurrentPosition() method to get the user’s location and how to provide that information to the Google Maps API to show a basic map on the page. In Part II, we will discuss some of the features that are available when displaying a Google map in a web page.

Helpful Links for the Google Maps JavaScript API.

https://developers.google.com/maps/documentation/javascript/reference

https://developers.google.com/maps/documentation/javascript/tutorial

https://en.wikipedia.org/wiki/Google_Maps

HTML5 Offline Web Applications | Part III: The applicationCache JavaScript Object

HTML5

HTML5 LogoThe cache manifest file allows you to easily set up an HTML5 offline application. The applicationCache JavaScript Object allows you to monitor and act upon the events that take place as your app loads.

In Part I of this article, we learned the basics of creating HTML5 Offline Web Applications. In Part II, we learned about the “FALLBACK:” section, allowing us to provide default assets for files and pages that we do not want to be available offline. In this third part, we will learn about the events that fire during the process of loading your application.

The key to using JavaScript to interact with your HTML5 offline application is the global applicationCache object. This object has properties that we may want to know about and events that we may want to monitor.

It might make more sense to view the full working example first. This way the content of this article will make more sense. http://examples.kevinchisholm.com/html5/offline-web-apps/example-3/index.php

Example # 1

In Example # 1, we have our cache manifest file. The only thing here that is new is the file: cache-events.js. This is the JavaScript that will interact with the page.
text

File Structure

Image # 1

App File Structure

In Image # 1, we see the file structure of our application. I’ve consolidated the HEAD tag for each page into head.php, and cache-events.js is consolidated in footer.php.

Example # 2

In Example # 2 we have a simple function that takes a message as an argument and appends it to the DOM as an update. This will make more sense when you see the working example.

Example # 3

In Example # 3, we assign a function to the document’s “onreadystatechange” event. Whenever this event fires, we will add a list item element to the DOM, with the current value of the document’s readyState property. If that value happens to be “complete”, we add a message which lets us know whether or not we are online.

Example # 4


In Example # 4, we add an event listener to the applicationCache object. Each time an event fires on that object, we check to see if the event is named “updateready”. If so, we know that the cache manifest file has changed. The browser will update the UI the NEXT time the page is loaded. We inform the user that there is an update to the app, and ask if they want to reload. If they click “yes”, then we force a reload of the page, which will force the browser to use the newly cached assets.

Example # 5


In Example # 5, we add a series of event listeners to the applicationCache object. In each case, we call our logEvent() function. This function takes the event object as its first argument. In the logEvent() function, we examine the event object’s “type” property, and then call the updateUI function, in order to update the web page.

Image # 2

Ready State Events

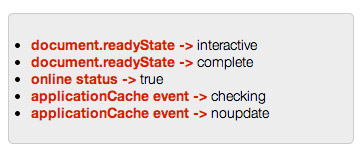
In Image # 2, we see our JavaScript code in action. We see that the readyStateChange event fires twice. The first value of the readyState property is “interactive”, which means that the page is downloading. The second value is “complete”. At this point, we check our online status, which is “true”. If you turn your internet connection off and reload the page, that value would be “false”. We also see that two applicationCache events fire: “checking” and “noupdate”. This means that the browser checked to see if the cache manifest file changed, and in this case, there was no change.

Image # 3

Ready State Events

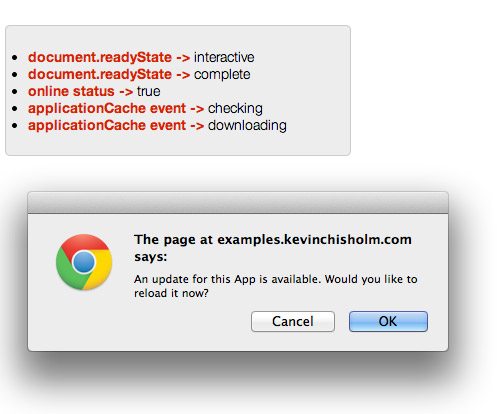
In Image # 3, we see that after the applicationCache event: “checking” fires, the “downloading” event fires. This is because the browser found that the cache manifest file has changed. Our JavaScript code prompts the user, asking if he or she wants to reload the page.
Image # 4

App Cache Error

Image # 5

App Cache Error in the JS Console

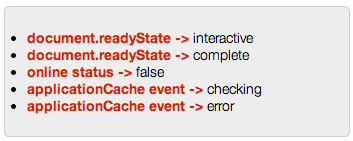
In Image # 4, we see that an error event has fired. Image # 5 shows the JavaScript console. We see that this error is expected because we are offline, so the cache manifest file cannot be checked.

Summary

In this article, we learned how to interact with HTML5 Offline Web Applications through JavaScript. We learned about the global applicationCache JavaScript object. We discussed the properties of this object that can be useful, and how to add event listeners so that we can monitor the activities of our offline web application.

Helpful Links for the HTML5 Application Cache JavaScript API

http://www.bennadel.com/blog/2029-Using-HTML5-Offline-Application-Cache-Events-In-Javascript.htm

http://motyar.blogspot.com/2011/09/handling-html5-application-cache-with.html

How to Turn the Query String Into a JavaScript Object

Object-Oriented JavaScript

JavaScript LogoIt is fairly common for any front-end web developer to examine the query string. If jQuery has taught us anything, that would be the power of abstraction: create functionality once, and then use that functionality as a tool over and over, as needed.

When working with the query string, it is usually best to grab it once, and then be done with that task. This will prove substantially helpful if you need to refer to the query string more than once in your code. If we do the work once, and do it right, then we have created a nice little tool that we can use over and over throughout our code.

So perhaps the best way to accomplish this task is to turn the query string into a JavaScript object. Simple stuff here. Let’s lay out our plan of attack:

  1. Get a reference to the Query String
  2. Chop off the question mark (we don’t need that)
  3. Turn the key/values into elements of an array
  4. Turn each key/value pair into a little two-element array
  5. Populate our object with each key/value as a propertyName / propertyValue
  6. We’re done!

So okay, let’s get to work.

Example # 1

In Example # 1 we have the raw and basic code needed to accomplish our task. I won’t go into any detail here. I just wanted to illustrate that the actual code needed is fairly minimal. So, if you run this code in your JavaScript console, and you have appended a query string to the page URL, you should see the object we created in the console.

Example # 2

In Example # 2, we expanded out the code with comments to make it easier to follow along. I won’t replicate each comment, but from a high-level perspective, here are the steps we take:

  1. Declare our variables at the top of the function (just good form)
  2. Get a reference to the query string, and chop off the question mark (i.e. omit “?”)
  3. Turn the query string into an array, using “&” as a delimiter
  4. Take that array, and split each element into a sub-array, using “=” as a delimiter
  5. That sub-array will always be a two-element array because on the left of the “=” is a key, and on the right side of it is a value
  6. Turn those two sub-array elements into a new “property / value” pair for our return object
  7. Repeat the last two steps for each sub array that was generated, by splitting the first array at “&”
  8. Now return our new object

Example # 3

In Example # 3, we added functionality that allows us to inject the values of our new object into the DOM. We use a for-in loop to iterate over the properties of our object. For each iteration of that loop, we inject a new LI element, with the appropriate markup for presentation. Note how we are using the variable “prop” and we also make a reference to “queryObject[prop]” which holds the value of the current property over which we are iterating.

Example # 4

In Example # 4, we have the full source code for our completed working example.

Here is the link to our full working example: http://examples.kevinchisholm.com/javascript/query-string/to-object/?fname=alfred&lname=newman&acctNum=010203&salesRegion=EastCoast&company=MadMagazine

Summary

In this article, we took at look at one way in which you can turn the query string into a JavaScript object. We learned how to get a reference to the query string, omit the question mark, turn the key/value pairs into an array, and then work with each element of that array to turn them into properties of our new object. We also learned how to inspect our new object and inject it into the DOM as markup.

Helpful Links for working with the Query String using JavaScript

http://en.wikipedia.org/wiki/Query_string
http://joncom.be/code/javascript-querystring-values/
http://stackoverflow.com/questions/901115/how-can-i-get-query-string-values
http://stackoverflow.com/questions/647259/javascript-query-string

JSONP With Only Native JavaScript – Part I

JSON

JavaScript LogoMost front-end developers consume JSON at some point. It has become commonplace nowadays to fetch data from a cross-domain site and present that data in your page. JSON is lightweight, easy to consume and one of the best things to come along in a while.

Another one of the best things to come along has been this:

jQuery.getJSON()

jQuery makes fetching JSON trivial. And there ain’t nothin’ wrong with that. But it’s not a bad idea to have a solid understanding of exactly what is going on under the hood.

The big advantage of JSONP is that it allows data to be retrieved from any URL on the planet with no concern for the kind of cross-domain limitations of AJAX. So this means that we are taking advantage of one of the older features of the JavaScript language: the ability to inject a remote script into our page. In a nutshell, JSONP is accomplished via dynamic script injection. In other words, you create a script tag, set the ‘src’ attribute to be any script you like, and that script calls a function in your page, passing it some data.

Now in the real world, your remote script would likely be produced by an API that supports JSONP. In these cases you have probably seen the URL of JSONP call look something like this:

http://www.somedomain.com?callback=

This is a more sophisticated approach and will be covered in Part II. For now, however, we will keep things very simple. In order to do so, we have to have an agreement between our JSON file and our web page. Our web page has a function expression that makes that function available, and the JSON file knows to call that function.

First, let’s take a look at our JSON file.

Example # 1

Example # 1 is our JSON file. It is really just a JavaScript file. It consists of one function call: jsonpCallback(). The sole argument to this function call is an array of objects. Each object has two properties: ‘name’ and ‘accountNumber’.

We’ll come back to this file shortly. For now, it’s just important to focus on the fact that this is simply a JavaScript file that makes a function call, and passes an array to that function.

Example # 2

In Example # 2, we have the markup for our web page. Now there are two things happening here:

1) The function declaration jsonpCallback() might look familiar to you. This is the function that is called from our JavaScript file ‘data.js’. Notice that this function takes one argument: ‘data’. So it expects to receive some data. Inside the function we assume that the data came through and we inspect it in the console.

2) After the function declaration, we dynamically append a script to the head of the document. Now if you take a close look at the ‘src’ attribute of our script, you’ll see that it is ‘data.js’

Putting the pieces together

Now that we have the details laid out, let’s walk through the sequence of events:

  1. The page loads, and the function declaration for jsonpCallback() is evaluated
  2. jsonpCallback() now exists and can be called
  3. We dynamically append a script tag to the page
  4. The URL for this new script tag is data.js
  5. data.js is loaded and the code inside of it executed
  6. data.js calls the function jsonpCallback(), and passes it the array of data
  7. jsonpCallback() receives the data passed to it and we inspect it in the console

Again, this is an extremely rudimentary example. The focus here was to illustrate the core concepts in play: dynamic script injection and passing data to a function. In Part II, we will look at a more dynamic approach to JSONP.

Here is a link to the working example for this argument: http://examples.kevinchisholm.com/javascript/jsonp/example-1/

Summary

In this article we learned how to implement JSONP using only native JavaScript. We discussed how the script that we dynamically inject into the page calls a function, passing data into the function that it calls.

Helpful Links for JSONP

http://en.wikipedia.org/wiki/JSONP

http://json-p.org/

http://remysharp.com/2007/10/08/what-is-jsonp/

Cross-Browser Asynchronous JavaScript Script Loading

Asynchronous

JavaScript LogoWhile it is perfectly normal to have one or more JavaScript tags in your markup as prerequisites to your code, there may be situations in which you want to avoid this

When I build a piece of functionality that is contained in one JavaScript file, I try to avoid asking the back-end developer to include additional scripts in the markup. So, my philosophy is: my script provides a certain “chunk” of functionality. Whatever external resources my script depends on are my script’s problem and will be handled accordingly. As often as possible, I’d like the consumer to simply choose to use or not use my script. This decision should involve simply adding or removing my script from the markup. The remaining abstraction is my responsibility.

This may seem a bit altruistic, but so far I’ve never had to lower my standards on the issue. The key to keeping this philosophy is, of course, the ability to reliably load other scripts asynchronously. I say “reliably” because it’s not enough to simply inject the script into the head of the document. You need to know when that script has successfully loaded before you take further actions that depend on the script.

The good news is: modern browsers provide the “onload” event, allowing you to set up your handler without too much effort. But the bad new is: Microsoft’s Internet Explorer 8 and below do not implement that event. So, there is some work to do. It’s not too bad; it just means we need to fork our code a bit.

Oh, and by the way; you might be wondering why I didn’t simply use the jQuery.getScript() method. jQuery is awesome and we all love it more than coconut ice cream. But I strongly believe that it’s important to know how to do these things with native JavaScript. One day a client will tell you that for whatever reason, you can’t use jQuery. When that day comes, you’ll be ready.

So let’s have at it!

Example # 1

Now here in Example # 1, we’ve created a function that takes a URL and a callback as arguments. The URL is required, the callback is optional. As you can see, this is pretty straightforward stuff:

  1. Create a script DOM element
  2. Assign an anonymous function to the “onload” event
  3. Set the script’s source
  4. Inject the script into the DOM

No worries.

Example # 2

In Example # 2 we have rolled up our pant legs and stepped into the cold wet mud that is Internet Explorer 8 (and below). So here we will need to assign that same anonymous function to the script element’s “onreadystatechange” property. And this property will change as the “ready state” of the script element updates. When that ready state is “loaded”, then we can be confident that the external script has successfully loaded and executed. It’s a bit more work, but then again, Internet Explorer wouldn’t be such a charming little browser if it adhered to the same kind of common-sense standards as every other modern browser on the planet… but I digress.

Example # 3

Well… Example # 3 certainly contains a bit more code, huh? In fairness, it’s heavily commented. But outside of that, what has happened is that as promised, we’ve forked the code so that we can support good ol’ IE, as well as all the other browsers that are made by sane people. I chose to check for the existence of document.attachEvent as a way of sniffing the browser. Some may disagree, but for me, it has always worked just fine.

If you follow the link to the full working example below, be sure to open your JavaScript console. When you do, you’ll see that the message from the actual external script always fires before the callback. Always. This is what we needed: the ability to load the script, and reliably know when it has loaded so that we can safely assume whatever resources it provides are available to us. So go ahead and try it in Internet Explorer 8 or Internet Explorer 7; it works just fine.

The full working example can be found here: http://examples.kevinchisholm.com/javascript/script-loading/

Summary

In this article, we learned how to implement a reliable solution for cross-browser asynchronous JavaScript loading. We discussed the need to fork our code in order to support Internet Explorer 8 (and below), and the “onreadystatechange” event that it implements.

Helpful Links for JavaScript loading

http://css-tricks.com/thinking-async/

http://friendlybit.com/js/lazy-loading-asyncronous-javascript/

Making JSONP Calls from HTML5 Web Workers

HTML5

HTML5 LogoThe importScripts() function can be used to load any JavaScript file asynchronously from within a Web Worker, making JSONP a snap.

I just put the finishing touches on a photo gallery for a fairly large commercial web site. This template involved two dependencies: mustache.js and a jQuery carousel plugin, as well as three JSONP calls. All of this has to happen before anything can be displayed in the browser. Fun stuff.

I’ve spent plenty of time pressing F5 over and over to see how many milliseconds I could shave off the page load time. Since there is a bit of data crunching that also has to happen once all dependencies and JSONP calls have loaded, I started to think that this project would be a perfect candidate for some Web Worker love (of course with a safety net for older browsers). After some A/B testing, I could see that there was no real savings when implementing Web Workers. This is because the average 3-second load time was mostly due to the multiple asynchronous calls, not the data crunching. Since asynchronous calls are asynchronous, they don’t lock-up the browser, and it is only their latency that “keeps us waiting.”

That said, in the process of setting up my A/B testing, I had fun messing with Web Workers, and picked up a few new tricks, so I thought I’d post an article about making JSONP calls from a Web Worker.

If you’re not too familiar with HTML5 Web Workers, you might want to read these three posts; they offer an overview and a quick dive in to the topic:

Getting Started with HTML5 Web Workers – Part I
Getting Started with HTML5 Web Workers – Part II
Getting Started with HTML5 Web Workers – Part III

Before diving into the Web Worker code, I’ll just mention that the JSONP call we make responds pretty quickly, almost too quickly. As a result, it’s tough to demo our Web Worker, because there is no sense of “wait” (I spent over an hour making a pretty “loading” experience that merely flickers for a nanosecond because the JSONP call returns so quickly : – ). So I’ve implemented a “sleep” feature: we add &sleep=NUMBER to the query string. This way, we can make the JSONP call perform a little slowly, which helps to demonstrate our topic. Here is the PHP code that is added to the top of the JSONP file:

Ok, a little JSONP / Web Worker Action Please!

Example # 1

In Example # 1, we have the code for our Web Worker. First, there is the JSONP callback. In this callback, we fire off a message to the script that started the worker, and pass it the JSON data. Note that we need to use JSON.stringify() to convert that JSON data to a string. This is because we can only pass strings as messages to and from a Web Worker. But if we “stringify” a JSON object, that will do just fine.

Next we have set up an event listener. When the calling script sends a message to this Worker, the code inside of the event listener is executed. We create a random integer which is used to tell the JSON page to “sleep” for a few seconds, imitating a slow response. The other random # is used as a cache buster.

After that, we simply make the JSONP call. The importScripts() is oh-so-lovely and makes it super easy to import any JavaScript file.

Example # 2

In Example # 2, we have a simplified version of the click handler for the “Make JSONP Call” button. It simply sends a message to the Worker, which “starts” it.

Example # 3

In Example # 3, we instantiate the Worker() constructor, and then set up the event listener for that Worker. The code inside of this event listener will be executed when the Worker sends this script a message. I won’t drive you nuts by going through it line-by-line, but on a high level, we take the JSON data that the Worker sends us, and use JSON.parse() to turn it back into an object. Then, leveraging Mustache.js, we create an unordered list, using the JSON data that the Worker fetched for us.

Here is a link to the full working example for this article. Make sure you click the “Make JSONP Call” button: http://examples.kevinchisholm.com/javascript/web-workers/jsonp/

Summary

Again, the very act of making an asynchronous script call is not so strenuous for the browser. But I can imagine a case in which you need to fetch some JSON and then crunch the return data before passing it to the calling script. In such a case, the “crunching” is what could bog down the browser. And since data you pass to a Web Worker is essentially “copied,” your script could wind up using more memory than necessary, by getting the JSON data, passing a copy of it to the Web Worker, and then getting a copy back from the Worker once it has finished doing some work on the data. That is three copies of the same chunk of data!

By initiating your JSONP call from the Web Worker, you get the data, crunch the data, and then pass the data to the calling script. This removes one “copy” from the whole scenario. And, I’m thinking that after sending the data from the Worker to the calling script, you could probably delete the data inside of the Worker, freeing-memory. Although it will probably get cleaned up by garbage collection. More fun stuff to investigate.

Happy Web Worker-ing!

Kevin

Helpful Links for Web Workers

http://www.sitepoint.com/javascript-threading-html5-web-workers/

http://www.storminthecastle.com/2013/04/19/make-your-ui-more-responsive-with-html5-web-workers/

http://www.codediesel.com/javascript/introducing-html5-web-workers/

http://refcardz.dzone.com/refcardz/html5-web-workers

http://www.tutorialspoint.com/html5/html5_web_workers.htm

Complex Multiple Script Loading Using the jQuery.when() Method and the jQuery.Deferred Object — Part II

jQuery

jQuery LogoWhat happens when your JavaScript code depends on not only multiple asynchronous scripts, but also one or more JSONP calls? Once again, jQuery.Deferred() and jQuery.when() save the day.

In Part I of this article: “Complex Multiple Script Loading Using the jQuery.when() Method and the jQuery.Deferred Object Part I“, we discussed the complex nature of multiple asynchronous dependencies. In that article, we were able to count on jQuery.when() to pay attention to the resolution of our jQuery.Deferred objects. In this second part, we’ll complicate things even further by adding a JSONP dependency. The “complication” is the fact that the success of the JSONP call requires us to re-think how we will leverage our jQuery.Deferred object’s resolution.

In my opinion, the asynchronous script calls are fairly easy to manage:

But what about a JSONP call? How do we squeeze that scenario into the jQuery.Deferred / jQuery.when() paradigm?

The approach I have taken starts with a variable that is set to an unresolved jQuery.Deferred object. As soon as you create this variable, you can then program around it. In the true spirit of JSONP, you can name your callback whatever you want. If the server supports JSONP, then you can assume that it will call your callback, passing in the much-desired return data.

Here is a pseudo-code walk-through:

Example # 1

In Example # 1, we have the core code that makes this all work. The interesting thing is that the actual JSONP call comes last. What we do beforehand is set up the tools we need to handle this asynchronous event. What makes this scenario a bit special is that you manually resolve the jQuery.Deferred object in the JSONP callback: “foo.resolve()”. This very nicely kicks in the .when() method that is chained to the return value of the jQuery.when() call.

Example # 2

In Example # 2, we have the code for the full working example. It builds upon the full working example from Part I of this article, but the added functionality has no connection to the form validation. The point that is (hopefully) being made here is:

  • This code provides a way to ensure that multiple asynchronously loaded dependencies are loaded before further action is taken.
  • This code checks to see if any of the asynchronously loaded dependencies have already been loaded in the page (possibly by hard-coded synchronous calls or another script).
  • This code allows for the inclusion of an asynchronously loaded JSONP dependency.

Going through the code line-by-line would be repetitive as that was already done in Part I. What might be helpful is to look at the code and see where the approach taken in Example # 1 has been worked into the full working code (Example # 2).

Here is the URL for the full working example: http://examples.kevinchisholm.com/jquery/deferred-and-when/complex-multi-async-dependencies.html

Summary

In this article we learned how to accommodate a JSONP call as an asynchronous dependency. We leveraged the jQuery.Deferred object and the jQuery.when() method to manage and act upon the resolution of the JSONP call.

Complex Multiple Script Loading Using the jQuery.when() Method and the jQuery.Deferred Object Part I

jQuery

jQuery LogoThe jQuery.when() method allows you to treat multiple asynchronous script calls as one logical event. But what if there is a chance that one or more dependencies are already loaded?

I just completed a project for a client that involved some tricky script loading logic. I had to use a jQuery plugin and icanhaz.js for templating (I prefer Mustache.js, but the previous developer had implemented icanhaz.js in many of the site’s templates). Now the difficult thing was that I had already written some JavaScript code that lazy-loads touts in the main navigation bar, which appears on every page in the site. So, the situation in hand was as follows:

  • My JavaScript depends on icanhaz.js and a jQuery plugin
  • icanhaz.js is asynchronously loaded further up the page
  • Since icanhaz.js is loaded asynchronously, I can’t assume it’s loaded when my new code runs
  • I don’t want to load icanhaz.js twice

eeesh….

I knew I could count on the jQuery.when() method to handle the multiple asynchronous script loads. Specifically, jQuery.when() can treat two or more asynchronous script load events as one event. The completion of the multiple events can represent one completed event, which can be used to tell the rest of your code: “hey, we have what we need, let’s proceed.” But at first I was not sure how to abstract the details of whether or not a script is already loaded. For example, If icanhaz.js has already been loaded in the page, I don’t want to waste time by loading it again (and potentially cause unexpected behavior because it loaded twice).

So I decided to leverage the jQuery.deferred constructor.

In short, for each script that needed to be loaded (i.e. each dependency), I wrote a function that checks to see if that script was already loaded. If so, then the function returns a resolved jQuery.deferred instance. If not, then I simply use the jQuery.when() method to wrap a jQuery.getScript() call, which returns an unresolved jQuery.deferred instance. So either way, my function returns a jQuery.deferred instance. This is perfect because jQuery can easily understand (and act upon) the “state” of a jQuery.deferred instance. And most importantly, jQuery can view multiple jQuery.deferred instances as one “event”.

“…..hmmmm Idunno Kevin, this is all starting to sound a little convoluted to me!”

I had similar feelings when I was working this out in my head. But once I fired up my JavaScript console, and started testing the code, it was not only easy to understand the logic, it worked flawlessly (serious kudos to the jQuery folks; these are awesome features).

So, for this article, I decided to use Mustache.js and the jQuery validation plugin as my dependencies. Mustache.js will be used to build the form and the jQuery validation plugin will provide form validation.

Example # 1

In Example # 1, we simply have the markup for the page. Not too much going on here: a page wrapper and two header elements. What it does illustrate is that the form and the validation you see when you run the final working example is all handled by our two dependencies: Mustache.js and the jQuery form validation plugin.

Example # 2

Now, in Example # 2, we have provided two constants which are simply the URLs for the script calls that we (might) have to make. This is a pattern that I like to follow, which can help to minimize clutter in your implementation code; make values that will never change constants and put them all in one coherent place.

The variable “data” simply holds an object literal that will be used by Mustache.js to populate the template, and the variable “template” is the string used by Mustache.js to create the template. (Notice the values inside of the double curly brackets: “{{}}”; these all map to properties in the “data” object.)

Example # 3

In Example # 3, we have a function that always returns a jQuery.deferred instance. The if/else statement provides two possible outcomes: Mustache.js is already loaded in the page or Mustache.js is not loaded. We test for the existence of window.Mustache (and the value of its “name” property) in order to determine the answer. If Mustache.js is already loaded, then we simply return a resolved jQuery.deferred object. If it is not, we then return a call to jQuery.when(), passing a jQuery.getScript() call as an argument. The jQuery.when method returns a jQuery.deferred instance that is in an “unresolved” state until the getScript() call completes.

The key point here is that even though in this case our function returns an un-resolved jQuery.deferred instance, the fact that it is a jQuery.deferred object is all we need.

So there is no need to walk through the function that does the same thing for the jQuery validation plugin; the logic is exactly the same. If you look at the code for the full working example at the end of this article, you’ll see that the only difference is the URL for the script that is loaded, and the way in which we determine if the plugin exists (i.e. we check for the existence of a property of the jQuery.prototype object named “formval”).

Example # 4

Now here in Example # 4, we create two variables. Both variables become a jQuery.deferred object because in each case, the variable is being set to the return value of the methods we just discussed in Example # 3: each of these methods returns a jQuery.deferred object. Again, these objects are in either a “pending” or “resolved” state, depending on whether or not the specified script was loaded.

Example # 5

{ //build the markup fom the template (uses Mustache.js) var form = Mustache.render(template,data); //inject the form $(‘#container’).append(form); //setup the form for validation (form validation plugin) $(‘#testform’).formval(); });

In Example # 5, look very closely at the first line: $.when(formValIsLoaded,mustacheIsLoaded). Essentially, this line says: “When the two arguments resolve…” that is, when both of these argument’s “state” changes to “resolved”. Now this is important because it’s treating the resolution of two or more events as one event. For example:

Event-A.completed + Event-B.completed = Event-C.done

So, this $.when() method will return when all of the arguments have a “resolved” state. Since the return value is also a jQuery.deferred object, then we can utilize its .done() method. We pass an anonymous function as an argument to the .when() method. This function will execute when all of the arguments of the .when() method are resolved.

Once we are inside of the anonymous function, we can be confident that our dependencies are loaded. At this point, there are just a couple of things left to do:

  • Create our form, using the Mustache.render() method, and inject it into the DOM
  • Set up validation using the jQuery.validation plugin

So, here we have it, the end result of all this work we have done, which is a simple one-field form. When you view the full working example (see link below), you can click the submit button to see the validation fail, which will cause the error message to show. And the label for the name field, the submit button’s text and the error message have all been supplied by the “data” variable in our code, which if you remember, is an object literal that contained all of those string values.

Example # 6

In Example # 6, we have the full code for our working example.

Here is the JsFiddle.net link for our full working example: http://jsfiddle.net/Ebj4v/5/

Final Proof of Concept

In the links that follow, we have added script tags to the code. In the first two cases, one of our dependencies is pre-loaded. In the third case both are pre-loaded. Chrome does not like the mimetype of the scripts as they are served from github.com, so please view these examples in FireFox. Open up your JavaScript console when viewing the examples. In each case, you will see a message indicating which dependency was pre-loaded. In all three cases, the resulting behaviour is the same: our code checks to see if a dependency is loaded, if so, great, and if not it loads it.

Mustache.js preloaded: http://jsfiddle.net/Ebj4v/6/

jQuery.validation plugin preloaded: http://jsfiddle.net/Ebj4v/7/

Both Mustache.js and jQuery.validation plugin preloaded: http://jsfiddle.net/Ebj4v/8/

Summary

In this article we learned how to solve a complex script-loading scenario. In doing so, we discussed the jQuery.deferred() constructor and jQuery.when() methods, learning how they can be leveraged to create an if/else logic so that we can determine whether or not a script was loaded, and then depending on the answer, take the appropriate action.

Helpful Links for jQuery.deferred and jQuery.when

jQuery.deferred

http://api.jquery.com/jQuery.Deferred/

http://api.jquery.com/category/deferred-object/

http://blog.kevinchisholm.com/javascript/jquery/using-the-jquery-promise-interface-to-avoid-the-ajax-pyramid-of-doom/

jQuery.when

http://api.jquery.com/jQuery.when/

Book Review: Async JavaScript, by Trevor Burnham

Asynchronous

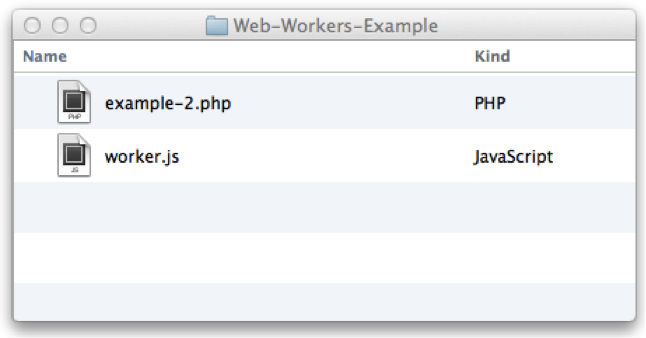
Async JavaScript, by Trevor Burnham - CoverLearn to master the tricky nature of asynchronous JavaScript with “Async JavaScript – Recipes for Event-Driven Code“. This short yet thorough book explains many concepts which not only demystify the subject, but also arm you with tools to architect smarter solutions.
There are books that explain how JavaScript works, and then there are books that transform your perception of the language. Trevor Burnham’s “Async JavaScript” is the latter.

Maybe you had your first JavaScript “aha!” moment when you used the document.addEventListener() method to create your first click handler. Or maybe it was the wonderment of running some free-form code in the console and watching the web page change. Regardless of which context kicked-off your fascination with JavaScript, the intimate relationship between the DOM and this dynamic language is one of the things that make it so special. That “real time” aspect of JavaScript development is addictive.

But once you ascend to real-world problem solving, the asynchronous nature of JavaScript can be a buzzkill. The only way to slay this dragon and return to the zombie-like euphoria of JavaScript development is to dive into this topic, master it, and then gently place your sword back into its sheath.

It can be done.

Async JavaScript covers every angle and does it quite well. Starting with the JavaScript event model, it introduces you to the tricky nature of how the language handles events. Mr. Burnham then provides a surprisingly refreshing explanation on the setTimeout() and setInterval() methods, rescuing them from the “anti-pattern” monikers they have unfairly accumulated over time because of their improper use.

Before you can count to 100 milliseconds, you are whisked away, into a whirlwind of concepts that help to demystify JavaScript’s asynchronous nature. In a clear and concise manner, concepts such as the Pub/Sub model, custom events, Promises/Deferreds and Web Workers are detailed, as well as numerous libraries that help to implement these patterns.

I can’t recommend this book enough. As you start to write intermediate-level JavaScript, you find pebbles in your shoe. Quite often, these pebbles arise from tricky asynchronous JavaScript problems. Async JavaScript by Trevor Burnham is an invaluable resource. It not only explains how JavaScript processes events, but also provides numerous perspectives that help to understand and master its asynchronous nature.

Note: This book is no longer available in paperback, just the Kindle edition. It has been revised and updated, and is now a “PragProg” book.

  • Title: Async JavaScript
  • Author: Trevor Burnham
  • Publisher: Leanpub
  • Publication Date: March 20, 2012
  • Print Length: 88 pages
  • Language: English
  • ASIN: B007N81FE2
  • ISBN: 1475247362

Getting Started with HTML5 Web Workers – Part III

HTML5

HTML5 LogoBy instantiating the Worker() constructor twice, we can see how more than one number-crunching task can be passed off to separate threads, once again leaving the browser responsive and completely available to the user.

In Part II of this article, we discovered the liberating effect of implementing a single Web Worker. We were able to pass our number crunching work off to the Worker, which ran in a separate thread. As a result, the browser remained responsive (e.g. we were able to resize the box while the numbers were being crunched). In this third and final part of the article, we will take things one step further by spawning two number-crunching threads, all the while continuing to keep the browser completely responsive.

Part III: Multiple Web Workers

Example # 1

In Example # 1, we have for the most part, replicated the approach taken in Part II of this article. The only difference here is that we have created two instances of the Worker() constructor (myWorkerOne and myWorkerTwo). We are using the same physical worker file (i.e. worker.js), so the argument passed to the Worker() constructor is the same in both cases. From there the steps are the same. We create our event listeners, and from each “Crunch some numbers” button, a message is sent to the appropriate Worker instance.

Click here to see the full working demo for Part III of this article: http://examples.kevinchisholm.com/javascript/web-workers/basic/example-3.php

When you clicked both of the “Crunch some numbers” buttons, a separate number-crunching task was passed off to a Worker in a new thread. You can see that the Ajax loader gif spins with no problem, and you are able to resize the boxes as much as you wish.

Click here to compare the examples from all three of the parts of this article: http://examples.kevinchisholm.com/javascript/web-workers/basic/example-1.php?menu

Summary

In this article, we demonstrated how multiple Workers can be used simultaneously. Just as in the example from Part II of this article, we proved that while the Worker is crunching numbers, the browser is completely responsive and available to the user.

The examples in all three parts of this article were very simple and meant only to introduce the topic of Web Workers. There is a great deal more to talk about with regard to Web Workers and I do plan to do so here in this blog in the coming weeks.

More Helpful Links for Implementing HTML5 Web Workers

http://www.htmlgoodies.com/html5/tutorials/introducing-html-5-web-workers-bringing-multi-threading-to-javascript.html#fbid=CwNX9_fBBqp

http://html5demos.com/worker

http://caniuse.com/#feat=webworkers

Getting Started with HTML5 Web Workers – Part II

HTML5

HTML5 LogoImplementing an HTML5 Web Worker is all about instantiating the Worker() constructor, creating event listeners, and posting messages between the Worker and the script that started it.

In Part I of this article, we made the case for Web Workers. We discussed the oh-so nasty concept of locking up the browser and how the single-threaded nature of JavaScript ensures that long-running scripts will send visitors away none-to-pleased. In this second part, we will use a Web Worker to pass off our “crunch” function to a separate thread, keeping the browser responsive and completely available to the user.

Part II : A Simple Web Worker

Example # 1

In Example # 1, we instantiate the Worker() constructor, passing it the name of a JavaScrpt file that has already been created and which contains the web-worker code. This file must be on the same domain as the page that calls it. In our case, it is in the exact same folder as the web page, so the path to the file is simply the name of the file: “worker.js”.

After instantiating the Worker() constructor, we add an event listener. This allows the worker file that we specified (i.e. worker.js) to send a message to the script that started the worker. The anonymous function that is the second argument of the addEventListener() method takes an event object as an argument (in this example, we call it “e;” you can name it anything you like). In this anonymous function, we remove a CSS class from the target DOM element, and then fill that element with whatever message the worker sent us. That message is contained in the “data” property of the event object (i.e. “e.data”).

Application Web Root
The Web Root – Web Page and Separate WebWorker File

Example # 2

In Example # 2, we have an abbreviated version of the click event handler for the “Crunch some numbers” button. What I wanted to illustrate is that we “start” the worker by sending it a message.

Example # 3

In Example # 3, we have the code for our Web Worker (i.e. the file worker.js). While all of the code in the script is evaluated and executed when we instantiate the Worker() constructor (just like any JavaScript file), the code inside of the self.addEventListener() call only executes when the worker receives a message. In this example, we set the variable “msg” equal to the “crunch()” function. Our crunch() function takes anywhere between one and ten seconds to return, simulating that nasty number-crunching behavior we have been talking about.

When crunch() does finally return, we post a message back to the script that started the worker. In this case, the message is the return value of crunch(): a string of markup that says “I’m done…” and tells us how long it took.

Click here for the full working demo of Example # 2:  http://examples.kevinchisholm.com/javascript/web-workers/basic/example-2.php

When you clicked the “Crunch some numbers” button, you were still able to resize the box, or do anything else you wished. The number crunching work was passed off to our Web Worker, which ran in a separate thread, which left the browser completely responsive and available to you.

This is a major improvement over the example in Part I of this article! In Part III, we will expand this demo to include a second number-crunching task, illustrating how we can spawn not only one, but multiple tasks to other threads using Web Workers.

Summary

In this article, we were introduced to the workings of Web Workers. We learned how to instantiate a Web Worker, start the Worker, post a message to it, and create an event listener so that we can respond when the Web Worker sends us a message, and access that message. We also learned how to setup an event listener in the Worker file, and post messages back to the script that started the worker.

Helpful Links for Implementing HTML5 Web Workers

https://developer.mozilla.org/en-US/docs/Web/Guide/Performance/Using_web_workers

http://www.html5rocks.com/en/tutorials/workers/basics/

Getting Started with HTML5 Web Workers – Part I

HTML5

HTML5 LogoHTML5 Web Workers significantly minimize the limitations imposed by JavaScript’s single-threaded nature, allowing you to keep the browser responsive.

HTML5 Web Workers significantly minimize the limitations imposed by JavaScript’s single-threaded nature, allowing you to keep the browser responsive.
When folks express their excitement about HTML5, the discussion is usually focused around features such as the AUDIO / VIDEO tags, Geolocation, or maybe improved semantics. These are all super cool, as are many other features that are part of (or associated with) the HTML5 specification. But, it often amazes me how little attention is given to Web Workers. In my opinion, the addition of Web Workers is a big deal.

This article will be presented in three parts:

Part I : Making the Case for Web Workers
Part II: A Simple Web Worker
Part III: Multiple Web Workers

Part I : Making the Case for Web Workers

JavaScript is a single-threaded technology. Only one thing can be done at a time.
Period. This is fine at first, but when JavaScript is doing any heavy-lifting, it can lock up the browser. Locking up the browser is bad, very bad. This is like a waiter serving your food late, and then spilling it on you. Regardless of how apologetic the waiter may be, you are not likely to tell your friends how great that restaurant is. As a web developer, all you need to do is lock up the browser once and you can be sure that the user is never (ever) going to tell their friends anything good about the page they were just viewing (and by association, the whole site gets a bad rap). They will not “like” it, tweet it, “plus-one” it, “pin” it, “dig” it or…. ok, you get the point: Don’t lock up the browser.

Number-crunching is probably the most challenging context. While all modern browsers have made great strides with regard to the speed of their JavaScript engines, heavy-duty calculations can still take time.. sometimes a few seconds. Unfortunately, a few seconds is out of the question. Many consider 100 milliseconds to be the limit; i.e. if a synchronous piece of code needs more than 100 milliseconds to return then that code probably needs some more attention.

HTML5 Web Workers allow you to execute JavaScript in a different thread than the one that the browser is running in. This is a big win. It means that in certain cases, your multi-second number-crunching code can be handed off to a Web Worker, and the browser can remain happy, peppy and bursting with love.

Did you notice the words: “…in certain cases” ? There are some limitations to how you can use Web Workers. It is far from a free-for-all. For example, you cannot access the Window, Document or Parent objects. Heavy DOM manipulation is out. At first glance, this may seem like a drawback. But as you can imagine, providing access to the DOM from more than one thread immediately complicates things in a way that is not good.

The key to leveraging the power of Web Workers is hinted at by its very name “worker.” Think of this feature as a calculator (or many calculators), that can be sent off to do some “work”, and then report back when done. I won’t go too crazy on the details here, there are many web-based resources that can provide an in-depth view of Web Workers. I’ve listed a few at the end of this article.

To make the case for Web Workers, let’s consider the following code example:

Example # 1

In Example # 1, we have a function that essentially “sleeps” for five seconds. If you run this code in your JavaScript console, it will lock up the browser for five seconds. Nasty business. We will use this code extensively throughout Parts I, II and III of this article. Every time you see this function referenced, just imagine that it is crunching some numbers (i.e where you see “I’m only sleeping”). The key point here is that a function that would need a few seconds to do some resource-intensive work, would behave in exactly the same way: it would lock up the browser.

Example # 2

in Example # 2, we have expanded the crunch() function so that it “sleeps” for a random number amount of time, up to five seconds. This makes the function feel a bit more “real world” in that the amount of time the function takes to “crunch” will vary a bit.

Click here to see a full working example of our “crunch” function in action: http://examples.kevinchisholm.com/javascript/web-workers/basic/example-1.php

In the example page, when you clicked “Crunch some numbers”, the browser locked up. If you tried to resize the box by clicking the “Re-Size Box” button, not only did nothing happen, but you probably got the “wait” cursor (this behavior varies from browser to browser). I intentionally used an Ajax loader gif to illustrate this: the gif’s animation is frozen during the numbers crunching. Once the “crunch” function has completed, it updates us with a message which tells us how long it took, and the browser is responsive again.

This is the “waiter spilling food on you” scenario. And it is not good.

In Part II, we will dive into Web Workers and learn how that technology can help us to pass off our number crunching work to a different thread, and keep the browser responsive at all times.

Summary

In this article we introduced the concept of Web Workers. We discussed the single-threaded nature of JavaScript and how it poses a challenge when it comes to resource-intensive work. We made our case with an example of a simple function that will render the browser unresponsive.

Helpful Links for HTML5 Web Workers

http://www.w3.org/TR/2009/WD-workers-20091029/

http://www.whatwg.org/specs/web-apps/current-work/multipage/workers.html

http://en.wikipedia.org/wiki/Web_worker

Problems Making JSONP Calls in JSFiddle – PROBLEM SOLVED

JavaScript

JS Fiddle LogoAll the JavaScript you write in the JSFiddle “JavaScript” box gets wrapped in an anonymous function and assigned to the window.onload event of an iframe that is shown when you click the “Run” button.
Last week I published this post: Problems Making JSONP Calls in JSFiddle 

As I was testing out some code, I noticed that JSONP calls were failing when using JsFiddle.net. I took a look at it and just found the answer. It wasn’t too big a deal, just needed to understand how JsFiddle executes the JavaScript code that you put in the lower-left-hand box (i.e. the “JavaScript” box).

Here is the code I testing, that was failing:

In this code, I use the “var” keyword to declare “myCallback” as a function expression, just like I was told in JavaScript summer camp back in the 70s. But even when using the “var” keyword, any variable declared in the global scope becomes a property of the window object. Anyhooo, I confidently assumed that my variable “myCallback” (or window.myCallback) would be available to the script that is loaded by the JSONP call. But that code failed and the following message appeared in the console: “myCallback is not defined”. Bummer.

Well, after a few minutes poking around in Google Chrome Web Inspector, I found the issue:

As I had suspected, JsFiddle executes your JavaScript code in an iframe. What I did not realize at first, is that it wraps all of that code in an anonymous function, that is assigned to the window.onload event. So by using the “var” keyword, my “myCallback” variable became private to the anonymous function. Here is the code that is actually executed by JsFiddle when I clicked “run”:

As a result, my “myCallback” variable (i.e. the function expression) is private, and not available to the outside world.

The answer was simple. I just had to force my “myCallback” variable to be global by removing the “var” keyword:


This forces “myCallback” to be an implied global, which in-fact becomes a property of the window object. It’s the exact same thing as if I had written: “window.myCallback – function()….”

Here is the JsFiddle.net link for the code that fails: http://jsfiddle.net/DQHax/

Here is the JsFiddle.net link for the fixed code: http://jsfiddle.net/DQHax/1/

Same thing, only let’s avoid implied globals, and explicitly attach “myCallback” to the window object: http://jsfiddle.net/DQHax/2/

Again, no big deal. But if you found yourself pulling your hair out and were googling for an answer, hopefully I saved you a few strands of hair.

: – )

Kevin


Problems Making JSONP Calls in JSFiddle

JSON

JSFiddle Logo
If you are pulling your hair out while trying to demo a JSONP call with JSFiddle, don’t bother. It won’t work out of the box.

There is no doubt that JSFiddle is a super-useful tool for saving little demos that you can share with others.  I use it like crazy when providing simple demos in this blog. Tons of cool features and in general, a brilliant idea.

One little quirk I ran into this morning is JSONP calls. I’m writing Part II of a post called: “Complex Multiple Script Loading Using the jQuery.when() Method and the jQuery.Deferred Object”. In this second part, I introduce the tricky scenario of adding a JSONP call as a dependency, which is in addition to other dependencies that are multiple asynchronous  JavaScript calls that may (or may not) have already loaded in the page (I know, I know….. I need to get a life).

Anyhooooo….

When attempting the code in example # 1, I got the following error: “myCallback is not defined”.

Example # 1

My guess is that JSFiddle uses iframes to render your test code. I’ve not made any attempt to look into this further, and I’m sure the answer is likely a call to “parent” or something similar. But just in you are pulling your hair out trying to demo a JSONP call using JSFiddle, hopefully this will save you the 20 minutes of troubleshooting that I just did. It won’t work out of the box (again, probably due to the use of iFrames). When I figure out the answer, I will post it. I’ll try to look into it this weekend.

Kevin

Using jQuery Deferred to Manage Multiple AJAX calls

jQuery

jQuery LogoOnce you have become accustomed to making AJAX calls and consuming the contents of the data returned by the server, it is tempting to fall into a laid-back mind set: “hey, AJAX is AJAX right?… I mean… you open the request, you send the request, you wait for the server’s response, and then you do something with the response… no big deal, right?”

Well, yes, but… because of the asynchronous nature of an AJAX call, it does not take long for more complex scenarios to arise. What happens when you need to know about a group of AJAX calls? How can we treat a series of asynchronous events as a single value that we need to act upon once there is a collective “success” value?

Enter the jQuery.when() method. This handy dandy little tool allows you to treat multiple asynchronous events as a single value. The syntax is quite simple:

var B = $.get(serverPage.xyz); var C = $.get(serverPage.xyz); $.when(A,B,C).done(funtion(){ //act upon the collective success of A,B and C });

Some might find this a bit unusual. Normally, an AJAX call is something you simply “do,” not something you assign to a variable. jQuery allows us to treat an AJAX call as a value. This value translates to an object that has properties and methods. The $.when() method knows how to recognize and act upon these objects, so it presents a perfect way to handle multiple asynchronous events as a single value.

Example # 1

In Example # 1, we create the variable “aj1”, and set it to equal the result of an AJAX call. This variable becomes a jQuery “jqXHR” object. When we immediately inspect the object, we see that it has a number of methods. This is interesting, but not super interesting.

If you open your JavaScript console and then run this code, you will see the AJAX call in progress, and the contents of the jQuery “jqXHR” object. But if you wait a few seconds, and then after the AJAX call completes, you once again run the code: console.dir(aj1), you will see that this object has changed a bit. The “readyState” property is equal to 4, the “responseText” property contains some HTML from the server, the “status” property is equal to 200, and the statusText is: “OK”. Because the AJAX request has completed, this jqXHR object has properties that reflect this new state.

Example # 2

In Example # 2, we use the jQuery.when() method to act upon the completed state of the AJAX request. When using this syntax, the completed state of each request is a corresponding argument in the anonymous function that is passed to the .done() method. Now we have something interesting, because what we see is that each one of these success objects is an array. The first element is the response text of the request, the second element is the status of the request, and the third element is the original “jqXHR” object.

Example # 3

In Example # 3, we set up three AJAX calls. Normally, one might create a success handler for each AJAX call. In this case, we simply want to know when all three calls have completed successfully. We pass all three AJAX calls (i.e. the three variables that have been assigned the return value of each AJAX call), as arguments to the .when() method. Then we pass an anonymous function to the .done() method that is chained to the .when() method’s return value.

Just as with Example # 2, we take the success object for each call as the corresponding argument of the .done() method call. Inside of the .done() method’s callback, we take action; the contents of the $(‘#target’) element is removed, and we append the server response messages to that element.

Here is the full working example: http://examples.kevinchisholm.com/jquery/when/example-1/

Summary

If you have not had to wrestle with a scenario like this, you soon will. You’ll find that as web pages become more complex, AJAX is leveraged in more complex ways. When asynchronous activity is involved, any complexity is magnified. So, fortunately, the jQuery.when() method is an easy and effective way to handle multiple AJAX calls as one collective value.

Helpful Links for the jQuery.when() method

http://api.jquery.com/jQuery.when/

http://api.jquery.com/category/deferred-object/

http://stackoverflow.com/questions/5280699/jquery-when-understanding


Making a Simple HTTP Server with Node.js – Part IV

Node.js

Node.js Logo

Setting the right value for the “Content-Type” header is a critical task for any web server

In Part III of this series, we built out our Node.js server to serve up any file that is requested, or gracefully return a 404 / “Not Found” header, as well as a custom HTML page informing the user that the requested file was not found. But the only problem is that we are not setting headers for each request. So, it’s important that HTML, CSS, JavaScript and image file, have the appropriate “Content-Type” header set.

In order to demonstrate all of this, we will include a CSS file and a JavaScript file in our web page. I won’t bother including the CSS file in an example; it’s just some silly CSS… nothing too interesting. But I will include the source of our JavaScript file in Example # 1, just so we can see that the second blue box in the web page is created via JavaScript.

TO SAVE TIME, THE FULL WORKING VERSION OF THE CODE EXAMPLES CAN BE CLONED HERE: HTTPS://GITHUB.COM/KEVINCHISHOLM/SIMPLE-HTTP-SERVER-WITH-NODE-PART-IV

Example # 1

Example # 1 simply shows the contents of the JavaScript file: “script.js” that we will request in our pages.

Example # 2

Example # 2 is the source code for index.html.

Example # 3

Example # 3 is the source code for about.html, a second web page that we can request from our Node.js web server.

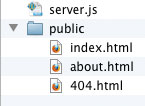
Before we go any further, let’s take a  moment to discuss the folder structure. Just as in Part III of this series, the folder that our server.js file sits in has a sub-folder named “public”. This is where our assets will go. It is this “public” folder that the world will have access to and all requested files will be in there. See Figure # 1.

Folder structure
Figiure 1: The folder structure for this article’s example.

Example # 4

In Example # 4, we have a JavaScript object that contains a list of mime-types that we will support. Each of the object’s properties represents a file extension that we plan to support, and the corresponding value is the mime-type string that will be used for the “Content-Type” header.

Example # 5

In Example # 5, we have added a new line to the variable declarations for the requestHandler() function. The variable “ext” contains a string copy of the requested file’s extension (e.g. “.html” for a web page, “.js” for a JavaScript file, and so on). So we will use that string to check all properties of the “extensions” object from Example # 4. Don’t worry if you feel like you are getting lost; we’ll piece everything together nicely at the end. For now, just know that we have so far provided a hard-coded list of file extensions that we will allow, and the mime-type string values for each one, and we have the variable: “ext” that tells us what the file type is.

Example # 6

In Example # 6, we see if the extensions object has a property that matches the value of the “ext” variable. If not, we write a 404 header, and return a simple HTML page, informing the user that the requested file type is not supported.

Example # 7

In Example # 7, we add a new argument to the getFile() function call. We pass-in the value of the property in the extensions object that matches the file extension of the user’s request. In a nutshell, we are telling the getFile() function what type of mime-type to set in the response header.

Example # 8

In Example # 8, we have expanded the res.writeHead() function call. Where previously we only set the 200 / “OK” response code, we now set the “Content-Type” and “Content-Length” headers. The “Content-Type” property is mapped to the value of the mimeType variable, which was passed-in as an argument to the function. So the fruits of our labor in this article all become apparent in this example. The value of the mimeType variable will be set accordingly, for the file type.

Example # 9

Example # 9 is a complete code-listing for this article. In Figure # 2, we see the results of http://localhost:3000/index.html. So, as you can see, we are serving not only HTML, but also an image file, a CSS file and a JavaScript file. The JavaScript file dynamically creates the blue box you see on page load (simply to demonstrate that our JavaScript file is served correctly from our Node.js web server, and works).

index.html page
Figure # 2: Our index.html page.

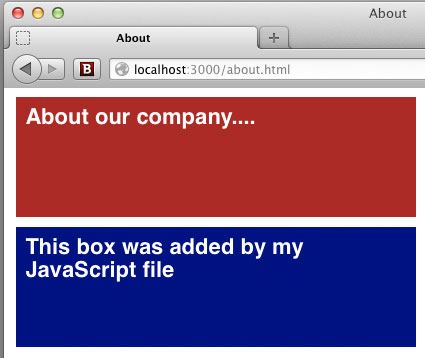
In Figure # 3, we see that our “about.html” page works, and also pulls in the CSS and JavaScript files with no problems.

about.html
Figure # 3: about.html

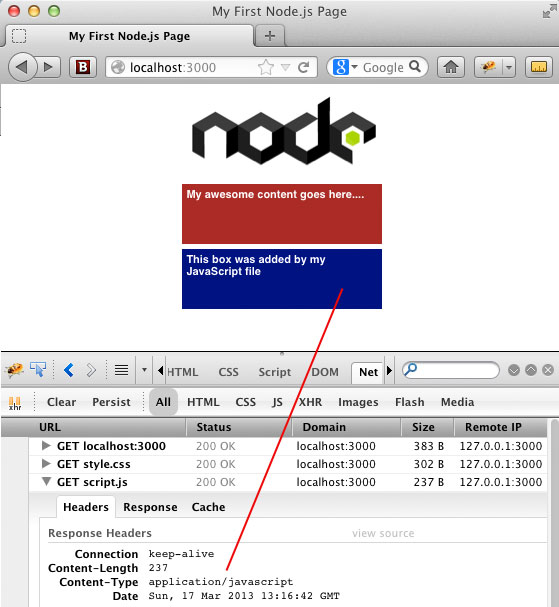
In Figure # 4, we inspect the JavaScript file call in the “net” tab of FireBug and can see that the “Content-Type” header is set accordingly.

The FireBug
Figure # 4: Inspecting the call to script.js in FireBug’s “net” panel

Summary

In this article we learned how to set the appropriate “Content-Type” header for each request, based on the file extension of the requested file. We demonstrated how to use the extname() method of the path module, to return the extension of the requested file. We also applied some logic, to handle scenarios in which the requested file-type is not supported.

Helpful Links for the Node.js path module

http://nodejs.org/api/path.html

http://docs.nodejitsu.com/articles/file-system/how-to-use-the-path-module

Helpful Links for HTTP header fields

http://en.wikipedia.org/wiki/List_of_HTTP_header_fields

http://www.w3.org/Protocols/rfc2616/rfc2616-sec14.html

Helpful Links for mime-types

http://en.wikipedia.org/wiki/MIME_type

http://en.wikipedia.org/wiki/MIME

Making a Simple HTTP Server with Node.js – Part III

Node.js

Node.js LogoIn Part II of this series: Making a Simple HTTP Server with Node.js – Part II we learned how to use the “path” and “file system” modules. By leveraging these Node.js modules, we were able to read the path of the HTTP request that our server received, and read from the file system of the web server. We also learned about the “__dirname” keyword, which provides an abstract reference to the folder in which the currently executing JavaScript file exists.

That version of our HTTP server simply checked to see if the request was for the file “index.html”, and if so, served it up. That was progress over Part I, but still not robust enough.

In this article, we will expand our Node.js HTTP server so that the following services are provided:

  • If an asset is requested, and it exists, it will be returned
  • If an asset is not specified, then “index.html” will be returned
  • If an asset is requested, and it does not exist, our custom 404.html page will be returned

We will make every effort to keep our three-step paradigm, which will, we hope, continue to illustrate that creating an HTTP web server with Node.js is at its core, quite simple. What we have to take a closer look at, is the fact that, as we ask more of our little web server, we have to roll up our sleeves and write the code that provides that very functionality.

So the good news is: It’s just more JavaScript. Yay!

Example # 1

In Example #1, we have the three-step core of our HTTP web server. We have already discussed each step in detail, so let’s just quickly re-cap:

Step # 1: Use the require() method to gain access to the Node.js modules that we need
Step # 2: Use the createServer() method of the HTTP module, and pass it a reference to our “requestHandler” function
Step # 3: Listen for a request on port # 3000

Simple, simple, simple.

Next, let’s look at two functions: our updated requestHandler() function, and then our new getFile() function.

Example # 2

In Example # 2, we first look at the request, and if no file was requested (i.e. the user simply typed http://somedomain.com into their browser), then we prepare to serve up “index.html”.

As we learned in Part II, the __dirname keyword provides an abstract reference to the folder in which the currently executing JavaScript file resides. We then create a variable named “page404”, which will provide a reference to our custom “404 / Not Found” page, should we need it.

Now we have everything we need, so we call the getFile() function, passing it the path and name of the asset we want (i.d. index.html), the response object, and then the reference to our custom 404 page.

Example # 3

In Example # 3, there are some new things happening. First, we use the exists() method of the file system object that was returned by the “fs” module, and assigned to our variable: “fs”. This method takes two arguments: a path to the file, and an anonymous function. That anonymous function takes one argument: “exists” (call it whatever you like). That single argument provides a helpful “truthy/falsy” flag against which we can test.

Folder Structure
The folder structure of this article’s example code

So if you take a moment to think about this, you’ll find that it’s quite cool: baked into the Node.js “fs” module is a method that simply tells us whether or not a named file exists. This is a perfect example of the brilliance of Node.js modules. Imagine how much heavy lifting you’d have to do if you needed to provide this kind of implementation yourself. Fortunately, someone did it for you. And that module can be used over and over again… a zillion more times if you like.

So moving along, if the “exists” argument returns a “truthy” value, we use the fs.readFile() method to literally read the physical file from the local file system. We have a little error checking to make sure that the file read operation did not fail, and if it did not fail, we send the contents of that file back to the user.

If the requested file was not found (i.e. the “exists()” method told us that the named file does not exist), then we serve up the custom 404.html file that we still have a reference to.

Example # 4

Example # 4 simply puts all our code examples together, to provide some context.

Summary

In this article we expanded our simple Node.js HTTP web server. We leveraged the exists() method of the “fs” (file system) object, to determine if the requested file actually exists, and provided logic that handles cases in which the requested file does not exist.

Helpful Links for the Node.js path and fs Modules

http://nodejs.org/api/fs.html

https://github.com/jprichardson/node-fs-extra

http://docs.nodejitsu.com/articles/file-system/how-to-write-files-in-nodejs

Book Review: Instant Dependency Management with RequireJS How-to

Asynchronous Module Definition
Instant Dependency Management with RequireJS How-to
Instant Dependency Management with RequireJS How-to from Packt Publishing

Greg Franko’s book, Instant Dependency Management with RequireJS How-to, from Packt Publishing, strives to cut through the clutter and introduce you to AMD through Require.js

Asynchronous Module Definition is a term that can be intimidating. Even worse, it can potentially discourage JavaScript programmers from learning about and implementing the AMD API.  Fortunately, this book can be helpful.

The initial areas of discussion. are what you might expect: learning how to load Require.js both synchronously and asynchronously, as well as setting Require.js configuration values. But what becomes apparent is that implementing AMD patterns does not mean having to abandon the tools you use. Mr. Franko does a nice job of illustrating how jQuery can be exposed in your pages as an AMD module, as well as Jasmine unit tests and client-side JavaScript templating. All of this is accomplished by leveraging Require.js. A logical extension of this journey is a discussion of JavaScript libraries that do not expose themselves as AMD modules such as Backbone.js and jQueryUI Widget Factory. In these cases, a thorough explanation details how to work around this challenge, and keep tight control of your JavaScript resources. There is also helpful content here for mobile web developers.

Instant Dependency Management with RequireJS How-to may not be the definitive “go-to” resource for those who are completely new to the concept of AMD or Require.js. While key concepts are well served, this book’s strength is its ability to broaden one’s perspective with regards to what Require.js is capable of. By illustrating jQuery’s ability to be exposed as an AMD module, the power and flexibility of Require.js becomes increasingly apparent.

I would recommend this book for JavaScript developers who are already familiar with the concept of asynchronous module definition and understand in general how Require.js works. For this audience, Mr Franko’s direction will deliver a great deal of value with regards to the numerous architectural solutions that are detailed. In each case it is easy to see that Reqiure.js is more than simply a sophisticated script loader. This library exposes a number of properties and methods that help you to leverage AMD as broadly as possible, even when some of the libraries in use are not AMD compliant.

Instant Dependency Management with RequireJS How-to is available in paperback, or eBook format.

  • Author: Greg Franko
  • File Size: 100 KB
  • Print Length: 42 pages
  • Publisher: Packt Publishing
  • Publish Date: May 22, 2013
  • Language: English
  • ASIN: B00CXRTC1Q

Making a Simple HTTP Server with Node.js – Part II

Node.js

Node.js Logo

OK, enough “Hello World!” Let’s serve up an HTML file, dagnabbit.

In Part I of this series: “Making a Simple HTTP Server with Node.js – Part I“, we learned the bare-bones steps needed to create an HTTP server with Node.js. While it was fun to see our text message make its way from our server-side JavaScript file, at the end of the day we sent a hard-coded text message. Not too sexy.

In this article, we will invite the user to type “index.html” into their browser window and prepare to be amazed. Ok, the user has to be on your local DEV machine, and type “http://localhost:3000/index.html”, but we have to start somewhere, right?

Example # 1

There are a few new things happening in Example # 1, when compared to the examples from Part I of this series. The biggest change is that we’ve expanded “Step # 1” and are requiring two new Node.js modules: “path” and “fs”.

The “path” module provides a number of methods that help you to examine and parse file paths. The “fs” module is short for “File System”. This module provides access to the file system. So here is where the fun stuff starts: Writing JavaScript that has access to the local file system? Yep. You bet. We have not even begun to scratch the surface of what is possible.

Next, our helper function has grown a bit as well. We use the basename() method of the path module to return the name of the file that was requested by the user (i.e. index.html). We then leverage the “__dirname” keyword, which provides a quick and easy handle to the folder that your server-side JavaScript file resides in.

After that, we check to see if the user has requested “index.html”, and if so we will return it. The fs.fileRead() method takes two arguments: a path to the physical file that we want to return to the user, and an anonymous function. That anonymous function takes two arguments: an error object, and the content of the file that is to be returned. So just to play it safe, we check to see if there is an error: if ( !err ). If there is none, then we use the res.end() method to return the contents of index.html and then close the request. If there was an error, for now we are piping it to the console for our own troubleshooting.

If none of that worked out, then we set a “404 / Not Found” header, and send some markup back, letting the user know. Step # 2 and Step # 3 haven’t changed since our last article: Create the server, and then listen for a request.

Phew!

That was a lot, but our Node.js HTTP server has grown up quite a bit. Instead of just sending back a plain text message or some hard-coded HTML, we are now serving up an actual HTML file. We could change that file any time, which would change what the user sees in the browser. It’s not exactly Facebook, but hey, we are creating an HTTP web server using nothing but JavaScript!

For Part III, we will smarten things up and enhance our server so that it will serve up any static content that is requested.

Summary

In this article we learned how to use the “path” and “file system” Node.js modules. By leveraging the modules, we were able to read the path of the HTTP request, and read from the file system. We also learned about the “__dirname” keyword.

Helpful Links for the Node.js path and fs Modules

http://nodejs.org/api/path.html

http://docs.nodejitsu.com/articles/file-system/how-to-use-the-path-module

http://nodejs.org/api/fs.html

http://jspro.com/nodejs/accessing-the-file-system-in-node-js/

http://docs.nodejitsu.com/articles/file-system/how-to-read-files-in-nodejs

Making a Simple HTTP Server with Node.js – Part I

Node.js

Node.js LogoThe beauty of creating an HTTP server with Node.js is that you are doing so using a language that you already know: JavaScript.

If you work with JavaScript, then you’ve probably heard about Node.js. What makes Node.js such an amazing technology is that it turns web-development on its head: a historically client-side language is now being used as a server-side language. I’m sure I don’t have to tell you how insanely cool this is.

When I first started looking at Node.js, my first question was: “Ok, server-side JavaScript. Got it. So what the heck can I do with it?”

Short answer: A lot.

Probably the most obvious and easiest to comprehend application for Node.js is to make a web server. Node handles all the low-level ugliness and let’s you just write code. The code you write is not too much different than the client-side JavaScript that you are used to. The biggest differences come in when you start to realize that you have access to the file system. You can do things with Node that are completely off-limits on the client side. When it comes to creating a simple HTTP server, the amount of code you need to write for proof of concept is amazingly minimal. The examples that follow are very basic. They don’t offer any real-world usefulness, but they do illustrate the small amount of effort needed to get up and running. In Part II of this series, we will look at more realistic HTTP server code for Node.js.

Example # 1 A

In Example # 1, we have the absolute bare minimum needed to set up an HTTP web server using Node.js. The very first line tells Node.js that we need to use the “http” module. Using Node’s “require” method, we assign the return value of the “HTTP” module to the variable “http”. This was Step # 1.

(A detailed discussion of the require() method is beyond the scope of this article, but a topic that plays an important role in Node.js. If you are not familiar with the Modules/AsynchronousDefinition proposal from Common.js, I highly recommend reading up on that topic. For any client or server-side JavaScript developer, it’s a biggie.)

The only part that might seem a bit confusing to some is the callback that is passed into the createServer() method. This callback is executed each time the server receives an HTTP request.

For Step # 2, we call the createServer() method of the http object. We pass that method an anonymous function which takes two arguments: the request object and the response object. Inside of that anonymous function, we use the writeHead() method of the response object, to set the server’s response of “200 ok” to the client’s browser, and set the header of “Content-type” to “text/plain”. Next, we call the end() method of the response object. The end() method closes the response to the client. It can also send output to the client. We pass in a string as an argument in this example, and that string is sent to the client’s browser.

For Step # 3, we call the listen() method on the return value of the createServer() method. We pass in “3000”, which tells Node.js to listen on port # 3000.

If you run this code in Node.js, and then in your browser, “type localhost:3000”, you will see the following in your browser: “Your node.js server is running on localhost:3000.”

Whew! The explanation for Example # 1A took much longer to write than the actual code!

As you can see, it’s pretty easy to create an HTTP server with Node.js. In my opinion, the only part that might seem a bit confusing to some is the callback that is passed into the createServer() method. This callback is executed each time the server receives an HTTP request. It might make things easier to understand if we move the guts of that callback to its own function, and then pass that function declaration as the callback to the createServer() method.

Example # 1 B

In Example # 1B, we create a function declaration named requestHandler. Then we pass that function as the sole argument to the createServer() method. I believe that if you are new to Node.js, you’ll find it is easier to see what is going on, because the createServer() method is all on one line.

Example # 1 C

In Example # 1C, we’ve refactored our code to make things even simpler. First, our helper function processes the HTTP request, then Step 1, Step 2 and Step 3. Bing, Bang, Boom. Simple stuff.

Example # 2 A


In Example # 2A, we’ve upgraded our message to the client’s browser to include some HTML. After all, HTML is what we will really want to serve, right? The only problem is that Node is not parsing the HTML. When you run this example in your browser, you see the HTML tags in the response. That is not what we want. What is happening?

The problem is in the header that we are setting with the res.writeHead() method call. The value of the “Content-Type” header is “text/plain”. So, Node just passes all the text along as… well, plain old text.

Example # 2 B

In Example # 2B, we have changed the value of the “Content-Type” header to “text/html”. If you run this example in your browser, you will see that Node sends the string as HTML, so our H1 and UL elements are rendering as they should in the browser.

Example # 3

In Example # 3, we take things a bit further. Up until now, we have been using the res.end() method to do two things: send some text or HTML to the client’s browser, and then close the response. In this example, we use the res.write() method to send our HTML to the client’s browser, and the end() method is used only to close the request.

We’ve also introduced some logic into our code. While what this example accomplishes is very little, and has virtually no real-world value, it demonstrates that while we have created an HTTP server, we have done so with JavaScript, and we already know the JavaScript language. So, we can do something like create a for/loop block, and use that loop to provide some dynamic HTML output. Again, this “dynamic” aspect of our code is not very impressive, but I think you get the point: it’s just JavaScript, so the sky’s the limit.

Summary

In this article, we learned how to create a simple HTTP server using Node.JS. We covered the three most basic steps needed, which include requiring the HTTP module, calling the createServer() method, and then telling the server to listen for an HTTP request. Finally, we learned how the server executes a callback function for each HTTP request it receives, and the most basic things that need to happen inside of that callback.

Helpful Links for creating a simple Node.js HTTP Server

http://nodejs.org/

http://docs.nodejitsu.com/articles/HTTP/servers/how-to-create-a-HTTP-server

http://www.youtube.com/watch?v=jo_B4LTHi3I

http://stackoverflow.com/questions/6084360/node-js-as-a-simple-web-server

http://www.nodebeginner.org/